The Definitive, Step-by-Step Flat Towing Setup Guide
So, you have decided to flat tow your car with your RV? Excellent decision! (if you're still on the fence about it, check out our video about the The Pros and Cons of Flat Towing!) At etrailer, we are flat towing experts. People drive from all over the United States to have us install their setup, which means we have seen and done it all. It also means that we understand how confusing and time-consuming it may be. This article will guide you through a brief installation process of your actual flat tow setup. We want to make sure you understand the effort and expense of preparing to flat tow before standing between your RV and dinghy, confused and overwhelmed. Our directions require you to have your base plate system and tow bar installed before connecting the components for flat towing. If you are using a supplemental braking system that requires splicing into your dinghy's braking system or using a hardware diode kit for synching your dinghy's lights with your RV's lights, then you will need to take your dinghy to a mechanic before trying to flat tow as well. Steps:
Note: The directions below are a general guide, but every tow bar and base plate combination may have additional steps. Our directions are not a replacement for instruction manuals.
Step 1: Park & Position
While some tow bars are rated for all-terrain use, it is a good idea to park your RV on level ground (or as level as you can) before hooking up a tow bar.Tow bars with telescoping arms will be more forgiving than fixed-arm tow bars on the exact orientation of your vehicle behind the RV; however, you still want to be as close to center to your RV as possible no matter what style of tow bar you have. Fixed-arm tow bars require that your dinghy's front aligns parallel to the RV's rear.Your tow bar will have a maximum arm length. Pull up close enough to the back of the RV to be within connection range of the arms. Once your vehicle is positioned, put your dinghy in park and apply the emergency brake.
Step 2: Attach Tow Bar
A vehicle-mounted tow bar has a coupler mount that folds down over either your hitch's ball mount or pintle hook. Once your coupler is positioned correctly onto your hitch, lock the coupler in place.A hitch-mounted tow bar has arms that attach to your vehicle’s base plate. There are several ways your tow bar’s arms may attach to the base plate. We recommend following your tow bar and base plate’s manufacturers' instructions for proper connection.As you have probably discovered at this point, tow bars are a serious investment. To protect your investment,
we recommend using a locking hitch pin to connect your RV-mounted tow bar to your RV.
Step 3: Attach Safety Cables
To begin, hook your safety cables from your RV to your towed vehicle, crisscrossing them below the tow bar. Crisscrossing the cables creates a basket in case the tow bar fails and becomes disconnected from either vehicle. Reminder: Your safety cables should never drag on the ground. Installing quick links to your RV's hitch and dinghy's base plate makes it easier for you to attach your safety cables every time you need to flat tow.
Step 4: Plug in Electrical Wiring
Next, go ahead and plug in your electrical cable from your RV’s rear to your towed vehicle along with the emergency breakaway cord.The next steps you need to take when connecting the lights' electrical wiring depends on the light system you have chosen. Consult your part's manual for instructions on how to do this.
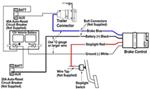
Step 5: Set Up Supplemental Braking System
There are different types of systems, so you will want to follow your system’s manufacturer’s instructions precisely. Some braking systems are installed at an automotive shop and won't require much, if any, in-field setup.The most important part of this step is to test that the brakes on your dinghy are engaging when you press your RV's brakes. Have a friend engage your RV's brakes, then watch your dinghy's supplemental braking system to ensure it is engaging fully.
Step 6: Prepare Dinghy for Flat Towing
Once the tow bar is connected properly, you want to ready your towed vehicle for flat towing. The exact steps you need to take will depend on the year, make, and model of your vehicle. To find these steps, consult your owner's manual. Several manuals include this information under "Recreational Towing." Steps may include preparing the transmission, brakes, or steering wheel.
Step 7: Lock-Out Tow Bar Arms
Before departure, you need to ensure both arms of your tow bar are locked in the towing position. To do this, you'll need to release the parking brake from your towed vehicle. Next, simply drive your RV forward very slowly until both arms latch. Slightly turning your RV left and right will help engage the latches on both arms. We recommend having a friend near the tow bar to confirm the latches engage. Note: Even if you have an RV backup camera, we still recommend having someone outside of the vehicle to confirm the arms have locked. Camera angles can deceive drivers into thinking the latches have engaged when they actually have not.
Unbinding the Arms to Disconnect the Tow Bar
Once you’ve arrived at your campsite, you’ll want to disconnect your dinghy from your RV; however, you may find that the locking pins to disconnect the tow bar’s arms are immovable. A great feature of modern telescoping arms is the addition of a non-binding tension release button on each of the arms. You simply press the button or pull the lever until you feel the tension release from the arms. You are then able to easily disconnect the tow bar’s arms.Older models of tow bars with telescoping arms are more difficult to unbind. These models come with a tool that is levered against the tension release lever or button. If you're in the market for a tow bar, trust us when we say you will save yourself a lot of frustration choosing a modern tow bar with non-binding tension release levers.For fixed-arm tow bars, it is more difficult to get the arms into a less tense state. With your RV parked and with the RV’s emergency brake on, maneuver your towed vehicle until you are able to remove the locking pins or coupler. It may help to have a buddy outside who can test the locking pins or coupler to see when they are loose enough to disconnect.
After you have released the arms, you can place your tow bar in the stored position on your RV, dinghy, or in a storage space.
Step 9: Test Entire Flat Towing Setup
Again, we recommend having a second person outside the driver’s side of your towed vehicle to check that your dinghy’s lights are working in conjunction with your RV’s brake lights, turn signals, and emergency lights. Testing the supplemental braking system one more time is also a great ideaLastly, check that when the RV turns left and right, the dinghy’s steering wheel and tires are following that same turn radius.
If you checked your car's owner manual, followed the guide above, and double checked your flat tow setup, you are ready to go! If you're still in the conceptual phase and need help budgeting for your setup, click here! There's no freedom like open-road freedom, and with flat towing, there's so much more road to explore. Now get going, and we'll be seeing you at the campsite!Related Articles:
Hi Russ; you pretty much have everything you need right there with the exception of a few parts. I'm going to go ahead and list it all out here with links to make it easy for your to manage. You will need the following: -etrailer Invisible Base…
When it comes to choosing between the Blue Ox Patriot #BLU37TR and the Brake Buddy Select 3 #HM39524, these systems are extremely similar in their setup and functionality. Both of these systems provide proportional braking in a compact and easy to…
Hey Pat, This is honestly not something I can directly answer, as it just depends on the room you have and how comfortable you are working around the exhaust when installing the etrailer Trailer Hitch Receiver #e98847 on your 2018 Subaru Outback. I…
Both the Roadmaster and Blue Ox tow bars are great options. But if it was my decision to make I would go with the Blue Ox Avail part #BX7420 as we have found that the Blue Ox tow bars are a little easier to connect and disconnect from. Also this tow…
If your vehicle has a factory brake controller plug, you can simply use the Tekonsha Plug-In Wiring Adapter for Electric Brake Controllers – Ford, Item #3034-P, which will connect to the vehicle plug and the brake controller. On the new E-450…
You are off to a great start with the Nighthawk #RM-576, D-ring adapter #RM-035, and the Stay N Play #SM99251 but you do need lighting for the flat towed vehicle. For lighting you can use the diode kit, #RM-15267, and not have to worry about cutting…
The BrakeBuddy Towed Vehicle Battery Charge Kit part #BB54FR comes with a the Brake Buddy Select 3 Portable Supplemental Braking System part #HM39524. I have attached a wiring diagram of how this is setup with the Brake Buddy.
Hello Charles, thanks for getting in touch. We do offer base plate from both Blue Ox #BX1126 and our etrailer brand #e98949 that will fit your 2017 Jeep Wrangler Willys. They are similar in a lot of aspects since both are basically different…
The diode that you want for your charging line from your Motorhome to your towed vehicle (Toad) is the Roadmaster Single Park Light Diode #RM-690. This diode will allow up to 85 amps at 12V and will only allow power to flow in one direction to…
The Flex-a-lite 15" Black Magic Xtreme S-blade Fan w/ Thermostat Controller - 24V - Reversible #FLX18024 is sold as a fan assembly with motor and thermostat, but does not come with any mounting hardware as the installation will vary across…
The triangle on the Blue Ox Patriot #BLU37TR remote controller will fill in as you start to brake which is an indication of how much braking force the Patriot is applying to the brake pedal on your 2021 GMC Canyon. When I reached out to my contact at…
The difference between the Class II and Class III hitches has to do with their Gross Trailer Weight (GTW), their Tongue Weight (TW), and their Hitch Receiver Size. Class II trailer hitch receivers have a 1-1/4 inch receiver and can be rated up to…