Hey Edwin, The Skylight #SR89YR will work perfectly fine with your 1-1/4" thick roof on your 2018 Lance 1575, though they typically will require some trimming to the garnish to fit perfectly. You will want to pick up 2 tubes of self leveling…
Hey Michael, You do not want to use self-leveling sealant with the Specialty Recreation Universal Replacement RV Skylight - 14" Wide x 22" Long - Smoke #SR67RR because it is made from polycarbonate, which doesn't mesh well with that…
Hey Nicholas, thanks for the pics and information. To replace your Dometic Brisk II 9105304474 AC, I recommend the Advent Air RV Air Conditioner System item #ADV92SR in white or item #ADV62SR in black. There's no way to just replace your AC unit…
Hello Robin, thanks for reaching out. The Thomas Payne Heritage Three-Seat Reclining RV Couch #TP43KR weighs approximately 200 lbs altogether including all 3 sections. What kind of RV is it going in?
Hey Kevin. Our Replacement Fabric for etrailer Powered RV Awning item #e86QV is just the replacement fabric. It'll attach to your existing awning roller so long as you have a 20' powered awning. There is no stitching built into the fabric for…
Hey Adina, from what I could find the Norcold N811F requires a cutout that is 60" high x 23-1/2" wide x 24" deep. I would double check your opening just to be sure but based on those dimensions I recommend the Norcold RV Refrigerator…
Hey Brad. You'll be wanting the Curt Adapter #C88KR. This will fit into the OEM pucks of your '25 Chevy 2500HD and will allow you to reuse your B&W Patriot Sliding Hitch. What camper are you towing with your truck?
Happy to help Bruce H, To install the Specialty Recreation Skylight we'd recommend using the Specialty Recreation Skylight Installation Kit #SR76RR. Years ago, most RV skylights were usually installed with butyl tape under the flange and self…
Hey Dan, There unfortunately isn't a guide to tell us what size skylight dome your trailer has installed on it so you'll need to measure your current one to find the correct replacement. We offer the following sizes: 14"W x 14"L…
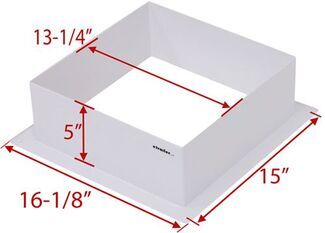
Unfortunately, it does not Terri. The Specialty Recreation Inner Garnish for RV Skylight item #SR57MR does not come with pre-drilled holes because it's a universal replacement part. The reason being is that RV ceiling and framing thicknesses…
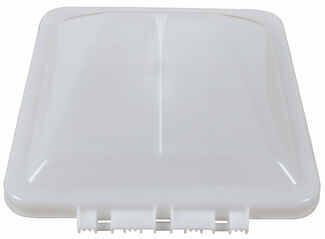
Hi Chad; I'm sorry to hear you have to replace your skylight. What happened? The good news is we do have a replacement available. The Specialty Recreation Universal Replacement RV Skylight #SR77RR is designed to fit a standard 14" wide x…
Hey, Kenny! The gasket included in the Steel Rubber RV air conditioner rubber gasket kit, part #SR73MR, is 1" tall and 1-1/2" wide. It’s designed to fit the standard 14" x 14" AC opening. Below, you’ll see a picture showing all of…
Tackling a roof or shower replacement is straightforward with a square RV skylight that matches your opening. Options that include an inner garnish help the interior look clean and complete, but sizes can differ from the original so confirm your cutout. Plan for enough sealant—more than one tube may be needed—and some installs use butyl tape under screw holes with lap sealant on top.
Not all square skylights include sealant or screws. Some kits do not come with the tube of caulk shown, and one tube may not be enough. Plan on butyl tape under screw holes and lap sealant on top; 2 to 3 tubes can be needed to complete the job. If hardware isn't listed, add an installation kit for screws and extra sealant.
Tighten it evenly and use all the screws, then seal thoroughly. Thin domes can want to pop up between screws, so add steady pressure as you fasten and don't over-space fasteners. Butyl under the flange helps fill gaps, and a generous lap sealant bead over the perimeter and screw heads helps reduce lift and leaks.
Match the skylight to your roof opening and outside flange footprint. A square skylight can fit perfect, but some find the new unit a bit bigger than the original cutout. Measure both the hole and the space around it. If you want a finished interior look, choose a skylight that includes an inner garnish or add one to match your ceiling depth.
Use butyl tape under the screw holes and finish the top with lap sealant. Self-leveling products can make a smoother finish; thick, sticky caulks can be hard to spread and leave stringy bumps. Lay a continuous bead and go back around each screw head. Have enough tubes on hand so you don't run short mid-job.


 RV Skylight Parts or Accessories
 Filters