There's one thing all RVers have in common: they all need to breathe. This is why vents are such a necessary component of any enclosed trailer or RV—they allow the flow of fresh air, help eliminate odors, and even help protect you against gases and fumes inside the camper.Over time, your RV's roof vent can leak, break down, or simply stop moving air as well as it should. If it's time to replace your RV roof vent (or install a new vent in a new location), the good news is that this is a project you can take on yourself at home. Below, we'll go step-by-step through the process of selecting and installing or replacing a roof vent.NOTE: This guide addresses the installation of a complete roof vent assembly. If you only need to replace the cover/lid located on the outside of the RV, check out our article on that topic here.
Choosing the Right RV Roof Vent
Measure Roof Vent Opening
Measure Garnish Size
Select Vent Options
Installing the RV Roof Vent
Remove Old Garnish or Cut New Opening
Remove Putty and Old RV Roof Vent
Insert and Seal New RV Roof Vent
Insert New Garnish
Choosing the Right RV Roof Vent
Before you can install a new vent, you first need to select the right unit. There are a few things to consider when purchasing a new vent or selecting a replacement.
1. Measure Roof Vent Opening
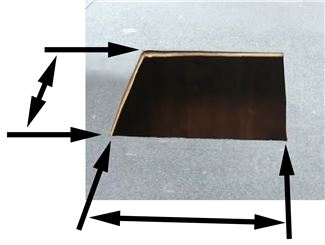
Measure the opening for your roof vent on your camper. If you're installing a vent in a location in which there was no vent previously, you'll have to cut an opening between roof joists to install the new unit. Standard roof vent openings are 14-1/4 x 14-1/4 inches.
Pro tip: It's easiest to measure the vent opening from inside the trailer. If your trailer's vent has an interior trim piece or garnish, remove it first to expose the edges of the opening.
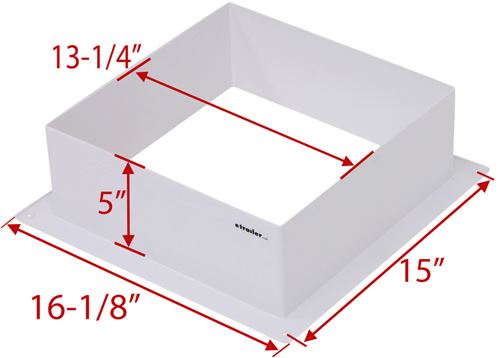
The leg length of this garnish is 5" from the top of the lip to the top of the garnish.2. Measure Garnish SizeA garnish is the trim piece that covers the vent opening on the inside of your trailer for a clean, finished look. Usually the garnish slides into a groove or channel on the vent and is attached with screws to the trailer ceiling.Garnishes come in different sizes or depths (referred to as leg length) to fit different vent models and roof thicknesses. Most vent assembly kits include a garnish, though you can purchase one separately if you need a different size.Make sure your garnish is the right length by measuring your roof's thickness from inside your trailer, then checking the garnish dimensions. If your roof is thin and you can't find a short enough garnish, you can purchase a longer one and cut it to fit with a fine tooth saw or tin snips.
Pro tip: It's best to trim your garnish indoors, especially in winter, so that the plastic remains at room temperature. Warm plastic will be easier to trim and will be less likely to crack or shatter.
Watch Now: Best RV Vent Options
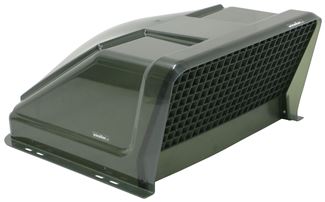
3. Select Vent OptionsNow that the necessary measurements are out of the way, you can decide on color as well as any extra bells and whistles you might want, such as fans or remote control options. We'll go over some of the main options below.FansFans increase air flow and circulation and are a great choice for larger RVs and campers and for those without A/C. If your old vent has a fan, make sure the new vent has one as well, and also ensure the new vent uses the same kind of power source as your old one (most use 12V DC power, but some run on 110V AC).If you don't currently have a fan but want one, you can upgrade and make the switch by running wires to power the motor. (A good fan may even replace the need for air conditioning.)In addition, some powered vents bring even fancier options to the table. Most vents require you to crank them open by hand, but some include remotes that allow you to open/close the dome or control the fan from afar. Some also have an automatic feature, which allows the unit to sense the temperature in the camper and turn the fan on/off as needed.Metal vs Plastic Vent CoversMetal lids are the most durable type. They won't crack in a hail storm or erode in the sun. They offer a flat, low profile for additional clearance. They also block out the light when closed.Plastic lids typically have domes and are taller than flat metal covers. The dome shape allows water runoff, prevents ice damming, and is less likely to leak. Most come in white or tinted smoke colors and allow light to filter through, so you don't have to rely entirely on your interior lights. However, they are more easily damaged by the elements than metal covers are (though polycarbonate plastic covers will be more UV-resistant than polypropylene covers).
Installing the RV Roof Vent
Whether you are replacing an existing vent or installing one from scratch, the installation instructions are going to be quite similar. Check your vent assembly product description and installation instructions to see if any additional install kits or supplies are necessary.
The following featured installation uses the MaxxFan Deluxe Roof Vent w/12V Fan, # MA00-06401K, on a 2018 CrossRoads Zinger travel trailer. The following should be used as guide. Make sure to read and follow all manufacturer instructions in the owner's manual included with your vent assembly kit.
Supplies Needed to Replace an Old Vent
To replace an old vent, you will need:
Caulk gun (if sealant requires caulk gun for application)
Installing the MaxxFan Deluxe Roof Vent w/ 12V Fan
Pictured: removing garnish from vent opening
Step 1: Remove Old Garnish or Cut New Opening
If you are replacing an existing vent, remove the old trim ring/garnish piece from inside the RV.If you are installing a vent in a new location, mark the desired location for your vent (make sure to stay between roof joists). Then cut a 14-1/4" x 14-1/4" (or other size as necessary) opening through the roof and ceiling.
Scrape off old sealant to expose screws
Step 2: Remove Putty and Old RV Roof Vent
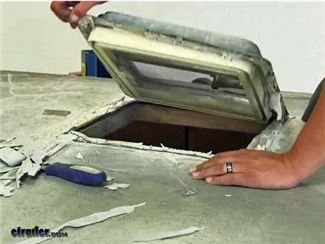
If you are installing a vent in a new location, skip this step and move on to Step 3.On the roof, carefully peel off any old sealant around your existing vent to access the mounting screws. You can use a putty knife or other tool. Take off the vent. If you have a powered unit with wires, make sure your camper power is off and clip the wires, leaving sufficient wire length behind to make new connections. Then scrape off residual sealant to get as clean a surface as possible.
Warning: When removing old sealant with a putty knife or other tool, be careful not to scratch the roof or tear the roof membrane.
Apply butyl tape to trim ring and press into place
Make wiring connections
Insert new vent
Step 3: Insert and Seal New RV Roof Vent
Without a fan: If installing a vent without a fan, apply butyl tape or sealant to your new vent. Insert the vent into the hole (make sure it's facing the proper direction! Check your installation instructions for details) and press into place, creating a seal. Make sure all screw holes are completely covered. Screw into place with included mounting screws, then apply self-leveling sealant over the screws.With a fan: If you are installing a vent with a fan, you'll want to route your power supply and ground wires first so that you can make your connections before inserting the fan. Apply butyl tape or sealant to the trim ring and press into place, creating a seal (make sure it's facing the proper direction! Check your installation instructions for details). Make sure all holes are covered. Screw into place with included mounting screws, then apply self-leveling sealant over the screws. Make your wiring connections, then carefully mount your fan, tucking the wires inside the hole you drilled as you insert the fan. Screw into place.
Pro tip: Use the manual control knob to open the fan prior to inserting. This will make it easier to get everything in place.
Step 4: Insert New Garnish
Attach the interior garnish piece inside the camper. Trim to fit if necessary, then screw in place. Be careful not to crack the garnish when you do so. Tuck any protruding wires out of the way (just make sure your wires don't get stuck in the fan). Test any functions of the vent, including the open/close function and the fan, if you have one.And that's it! You have a new vent. Enjoy the fresh air.
Still have questions?Email us or give us a call at 800-298-8924.
Hey Joe, the limiting air pressure factor for the Lionshead Steel Modular Trailer Wheel #LH44ZR that you referenced would actually be the valve stem you put in it. For example the metal valve stem part #AM20906 would be a great option that can handle…
I can help you determine the cover you need, however the 2019 Gulfstream Vintage Cruiser doesn't state the vent used so I can't confirm a fit by that information alone. There are basically 4 different vent designs so you will need to…
There are a number of different trailer vent styles that come down to hinge fit. I tried to look up your order history to see what cover you purchased, but there wasn't a cover connected to an order from the email address you asked the question…
The correct replacement cover for your Ventline Northern Breeze VB0568 Roof Vent is the Vent Cover for Ventline Old Style Rounded Dome Trailer Roof Vents #BV0554-01 for white, or #BV0554-03 for smoke. I have attached a couple of videos for you to…
The vent part #34474558 does not come with install hardware but you would want to pick that up local to you at a hardware store. You would want to use number 8 screws either 3/4 or 1 inch long depending on how thick your roof is.
If you are looking to replace an entire vent assembly the most common cut out dimensions are 14-1/4" x 14-1/4". As to not disturb the roof sealant you can remove the inner garnish on the vent from inside your 2018 Forest River Sunseeker.…
Hey Jon; I was actually just talking to Furrion about heat options for the Chill Cube yesterday (1/21/2025). At this time, the only way to have heat with this unit is through a furnace on a ducted setup. The Furrion Chill Cube RV AC w/ Air…
There is a standard vent size opening which is 14" wide x 14" long but not all of them follow this rule so you will need to measure to be sure. The Camco RV and Enclosed Trailer Roof Vent Cover part #CAM40453 fits the standard 14" wide…
If the vent you have installed on your trailer has a 4-point hinge like the attached photo, part #BVD0449-A01 would be the replacement lid for your Ventline roof vent. We do not offer a metal replacement lid with a 4-point hinge. The replacement knob…
I found the light you are looking for on Google, but we don't carry that style of light. I really wish we could help but we could only offer a somewhat different option like the Bargman 84 Series light part #30-85-002. This measures 14-1/16"…
Hello Patrick, thanks for reaching out. We do have a great option for upgrading a standard powered roof vent. What I recommend is the following: - MaxxFan Deluxe Roof Vent w/ 12V Fan, Thermostat, and Remote - Powered Lift - 10 Speed - Smoke…
Since heat rises I would at the very least put a set of the Trailer Vents #HMAV2-AVT2 near the top of the trailer to get the hottest air of the trailer out. What you could do for maximum air flow in your trailer is have a set facing forward in the…