Hey Edwin, The Skylight #SR89YR will work perfectly fine with your 1-1/4" thick roof on your 2018 Lance 1575, though they typically will require some trimming to the garnish to fit perfectly. You will want to pick up 2 tubes of self leveling…
Happy to help Bruce H, To install the Specialty Recreation Skylight we'd recommend using the Specialty Recreation Skylight Installation Kit #SR76RR. Years ago, most RV skylights were usually installed with butyl tape under the flange and self…
Hey Michael, You do not want to use self-leveling sealant with the Specialty Recreation Universal Replacement RV Skylight - 14" Wide x 22" Long - Smoke #SR67RR because it is made from polycarbonate, which doesn't mesh well with that…
Hey James! The tallest skylight we have is the Specialty Recreation Replacement RV Skylight w/ Inner Garnish item #SR66MR. It's designed to replace an existing skylight but it will work to add a new one as well. It fits a 14" x 22"…
Hey Nicholas, thanks for the pics and information. To replace your Dometic Brisk II 9105304474 AC, I recommend the Advent Air RV Air Conditioner System item #ADV92SR in white or item #ADV62SR in black. There's no way to just replace your AC unit…
Hey Kevin. Our Replacement Fabric for etrailer Powered RV Awning item #e86QV is just the replacement fabric. It'll attach to your existing awning roller so long as you have a 20' powered awning. There is no stitching built into the fabric for…
Hello Robin, thanks for reaching out. The Thomas Payne Heritage Three-Seat Reclining RV Couch #TP43KR weighs approximately 200 lbs altogether including all 3 sections. What kind of RV is it going in?
Hey Adina, from what I could find the Norcold N811F requires a cutout that is 60" high x 23-1/2" wide x 24" deep. I would double check your opening just to be sure but based on those dimensions I recommend the Norcold RV Refrigerator…
Hey Brad. You'll be wanting the Curt Adapter #C88KR. This will fit into the OEM pucks of your '25 Chevy 2500HD and will allow you to reuse your B&W Patriot Sliding Hitch. What camper are you towing with your truck?
Hey Dan, There unfortunately isn't a guide to tell us what size skylight dome your trailer has installed on it so you'll need to measure your current one to find the correct replacement. We offer the following sizes: 14"W x 14"L…
Hi Chad; I'm sorry to hear you have to replace your skylight. What happened? The good news is we do have a replacement available. The Specialty Recreation Universal Replacement RV Skylight #SR77RR is designed to fit a standard 14" wide x…
Unfortunately, it does not Terri. The Specialty Recreation Inner Garnish for RV Skylight item #SR57MR does not come with pre-drilled holes because it's a universal replacement part. The reason being is that RV ceiling and framing thicknesses…
Hey Edwin, The Skylight #SR89YR will work perfectly fine with your 1-1/4" thick roof on your 2018 Lance 1575, though they typically will require some trimming to the garnish to fit perfectly. You will want to pick up 2 tubes of self leveling…
Happy to help Bruce H, To install the Specialty Recreation Skylight we'd recommend using the Specialty Recreation Skylight Installation Kit #SR76RR. Years ago, most RV skylights were usually installed with butyl tape under the flange and self…
Hey Michael, You do not want to use self-leveling sealant with the Specialty Recreation Universal Replacement RV Skylight - 14" Wide x 22" Long - Smoke #SR67RR because it is made from polycarbonate, which doesn't mesh well with that…
Hey James! The tallest skylight we have is the Specialty Recreation Replacement RV Skylight w/ Inner Garnish item #SR66MR. It's designed to replace an existing skylight but it will work to add a new one as well. It fits a 14" x 22"…
Hey Nicholas, thanks for the pics and information. To replace your Dometic Brisk II 9105304474 AC, I recommend the Advent Air RV Air Conditioner System item #ADV92SR in white or item #ADV62SR in black. There's no way to just replace your AC unit…
Hey Kevin. Our Replacement Fabric for etrailer Powered RV Awning item #e86QV is just the replacement fabric. It'll attach to your existing awning roller so long as you have a 20' powered awning. There is no stitching built into the fabric for…
Hello Robin, thanks for reaching out. The Thomas Payne Heritage Three-Seat Reclining RV Couch #TP43KR weighs approximately 200 lbs altogether including all 3 sections. What kind of RV is it going in?
Hey Adina, from what I could find the Norcold N811F requires a cutout that is 60" high x 23-1/2" wide x 24" deep. I would double check your opening just to be sure but based on those dimensions I recommend the Norcold RV Refrigerator…
Hey Brad. You'll be wanting the Curt Adapter #C88KR. This will fit into the OEM pucks of your '25 Chevy 2500HD and will allow you to reuse your B&W Patriot Sliding Hitch. What camper are you towing with your truck?
Hey Dan, There unfortunately isn't a guide to tell us what size skylight dome your trailer has installed on it so you'll need to measure your current one to find the correct replacement. We offer the following sizes: 14"W x 14"L…
Hi Chad; I'm sorry to hear you have to replace your skylight. What happened? The good news is we do have a replacement available. The Specialty Recreation Universal Replacement RV Skylight #SR77RR is designed to fit a standard 14" wide x…
Unfortunately, it does not Terri. The Specialty Recreation Inner Garnish for RV Skylight item #SR57MR does not come with pre-drilled holes because it's a universal replacement part. The reason being is that RV ceiling and framing thicknesses…
Match your cutout size and overall dimensions for a direct swap. Choose smoke or white to manage glare and help keep interiors cooler, and add an inner garnish for a clean finish. For installation, use butyl tape with lap sealant, plan on extra tubes, trim the garnish if your roof is thicker, and follow material guidance—some polycarbonate units should not use self-leveling sealant.
Yes—take your time removing old sealant to protect roofing, then dry-fit and inspect around predrilled holes. Trim any plastic residue or bumps so the flange sits flat for a good seal. On curved roofs, add padding if needed and avoid over-tightening to reduce stress at the ends. Add fasteners where needed to improve the fit.
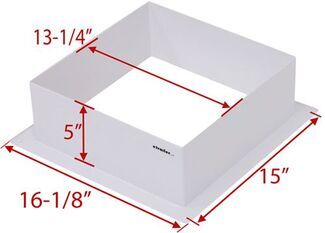
Measure the roof cutout and match the outside footprint and bubble height to your opening and roof curve. Check your roof thickness; the inner garnish may need trimming for a snug ceiling fit. If swapping an inner piece, confirm the garnish profile so it doesn't press against the lens and prevent it from mating to the ceiling.
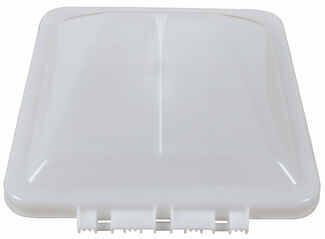
Pick smoke or opaque if you want to cut glare and help keep the interior cooler. Clear brings in maximum light but can heat up the space more. If you're replacing an OEM unit that felt too bright, a darker lens can reduce harsh sunlight in living areas.
Use butyl tape under the flange and a compatible sealant over the screws and edges. One tube may not be enough, so have extra on hand. Verify sealant compatibility with your skylight material; some polycarbonate units specify avoiding certain self-leveling sealants or include their own. Reuse existing screws when possible or match them after removal.


 RV Skylight Parts or Accessories
 Filters