
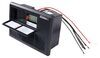
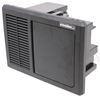
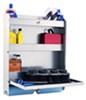
Exterior LED Utility Light - Flush Mount - Powder Coated Aluminum - Clear Lens - 12V DC
(8 reviews)
Price: $179.54
In Stock
Exterior LED Utility Light - Flush Mount - Powder Coated Aluminum - Clear Lens - 12V DC
Item # M357FR
Our Price: $179.54
In Stock


- All Info
- Reviews (8)
- Q & A (0)
- Videos (3)
- Photos
M-3 and Associates Work Lights - M357FR
- LED Light
- Exterior Lights
- Utility Lights
- White
- M-3 and Associates
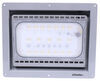
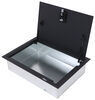
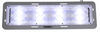
13-5/8" x 10-7/8" Rectangle. LED utility light illuminates an exterior area with bright white light. Durable aluminum construction with powder coat resists corrosion. Mounts flush to exterior trailer wall.
Features:
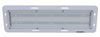
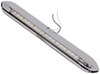
- Low-profile, rectangle LED lamp delivers bright, focused light to illuminate wide areas
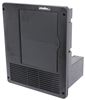
- Flush-mount design delivers a sleek, unobtrusive look
- LEDs make great replacements for incandescent lights
- Lasts 50 times longer
- More efficient - provide brighter light with less power output
- No bulbs to replace - no brittle filaments
- Clear lens with white LEDs
- Compatible with 12V DC systems
- Made in the USA
Specs:
- Dimensions: 13-5/8" long x 10-7/8" tall x 1-7/8" thick
- Required cutout dimensions: 11-5/8" wide x 8-3/4" tall
- Light output: 4,500 lumens
- Diodes: 19
- Power draw at 12V DC: 4.2 amps
- 1-Year limited warranty
9500032 M-3 Exterior LED Utility Light - Flush Mount - Powder Coated Aluminum - Clear Lens - 4500 Lumens - 12V DC


Video of Exterior LED Utility Light - Flush Mount - Powder Coated Aluminum - Clear Lens - 12V DC


Videos are provided as a guide only. Refer to manufacturer installation instructions and specs for complete information.


Video Transcript for M-3 Exterior LED Utility Light Review and Installation
Hi there enclosed trailer and fifth wheel owners. Today, we're going to be taking a look at M-3's LED adjustable floodlight. These flood lights are going to be an ideal setting for your enclosed trailer, your car hauler, or anything where you do a lot of sporting events or racing. Because you can bring this trailer with you. You can bring your horses, your car, whatever event you're going to. And then you can set up on the outside and you can be there all night long, you've got plenty of light here on the outside.
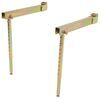
So if you're at the track and you need to do some fine tuning or adjustments, you can pull up to your trailer, do everything you needed to do. Everybody around you is going to be able to see your trailer, your setup, so you're easy to find also at those events. Because that's another issue, when you're with people at these events they're hard to find sometimes. Having a nice trailer that's all lit up puts a landmark for your spot there. So you can always come back to enjoy yourself or make your adjustments.The flood lights are going to be adjustable.
They can tilt, so you can either have it straight out or you can put a downward tilt to it to point it more towards the ground to eliminate the area right outside the trailer. It's going to be an LED flood light, so it's going to last significantly longer than your typical incandescent bulbs, about 50 times as long. And they also draw considerably less current than a light of this magnitude would. There's 19 diodes inside of here to produce the light, and it puts off about 4,500 lumens. Each light is going to draw about 4.2 amps.
And an incandescent putting out that much light would be considerably higher wattage than what this is right here. Which means that you can have more lights on your trailer without draining your battery nearly as fast, so you can enjoy this light much longer throughout the night.I also like that there's a recessed flush mount design. That's nice because we don't have anything sticking out on the side that we have to worry about when we're pulling into a garage or whatever spot that you've got or passing by anything. Maybe if you just want to go through a drive-through and pick up some food on your way, this is something you don't have to worry about, because it's nice and flush along the side. It's not going to stick out.
You don't have to think about it. And with it being recessed and the flush design, it allows it to still have that tilt function without protruding out too far. The size of our light is going to be 13 5/8" long by 10 7/8" tall. The depth to where it sits in your trailer is nearly 2" at about 1 7/8".The mount for your light is going to be constructed of aluminum. So it's going to be strong, durable, lightweight, and rust resistant, as aluminum doesn't rust. And to further protect the aluminum from any types of corrosion it has a gray powder coat finish on it, which you could change if you wanted to. You could easily paint it to match your trailer. Now that we've gone over some of the features that the light, why don't you follow along with me and we'll get it installed together. You are going to have to make a pretty large cut in your trailer. We're going to go over making those cuts, how to find out a good spot, and also how to find some wiring to get it in there. The hardware does not come included with this, so you do want to make sure you've got appropriate hardware. We use self-tapping screws for ours. It's just going to depend on the thickness of your wall and how securely you want it to be mounted up there.We'll begin our installation by cutting out the hole that we need to mount our light. So you want to make sure you choose the appropriate location and then we can mark and cut it out. I do want to point out though that it does come with a template here. And I've already installed one of these, we're going to be doing two. I'm going to show you the second one here on how to install it. But the template's actually too small. So you can just set that aside, we're not going to be using it. I've gone ahead and taken the appropriate measurements from the first light I cut out and we're going to be using those. Let's take a look at the side of the trailer here.I've gone ahead and marked it out to the appropriate size, you can see it here. And what we measured it to is 12 1/4" long by 8 3/4" tall. And this is going to be the appropriate measurement for this light to fit. When you go to cut it out, the easiest way to do this is to just take a drill bit. You want to make sure you have one that's large enough for whatever your cutting blade is you're going to use to cut this out is. So that's going to vary depending upon your tools. So we're going to put it in the corner here and we're going to cut this out. And you want to cut just on the outside of my lines that I've marked, to make sure that we've got plenty of room. Because there is a big overlap that we're going to have on the lights, so you don't have to be crazy perfect with it. So we're going to drill right on through.And now depending on your trailer, one of the things you want to keep in mind is the depth. So where we've positioned our light here, we tapped on our trailer. It's hollow here, but we've got a beam there and we've got a beam here, and we're putting it between those two beams. The other thing is the depth though, because when we cut this out, the walls and the interior of our trailer have already been finished. So the light's not going to reassess far enough and it's going to hit that inside wall. So we're going to be cutting through the outer wall and the inner wall. And you may need to do this on yours too, because the light is about 2" of depth that it needs to go in. So we're going to continue drilling right on through the wall here so it goes straight through. If you have a deep enough wall, you'll want to stop on the outside. If you're unsure, then I would recommend cutting out the outside first testing the fit. And then if you need to cut out the inside, you can do so.We're now going to repeat that for the remaining three corners and then we can start cutting it out. You can use a jigsaw or a cutting wheel or a small cutting blade like we have here. This is a small reciprocating saw. We're going to be using this over the jigsaw for this outside piece because the depth of our blade, it hits on there and just makes it a little bit more complicated, so this one works out very well. We're just going to start with the hole that we had drilled and then just cut out around it. Now that you've got the outside of here cut out, you can go ahead and test fit your light. If it fits, you can skip the step that we're about to do. But if your light hits on the inner wall here and it doesn't fit depth-wise, then we're going to need to cut this out. So I'm going to head inside and we're going to use the jigsaw now to cut off the wood here.Let me get right here to the end, you can. We'll push it inside so it doesn't fall down between the gap. Now we've got our hole cut out, we can go ahead and just test fit to make sure that it is going to sit in there nice and flush, and everything fell right into place. So we are good to go now. So before we start to mount it up, there's a couple of things we want to do. Our wiring here, we need to put this in a location where we can access it on the inside so we can run it. And before we put it up, we're going to run butyl tape all the way around the outside of our light here to seal it up against the outside. So I'm going to start by putting that butyl tape on, going to coat it all the way around, and you can get butyl tape here at etrailer.com.So we're just pulling out lengths that we're going to need, ripping them off, and then just applying it around the outside. Because when we screw this down, it's going to compress the butyl tape and seal it up against the outside. Definitely want to make sure you cover up any of the screw holes with the butyl tape, so that way when the screw goes in it pulls that butyl in with it to help seal up those holes. So now we've got it all the way around here. So we're going to go ahead and get it set into place, and when we're feeding it in and we want to get our wires fed into place. Now this is going to vary depending upon your trailer, how you're going to do this. We can take a step inside here real quick and I'll show you how I'm going to feed mine through. But again, depending on how finished your trailer is and what you're putting these in.So on our trailer there we're trim pieces that run across the top. So I just took the screws out and just pried the trim piece away. There was plenty of wiring already back here, but we can easily push our wiring up and then reach up and grab it and pull it through. And when we pull it through, we want to make sure we're going to feed it up over top of this trim piece, so when we go to put the trim piece back on it's not going to smash anything. I'm going to be tucking to all these wires back up behind it as well. I just got them pulled out because we're also going to be tapping into some of these wires here to get our powers and grounds.So we're going to go ahead and set it in place now. I'm going to just rest it like this so I can go ahead and get that wire fed like we just talked about. And for now it's okay if you've got it pulled down below the trim piece, we can adjust that later, we just are trying to get it into position. We'll lift it up. I like to lift the top up first to make sure that I don't pinch the wire or anything when pushing it in, and then we'll get the rest of it all pushed in there. You'll have six holes here that we're going to be using to thread it in.You will have to provide your own hardware for this. We're going to be using self-tapping screws to get it installed. And again, depending on the depth of your walls and stuff, that's going to change the length of hardware you're going to want to use. We want to make sure that our screws go through the metal outside and also start to go into the wood, but we don't want to pass all the way through. But that way we've got nice, solid contact to ensure that it's going to draw it up tight, to squish our butyl tape and seal this up. The self-tapping screws we're going to be using are an inch and a half in length. And we're just going to run it right in. You can actually feel it hit the wood, it starts to push back out. So if that happens, we're just going to loosen this up some, press in, and go back down, and that's going to draw it in. Just going to work our way around with the remaining holes.So we can now start hooking up our wiring here on the inside. The blue wire is going to be your negative wire and the brown wire here is going to be your positive wire. Now this you want to hook to a switch. If you don't have a switch, you'll want to make sure that you install one for them. Our customer already has one installed down here. They've got an interior and an exterior light switch. We're going to be wiring it up to the exterior light switch here, which already has everything hooked up. And if you already have a switch, that's great because you also need to figure out where power and ground is, where you can tap into it. And on your light switches here, you're always going to have power that's hot at all times going to one of those. So even if you don't use the switch, you can use the hot at all times lead that's going to the switch to jumper from there to whatever switch you want to add for your lights.So since we've got these already, we're going to be just attaching it to the wires. And I followed them up the wall and found them up here. If you need ring terminals and switches, we've got those here at etrailer. But if you are just going to be tapping into existing wiring, and this is that wire that's coming off the switch that we we're just talking about right here. And this is the switch side of the wire, so this is not hot all the time, this is only hot when the lights are turned on, which is exactly what we want, because we want this light to come on when we turn that switch on.So this brown wire here is our hot wire, so we're going to go ahead and just trim off the end because we don't need it. It is pre-stripped and pre-tinned for you to put a spade terminal or a butt connector, whatever you need on. But we're actually going to be using a quick splice here to just go right around the circuit that we want to tap into. And we're just going to put the brown wire in the other side of our quick splice right here. And then we will use some channel locks to squeeze that down and connect the two circuits together. Now if you're wiring this up outside your trailer, I do not recommend using quick splices. I only recommend these if you're going to be working inside. If you're working outside, you want to make sure you use butt connectors, particularly heat shrink butt connectors to keep out any moisture and ensure a long-lasting circuit operation. We've got those available here etrailer.com as well.Once you've got your quick splice on there for your power, next you're going to need is a ground source. And in most cases your frame and things like this here are going to be grounded. So you could just use a ring terminal, attach it to it, and then just run a self-tapper into the frame somewhere. But we're going to be hiding all this wiring back behind here. And this white wire that's right here is a ground circuit. So we're going to be tapping into this white wire rather than using the frame. And we're going to also be using a quick splice for this one as well. So we're just going to take our quick splice, just like we did with the black one. We're going to bring it over, we're going to trim off the little bit of pre-strip that is there, and we're just going to squeeze to connect these two circuits together. We've got them connected, just take the cover for the quick splice, fold it over to lock that down in place.Before we put all of our wires back up, let's make sure everything's working properly. We're going to hit on the outside, I'm going to hit the switch here to turn them on. So we'll go ahead and turn them on and we can see that they're working properly. So now we can clean up all the wiring on the inside and get everything cleaned up, anything that we had taken loose to access any of that stuff. And then what I do recommend doing is just taking a further step to seal up around these. Even though we've got the butyl tape in there squeezed around them, it's that a bad idea to apply a bead of silicone all the way around it. We've got silicone here at etrailer.com, and that'll just help further seal it up to ensure we don't miss anything that the butyl tape might not have gotten. If you had to cut out your inside wall, I'd recommend sealing around that as well, so that way you still have your two barriers, so you've got that empty layer of insulation in between.And that completes our look at M-3's LED adjustable floodlight.
Customer Satisfaction Score:
98% were satisfied with this product
2% of customers were not satisfied
- Wrong item was ordered
- Defective
- etrailer mistake
Customer Reviews
Exterior LED Utility Light - Flush Mount - Powder Coated Aluminum - Clear Lens - 12V DC - M357FR
Average Customer Rating: 4.8 out of 5 stars (8 Customer Reviews)
13-5/8" x 10-7/8" Rectangle. LED utility light illuminates an exterior area with bright white light. Durable aluminum construction with powder coat resists corrosion. Mounts flush to exterior trailer wall.by: Quantum08/07/2022
Love these lights and great customer service. We had a light that arrived burnt out and etrailer replaced it promptly. They went above and beyond !!
by: David02/09/2022
Absolutely incredible service. They went above and beyond with thier customer service and we will definitely be coming back for more!
by: Theresa 11/11/2020
Product came on time and was a good quality product. Easy to order a d good customer service.
by: Albert 09/15/2022
by: John 10/25/2022
by: Pete 08/22/2023
by: Michael 09/27/2021
by: Robert 10/19/2022
8
8
See what our Experts say about this M-3 and Associates Work Lights
- How To Wire the Exterior LED Utility Light Part M337FRThe Exterior LED Utility Light part # M337FR has three wires, one for power, one for ground, and one for neutral. I spoke with M-3 and they informed me that the light follows EU Wiring Specifications so the power should be brown, the neutral should be blue, and the ground should be green with a yellow stripe. There is also a 12 volt version as well, part # M357FR which also has three wires but only the power and ground would need to be attached.
view full answer...
Info for this part was:

Edited by:
Lindsey S

Installed by:
Kathleen M

Installed by:
David F

Video by:
Dustin K

Video Edited:
Chris R

Written by:
Mike S
At etrailer.com we provide the best information available about the products we sell. We take the quality of our information seriously so that you can get the right part the first time. Let us know if anything is missing or if you have any questions.
Product Experts Available Now!
Call 1-800-940-8924
Thank you! Your comment has been submitted successfully. You should be able to view your question/comment here within a few days.
Error submitting comment. Please try again momentarily.