


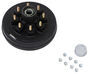
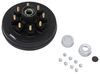
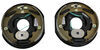
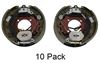
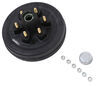
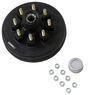
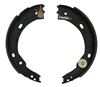
Driver's-side and passenger's-side electric brakes measure 12" x 2". Brake pads are made of durable friction material for improved braking and longevity. E-coated backing plates resist rust. Fit 14-1/2" to 16-1/2" wheels.
Features:
Specs:
With repeated use of these brake assemblies, the brake shoes may move out of alignment, causing less efficient braking performance. To keep the brake shoes aligned and the brake assemblies performing correctly, you should perform routine maintenance.
These brake assemblies should be adjusted after installation and then as needed for the life of the brakes. To adjust the brakes, use a brake adjustment screw tool (sold separately) to turn the adjustment gear on the inside of the assemblies. Continue to turn the gear until the drum surrounding the brake catches on the brake pads enough so that the hub can no longer be turned easily by hand. Then reverse the gear by about 10 clicks. A properly adjusted brake should drag slightly on the brake drum.
These brake assemblies meet the requirements for certification by the Canadian Standards Association (CSA). The CSA creates standards, which when complied with ensure a safe and quality product. These brake assemblies underwent extensive testing to measure stopping distances when braking. These brakes have also been tested by QAI for braking performance in a complete automotive setup and under real-world conditions to provide the most realistic scenario for the everyday driver.
Each shoe on these brake assemblies is lined with automotive-grade friction material for improved stopping performance and longevity. The friction material is fully bonded onto the surface of the brake shoe. This lining is custom-molded for a perfect fit. The edges are tapered to ensure long-lasting performance. This taper, along with the circular grinding that the lining undergoes, helps to prevent cracking and crumbling. This durability helps to prevent mechanical lockup, which can occur when brake shoes are excessively worn or broken.
The friction material is also SAE-N certified, which means that it is an environmentally safe product that complies with California and Washington regulations regarding the composition of brake pads. As a result, this material not only provides high-performance braking that can endure the test of time, but it is also environmentally friendly and safe for use throughout the United States and Canada.
Videos are provided as a guide only. Refer to manufacturer installation instructions and specs for complete information.
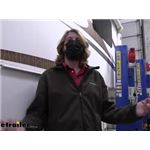
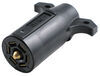
Presenter Hi there, Cameo owners. Today, on your 2009 Carriage Cameo, we're gonna be taking a look at and showing you how to install the etrailer replacement backing plate and brake assemblies. With this, since it has Nev-R-Lube axles, we're also going to be replacing the hub and bearing assembly for that as well. You can get all these parts here at etrailer. So I just wanted to show you a quick look between our old assembly and our new. You can see all the corrosion that we've got occurred inside of this one that can cause it to stick and drag and not operate it smoothly and also can cause some noise.
Our new assembly here is gonna be much quieter and smoother in its operation. You can see the customer here has gotten quite a bit of wear out of his shoes. The friction material's worn pretty good. You can see how much thicker it is here on our new shoes. And it takes a long time for shoes to wear down.
You actually get a lot of miles out of those. The thinner friction material here on the shoes typically outlast pads on like a disc brake setup, and you don't get the same stopping power with a drum as you do with a disc brake, but they do tend to have longer life on their shoes. Unfortunately, the brake hardware and stuff you got going on here, corrosion and things, takes its toll and, well, you usually end up having to service this one just as often or more often than a disc brake setup because of the various moving components. But the actual shoes tend to last quite a bit longer than like a pad does. But you can see you get all new springs, all new hardware, it's set up very smooth.
This one here, as you can see, it's kinda almost pushing it and cocked a little bit, and that's likely just 'cause of the corrosion and stuff. It's not quite seating back into it's perfect centered spot. It's worn down a little bit though, so it's not touching the drum when it's moving, but this one here's just not gonna operate as smoothly and with the same stopping force as a properly adjusted new one that's clean and gets good friction against the components that it needs to stop. So we get nice outer pressure and friction against our drum here, and our magnet gets plenty of friction against the surface being nice and clean, which is what allows it to drive these components into the drum. So you're gonna replace your drums and your bearing assemblies here on your Nev-R-Lube.
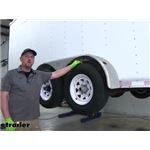
You've got your trailer now, it might be 10, 15 years old. You know, stuff does eventually wear out. When you go to replace some new ones, when you remove your old one, we need to know the diameter of the inside of the bearing here. And you can measure that two ways, you could either measure the inside diameter of the bearing here, or you could measure the spindle where the bearing would sit over here on the axle. They should give you the same numbers. The outer diameter, that spindle, should basically be the same as the inner diameter of this bearing 'cause their machined to be very close to one another. This is a 50-millimeter, and that's what we need for our 7K axle that we've got installed on here. So just keep that in mind. 50 millimeters also what's typically used on the 8K axles as well. But one of the differences between the 7K and the 8Ks is usually your backing plate for your brakes. Typically, your 8Ks are gonna be a four-bolt setup. And with the 7Ks, they're gonna be a five-bolt. So just pay attention to that when you take this off if you're replacing the brakes, the shoes, and the whole backing plate and everything with it. Pay attention to the number of bolts that hold the backing plate on to make sure that you're ordering the correct components. Usually on your axle, you can find a sticker on it so you can get a part number off of it. And a lot of times, it says the axle size on there, so you can find out whether, you know, you have a 7K or an 8K, whatever. You can usually see that here on the axle. You can use your trailer weight rating a little bit, but I would be a little careful on using that 'cause this is a pair of 7K axles right here. You add that together and you get 14K. The rating on this trailer is just, it's like 14,995 or something, so it's just under 15K. So there's close to a thousand pounds more for the max rating on this trailer than for these axles. So you would think they would be 8K to give you headroom, but they're not. They're 7K. So it's really important you do double-check your axles and make sure you're putting the parts that are designed for this to go on. Otherwise, they're probably not gonna fit properly. With the Dexter Nev-R-Lube, these ones here, we never need to grease. But you wanna check your bearings from time to time. So when you get your trailer up and you're just gonna checking it out, maybe lubricating any points you've got in your suspension to some of the stuff, kinda looking it over for a trip, when you got your wheels off the ground, you wanna check for play in your wheels. And we don't have any play on this one, which is a good sign. We don't want play. It's not like your traditional wheel bearings that you have to assemble and pack and adjust yourself. These ones, you don't do any adjustment. It's a pre-packed sealed bearing inside of these, and you just torque it to a specific spec that holds it where it needs to be and everything works. And in this design of bearing, there should not be any play. If you have play in there, you need to replace your bearings. They're gone their way out and they will eventually, you know, fail on you down the road. And that could take some time before that happens. You'll likely hear some noises first, but they can fail out of nowhere. So you feel that play, you should consider getting replacement done here. As far as the Nev-R-Lube goes, that's kind of the biggest thing there is just checking for that play. We never have to grease these or anything like your traditional bearings and adjust the nut or anything like that. So we're gonna be replacing the brake assemblies here. So we gotta get our drum assembly off, so we can get there to inspect and replace the necessary components. So we've got some brake issues going on this one. So we're gonna start by removing our wheel here. We're gonna use our 22-millimeter or 7/8 would work on these. You might wanna just double-check. Your sizes could vary on your wheels. And with these style of lug nut that's on here, they actually have like a chrome cap that goes on these lug nuts that's kind of made onto it. I dislike this style. I see these a lot on some vehicles, I believe Chevy, Ford, and Chrysler kinda all used them at some point. And what happens is the cap swells on there, and then the socket likes to stick. I mean, the lug nut here likes to stick inside your socket. So if you thread it back on there, if you can kinda rock your gun up and down to get it off of there. See how hard it is to get these on there 'cause of the swelling that occurs 'cause of the corrosion between the nut and that chrome cap. 'Cause that's how so we'll be able to loosen it while it's still threaded. You can get your gun back off of there, and you can take these off by hand. So we're gonna get the rest of these off, gonna be a little bit of a struggle 'cause the type of nuts that they are. Nothing too crazy though. Now that we got 'em all broke free, you can just unthread the rest by hand. That way, they don't stick in your gun. And you can actually see this one here, it swelled to the point that it's starting to split, and that's just the chrome cover. You can see all the corrosion on the actual nut that is below that chrome cap. So I dislike this style of nuts. We do have new replacement lug nuts here at etrailer, so if you wanna get rid of these, if they're all swollen and making it real difficult. You can get sets here at etrailer. We've got 'em in varying lengths and sizes. So that way, you can get the kind of the style and right size that'll fit your trailer. All right, so we got our wheel pulled off and out of the way. Next, we need to remove the cap here in the center. This is pretty close to how you do your regular wheel bearings. You'll notice that these caps are much bigger though, than you would find on your traditional bearings that you have to pack yourself, and they're labeled Nev-R-Lubes. So that's one of the things you can see right away without having to disassemble this to know that you have these Nev-R-Lubes. We're gonna just use a flat-bladed screwdriver and try to get behind the lip of our cap here. And we're just trying to pry it out of there a little bit. We got it to move just a little bit there. We'll just twist it a little. Continue working our way around until we get this popped off of here. These ones I find usually are a little bit stiffer than your traditional caps, but they're, they're pretty much kind of the same thing here. So just work our way around, popping this thing out. You're gonna find what you can do is you can, once you get it up kinda far enough, you can take your screwdriver here and just knock it right off of there just like that. And unlike the traditional bearings, one of the first things I usually do is I lay a napkin down, and I got a thing of napkins, shop towels and stuff here next to me 'cause it's a very messy job. Not with these Nev-R-Lubes. It's a sealed bearing inside of there. So you might see a little bit of grease that's come out of the bearing. There's like a tiny little bit there, but nothing crazy. You know, we're not leaking out a ton of grease. Now, if you did see this just fully packed full of grease, you know the seals in here probably failed, and you wanna consider a replacement. So we see a little bit of grease. We're gonna be replacing this assembly anyway just 'cause these are the original. But this one doesn't look that bad. Couple of other ones on the other side had a little bit of play, so the customer's just doing a full replacement. You'll also notice that there's a sticker on these, and that's the torque spec. I recommend double-checking and maybe you take a picture of this sticker before you disassemble it in case you accidentally damage this, flies away, it's just kind of a paper sticker. So you'll wanna know that number on there, so you know what to torque it too. So I already see what it is. You'll also see here on the end of the shaft, there's this little black ring. That's a snap ring that's on there that we'll need to remove to get this off. On your traditional ones, you'd have like a cotter pin or a cage nut or something on here to hold it and take that off, and you can get to your bearings from there. With this one, we gotta get this snap ring off first. So we're gonna grab our snap ring pliers, and it does have a very small hole. If we look here on the top, you can see there's a small hole right here, and there's another small hole right there for our pliers to fit down in. Line it up with the hole there, and then we can use these to spread the clip. And we're trying to get it off there. And we did get it to kinda start a little bit there. Our snap ring pliers are kinda wore out on the tips, so they don't get a very good grip. But if we have a gap here that we can see, so we can actually get our screwdriver right there into the gap, and then we can just kinda work this off. That's another option you've got us to be able to just work these kinda off of there. If you can, use your snap ring pliers, but again, the tips on these, they do wear out over time. We probably should get new tips here. We'll go right ahead and get the other side kind of popped off of here. And with these clips, it's always a good idea to keep your hands kinda nearby and on here because these things can shoot off of there. And keeping your hand on there can help prevent it from getting lost. And there we go. We've got it popped off of there. So if you look at our tips there, you see they're pretty worn. So if you can see that, you probably wanna get yourself a different set to make sure you can get in there. And then, here's a closeup look of those two little holes. So now that we got that off there, we're gonna toss that inside of the cap so we don't lose it. We're gonna need to reuse that. And now, we can get the nut off of our assembly there. We're gonna be using a 1 7/16 socket to remove it. And we are gonna use an impact on here to remove it, but you do not wanna use an impact when installing these because you can actually damage the bearing when putting it together. There we go. And after we took that nut off, our paper did fall off of there. So we're gonna make sure we put that back on. That's why I recommend taking a picture just in case you lose it, you know A gust of wind blows by, and that could easily be gone. All right. So now that we've got our nut off, the assembly actually just comes apart. You might be thinking, "Hey, your traditional ones, "you gotta slide your bearings out "and you got your washer and stuff on there, "and then you gotta knock out that inner," and all kinds of stuff. But with these Nev-R-Lubes, all that we've got behind that nut is our washer. So pull the assembly, a washer falls off of there. And then, the whole assembly comes off, and the bearing's actually pressed inside of this hub. So we don't have any grease seals or anything we need to worry about. We just set this aside. Our new one will have the bearing pre-pressed inside of our assembly here, and we can kinda see there's a lot of brake dust in there, got a little bit of hot spots. It would be a good idea to check for roundness on this if you're planning on reusing it to see if it's, you know, still true and round, if it would need to be machined, see what the tolerances are. Usually, you'll find tolerances written on your drum, so you can verify if it's machinable or not. This thing's pretty rusted up. So right here, it does say max, min, drum diameter right there, 12.09. So if you we're planning on machining it, you can measure the inside diameter here. You'd wanna check it at multiple points to check for trueness. If it's true, it'd be the same distance all the way around this thing. And if it's not true, if you got different numbers, you know, from here to here versus there to there, you know, it's not round, you can send this to a machine shop. But if your numbers that you're measuring there are already larger than your maximum diameter, then this drum is trash. It needs to be replaced. It cannot be machined any further. You've exceeded its maximum tolerance. So those are the things you could use to check to see whether or not you're gonna reuse this or not. And we're gonna be replacing 'em. Got a little bit of grease leaking out from inside the bearing. It's not too terribly bad, but to give our customer's peace of mind, he wanted to replace them, so we'll just set this aside. So now, we'll look over here at our drum brake assembly. We wanna take a look at our shoes and boy, he got his money's worth out of these. They're pretty thin. I mean, there's still some meat left there on the shoes, but he definitely wore 'em down good. So these are fairly worn. On this side, everything's all good here. When I checked the other side, I took this off just to inspect it and some of the springs just fell right out. So this side looks a little bit better working condition than the other side did. But these shoes are definitely worn thin. There's a little chunks missing out of it here in a couple of spots. So we're gonna get this replaced to make sure we get these working once again. It's always good to look down here at the magnet too. It's good to look to see if you have contamination in here. If you got grease and stuff like that in here, you got any grease on your magnet, it's not gonna wanna grab on your drum on the inside like it would. So you make sure you get that all cleaned up if you're trying to reuse stuff here. So we're gonna be replacing the whole thing, so there's no reason for us to clean anything up here. There's just the five nuts here that we'll need to remove to get this off. And then, this is an electric drum brake system, so it's got an electromagnet here that gets energized from our brake controller. We'll need to snip the wires off also. They poke through right here, and then they're on the backside. So we'll be cutting these. We can probably go ahead and do that right now first thing. So now, we're here on the backside. We're just gonna snip the wires to separate our brake assembly here from the rest of the trailer. Our wire coming out of our axle here, we need some length here to be able to use to connect our new one. So we're gonna make sure we got some saved here. So we got plenty of length there that we can use to hook up our new assembly we're gonna be putting on. Now, we're gonna use our 9/16 socket to remove all the nuts. Right now, we've got all the nuts removed. Our assembly just slides right off of there. Backing plate and all. And then, so you can get just a better look at it. This is actually a, the hardware and stuff on here looks like it's in okay condition. It's just the shoes are pretty worn. Got some cracking definitely going on, on these shoes. So definitely need to get these replaced 'cause once the bottom breaks, they'll just scrape in the metal inside of your drum there once the friction material here breaks off the bond, and it's pretty badly cracked. But realistically, you could probably clean this up and replace the shoes. I will say replacing just the shoes is a significant time increase on replacing your brake components here 'cause you gotta get all these springs set back up again and also adjust it. We're gonna adjust the new ones we put on as well, but you usually have to do more adjusting when you replace the shoes just 'cause you're throwing it so far out trying to get this thing in. There's some special tools that you don't have to have but boy, does it make removing the shoes a lot easier for certain things here. There's the spoons for removing your springs as well as like a cup-type screwdriver that fits on these to remove those. So we do have those tools available here if you need to get those. But I highly recommend just buying the full back plate assembly. That way, you don't have to worry about accidentally doing something wrong, you know, get back out on the road, you didn't put something on right, and it flings apart. You just have a pre-built assembly for it that you can slide on. It's gonna save you a ton of time too 'cause you'll see how easy it is to replace your brakes here when we set this aside. And we'll simply grab our new one, and you can see all the hard work's been done for us. They've got the shoes installed, everything is set up nicely for us. It's all clean. We don't have to worry about getting anything clean 'cause if you we're replacing them, there's a couple lubrication points for your components on the backside. Wherever it touches on the back plate, you'd wanna lubricate. And you wanna make sure you remove all the lubrication from your magnet here. So we don't have to worry about doing all that. All that's done for us. It's clean and lubricated in all the appropriate spots and set up. So it makes things way easier 'cause all we have to do is take this assembly here, slide it back into place. Make sure you grab your wires, and make sure they don't get pinched when you're putting these on here. Your magnet goes at the bottom with your anchor point here at the top, so that way it looks just like your old assembly. And then, it's as easy as reinstalling the nuts that we just removed. So you can see the huge time save of just removing these five nuts and replacing the whole shebang versus trying to do just the shoes. And it's not uncommon for these springs and stuff to get weaker and stuff over time. So you know, you're not only saving yourself some time, but you're ensuring you have a well-working system that's gonna last by just replacing it all. As you try to salvage parts, the integrity of those parts that you're reusing may not last as long as these brand new parts here. So you can think about all that time that saves in the long run. We can then snug up these bolts and torque them to the manufacturer's specifications. So here, we've got our new drum assembly next to our old drum assembly. It's gonna be the same bolt and thread size as our other one. So you got the same bolt pattern and stuff, so that way you could reuse your lug nuts. Our wheels are gonna fit right on there and stuff. And we do got these in different sizes, so you would wanna double-check to make sure you're matching this up with your trailer. Make sure you got the same diameter bolt. Whether, you know, it's half, 9/16, 5/8. These are 9/16 on these here, so we're matching all this up. If we look inside at our bearings, you can see this one here, the bearing is installed in there. We got a snap ring that holds it in place, and we can see that it's got some of the grease leaking out of it here. Just a bit, not too bad. Nothing's too leaky, but we are leaking some of our grease out of there on our backside here. You know, you can see some of that grease is kinda getting in there too. That brake dust collects on that grease there, but it's not too bad. It's not flowing all over the place in here. But it was starting to leak that out. It's just gonna get worse with time. Putting those bearings in there normally would have to be put in with a press, like a hydraulic press. So at home, you probably don't have one of those. So here, you can see our new assembly. It is pre-installed for us. So that way, we don't have to have a hydraulic press. The snap ring's already installed in there. You can see it's nice and clean in here. We don't have any grease leaking. This is a pre, like packed assembly. The grease is already inside of here. Our inner raise here meets right up to the other inner raise on the other side, and all that grease is held in there. You can see that there's a tiny little gap between those two inner raises. So this is very similar to what you'd find on a lot of your, actually a lot of like the Japanese automotive manufacturers. They usually use kind of a pressed-in bearing style that's very similar to what you see here. And there's a couple of things that you need to keep in mind when using this style. This style's pretty nice, it's pretty robust, pretty easy to work with. But those inner raises there, those can come out of there, and you just wanna pay attention when you're putting this thing together. So we're gonna be sliding this together here in a minute, and I'll just kinda just point that out when we do that. But you can see, it's already basically just everything's done for you. They got a press in, they got all the snap rings installed, everything's nice and clean, so it's ready to pretty much just slide right on there. We are gonna tend to our spindle real fast before we slide it on, get the grease off of here that was on here. And we are actually gonna use some anti-seize on this spindle here just to make the installation and removal if we, you know, need to service this in another, whether 10 years or whatever, we'll be able to get this thing off of here again. So we're just cleaning that up there. We got some copper anti-seize here. We're just gonna smear it around on the outside all the way around. That'll help our assembly slide together a little easier. We're then gonna come over here to our bearing, and I like to put just a little bit kind of on the lip of that inner raise. Really don't need it too much here on the outside, but on the inside lip here, this way, when you're going to try to line it up on there, you got a little bit of lubrication to help get it centered on that spindle. There we go. Just a little bit right around there. And now, we're ready to take our component here and put it together. We're gonna remove our sticker from the inside here 'cause that's just, I mean, there's a little bit left in there. It's fine. It's just gonna get worn off and eaten up, but we wanna get the bulk of it out of there. All right. So here, we've got our drum. We're just gonna line it up here, and you see how it just slides right into place, right on there. Now, I didn't push that hard. If you're, like if this is stuck, you don't wanna just start slamming on this with a hammer. You know, if it's out here like this and it just doesn't wanna go any further, if you start hitting on the drum here, what can happen is if this inner raise here is stuck on the spindle, you can actually pop that inner raise out. And once that happens, it is possible to put that inner raise back in, but more than likely you're gonna have some bearing issues that's gonna make some noise. Typically, you destroy the bearing once that raise comes out. So you don't need a lot of force, just kinda slide it in. If it gets stuck like this, I'll show you here what you'll wanna do. If you need to persuade it at all, you wanna make sure you're using something that's gonna ride on this inner raise. 'Cause we don't want that inner raise popping out, so you can find yourself a socket, put it on there, and then use that to tap it in. That way, you're tapping it in and pushing on that raise, so we don't ever lose those inner raises. So here we go, that guy's in there. Now, it's just reinstalling our components. So we'll take our washer. We'll put that back on. Take our nut, put this back on. And here's where we don't wanna use an impact. We're gonna run that down, but I'm gonna use my impact just for a second. But as soon as with this washer here, as soon as we touch that, we're gonna stop. 'Cause we do not want to have the impact putting pressure on the bearing. So just hit it a little bit. Just try to take up some of this play. All right, so we're snugged up to it now. That's where we want. We don't wanna hit on that bearing with our impact like that. We're just taking up the play real quick. You can see I can still spin the washer just a little bit here. So we haven't put any impact force on that bearing yet. Now, we're gonna switch over to our torque wrench, and we're gonna torque it to the specifications from the manufacturer, which was on that sticker right here. So there's our specs. We're gonna set it up into that range there, and then tighten it down. So make sure you're following the specs written on yours. There we go. And the main reason why we don't wanna use the impact on there is 'cause with the impact, you don't have control. It could easily hit and you can easily over-torque this. And if you over-torque 'em, that pressure that's on there can cause the bearing to wear prematurely. You're gonna get some noise, and it's just not gonna last nearly as long as it would if it's over-torqued. I've seen them fail as quickly within a month if somebody just barrels it on there all the way as hard as it can go with an impact. So it is important that it's torqued properly. We're then gonna put our sticker back in place. Now, it's pretty difficult to get that sticker back around the, like lip of the nut there without tearing it. So I found it's fine as long as it's in here. So that way, you've got the sticker, so you can verify what the torque spec is the next time you need to get in here if you ever need to service it again. So we're just gonna get it on the threads of the spindle here, and that'll be plenty fine. That way, it'll be in here. You know, the spindle doesn't spin. It's the outside here that spins, so it should be just like that and protected in here. Next, we're gonna put our snap ring on. And what I usually do is I'll kinda get the bottom somewhat started, and then I can squeeze open the top here and slide it on. There we go. We got the one side. If you notched a little bit too far but the other's about okay, you can usually just pop that back with your screwdriver here a little bit right there, right into place. Double-check ourselves all the way around. There we go. We can rotate the snap ring on there, but it's not gonna come off. So now that we got that back into place, we'll need to reinstall our cap here on the end and that just pushes back in there. We do have replacement caps here at etrailer if you happen to damage 'em. And then, just tap that in all the way around. And we're using our dead blow here for all of this just to try to keep things nice. If you use a steel head or a metal head hammer, you're gonna ding up and put little dings in this. The dead blow helps minimize any damage to any components. So now that we've got our assembly kinda all installed here, we need to hook our wires back up. So these wires that are coming out the back, they're both black. There's no polarity or anything required. We just need power and ground to activate the system here, and it gets that from the brake controller. So we can hook up either wire that's coming out of our brake controller here to either of these wires. It won't matter which one is power and which one is ground. And that's what these two are gonna supply from the output of the brake controller. So we're gonna go ahead and just check the length here. I think I'm gonna strip a little bit more off of the wire coming out of the axle. We don't need that much excess. We'll then cut in between these two wires if you have where they're kind of made together. Then, you can peel 'em apart afterwards. There we go. And we can peel it. We're gonna strip back each of these ends. This particular wire that's on here happens to have a second sheathing under that, so just check to see if yours do. Most of 'em don't. It's probably specific to this particular trailer here, so we're gonna get that all stripped off. There we go. We can now easily access our wiring here, and we're gonna crimp a butt connector onto the end of each of these wires. We're using heat shrink butt connectors since we are outside here in the elements. We're not inside of our trailer where it's protected against moisture. You can get these here at etrailer if you need some. Just slide that on and crimp it down. Do the other wire here. And now, I will attach our other end just to our wires. They do come pre-stripped, although I like to strip just a little bit more off of there, makes it a little bit easier to work with. All right. And then, we're just gonna slide each of these and one into the other side of one butt connector, and then the other one's gonna go to the other side of the other butt connector. And we'll crimp those down. If you need wire strippers or crimpers for doing this, we do have 'em available here at etrailer. Okay. So now that we got those crimped down, we can grab our heat gun and we can shrink down our butt connectors. That'll seal 'em up. There we go. So we've got this guy installed now. The only thing that we really have left to do on this side is to adjust the brakes. We wanna feel a ever-so-slight drag as we go around. I feel like we got just a hair there, but we need to adjust it just a little bit more to make it right, and our adjustment's located on the backside. We're now on the backside of our new brake assembly that we just installed. This is the back plate here. We need to make our adjustment now for the braking system. They are supposed to automatically adjust and stuff, but you're just gonna get better performance and longer life out of your system here if you just do the initial setup. So to do the initial setup, we're gonna pop out this cap here. We're just gonna use our screwdriver to do this. We just gotta get up under it, and then it just pops right out of there. And then, our star adjuster is inside here. You can use your screwdriver here to adjust the small star wheel where you just kinda hook it onto one of the little points of the star and using it to either push it to turn it up or to turn it, you know, down. Whether clockwise or counterclockwise. This is a brake adjustment tool here. This is kinda what it looks like. It's really pretty similar to a flat-bladed screwdriver, but it's wider. It's a little bit different angles here to make it easier to fit up in there. It's not necessary. The screwdriver does work, but if you've got one, it is a little bit easier 'cause it just fits in your hand a little better. The wider end hooks on the star a little bit better. So now, we're gonna go ahead and adjust it. So when you get these, more often than not, you have to increase the pressure. It doesn't have enough pressure usually. So what you'll do is while you're down here, take one hand and just give it a spin. Probably spins really free right now. Probably don't feel any rough spots or anything like that. No dragging. We wanna have a very subtle drag on it. So we're gonna adjust it. If we stick our spoon in and we push upwards on the wheel, so we're pushing the star up, which would turn it, you know, this direction with the top going around. That'll increase our pressure. So we're gonna take out play by doing that. If it's too tight, you would go the other direction. We'd be pushing the star down, turning at the opposite direction. But we know we need more pressure, so I'm gonna hook it here on the bottom, and then just push up with the tool to turn the star wheel. And based on how it felt, definitely need to go pretty far. So I'm gonna just go ahead and put a few turns in it. Normally, when you're doing this and you're pretty close, one notch makes a pretty big difference, but we're pretty far away. So let's do a few turns. Yeah, we're still not even touching there. So we'll just keep on adjusting. So you see here, if you didn't adjust this, it will, you know, automatically adjust itself, but it's gotta take out a lot of this play. So the first few stops and stuff, you're not gonna be getting the optimal performance out of it until it is fully adjusted and it could potentially adjust certain brakes at a different speed than the other one. So it's just nice if you just do it yourself, get 'em all set up. And that way, it's gonna work properly. As soon as you get outta here, they're all gonna kinda wear evenly, kinda the same with one another as long as you don't have any issues that's causing something to not work properly. So this feels pretty decent here. You see how I spin it, it kinda stops. I can feel that it's not dragging the entire time. There's just kind of a spot that it comes around and it kinda hits. And that's kinda what you're looking for there. We don't want it to be too hard to turn here or else you'll burn your brakes up. But we do wanna be able to kinda just feel that when we spin it around, we touch on our pads. That way, we know we've taken out most of the play. We've got our brakes pretty well adjusted. Another way you could do it is you could just keep on going a little bit. And now, I can barely turn it. So that way, you can feel what it feels like when you've gone way too far. So now, we can back it off just a little, and we're just changing the direction. We're turning the wheel now. And now that we've backed it off, we're at a pretty similar spot here where it's fairly smooth, but then we kinda hit that spot. I think I might take one more click out of it. It's the wrong direction. Okay. And that feels pretty good. We can feel we're kinda free at certain spots. We've got a slight drag in other spots. This feels like a pretty good spot that's not gonna be too excessive, but it's gonna allow us to have a small gap there. So when the brakes do apply, they can apply quickly and strongly. So now we've got that adjusted there, we're just gonna pop our little cap back in down here. And we're gonna repeat this process for all the units that we replace. So we've done this all the way around of the trailer, so we repeat this on the other side, and then we did the same thing for the other axle. So that way, we've got fully functioning brakes all the way around, and we're of course gonna adjust all those. Once we've got it adjusted here, it's a good idea to test it to make sure it's working. Because you could have some issues with your wiring and stuff here, you don't know whether or not these work as we haven't tested 'em before. We already verified that we had, you know, our output back here to the brakes from our controller. But we're gonna go ahead and plug in our tester just to make sure that each one of these, when we apply the output from the brake controller, that it does stop it from turning. And then, that way we'll know that, hey, each one's working. All the wiring's good, everything's good, and we can just put our wheels back on from there. So I've got an assistant at the front with our test box that simulates a brake controller. You can see here, we can spin it. Go ahead, Shane. And as soon as he turns on the brake controller, it locks it up. So this one's working properly. Go ahead and let off, Shane. And he lets off, and it releases. That's all we really need to see to make sure that our brakes are applying and that they're releasing properly. It's a good idea to repeat this at each one just to make sure that you've installed them all correctly. But if it's working properly on all those, then you're all good to go. We'll get these wheels back on. And that completes our installation of etrailer's drum brake and backing plate assemblies..

half of brakes came apart in shipping
Info for this part was:
At etrailer.com we provide the best information available about the products we sell. We take the quality of our information seriously so that you can get the right part the first time. Let us know if anything is missing or if you have any questions.


Thank you! Your comment has been submitted successfully. You should be able to view your question/comment here within a few days.
Error submitting comment. Please try again momentarily.