
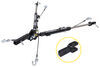
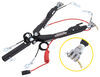
Brake Buddy Stealth Supplemental Braking System - Proportional
Item # HM39530
Retail:$1,459.14
Our Price: $999.75
You Save: $459.39
Confirmed to Fit
2018 Volkswagen Golf
Will this fit?
To see if this custom-fit item will work for you please tell us what vehicle you'll use it with.
This item qualifies for Free Shipping
In Stock
Thank you! Your comment has been submitted successfully. You should be able to view your question/comment here within a few days.
Error submitting comment. Please try again momentarily.


- All Info
- Reviews (78)
- Q & A (0)
- Photos
2018 Volkswagen Golf - Brake Buddy Stealth Supplemental Braking System - Proportional
- Brake Systems
- Hydraulic Brakes
- Proportional System
- Brake Buddy
- Fixed System
- Power Assist Brake Compatible
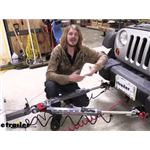
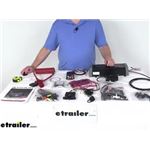
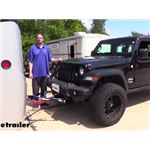
Get fully proportional braking with a system that never has to be removed, replaced, or reset. Actuator installs out of sight and remains virtually invisible when your car isn't being towed. Controller also works as a trailer brake controller.
Features:
- Supplemental braking system applies towed vehicle's brakes in proportion to braking action of RV
- Towed car's brakes are activated at the same time and with the same intensity as those in your motorhome
- Sensitivity control lets you adjust rate of responsiveness of braking sensor
- Low sensitivity requires intense stopping action from RV to activate towed car's brakes
- High sensitivity allows towed car to respond to light braking action of RV
- 1-Time setup - no need to remove, reposition, or reset system
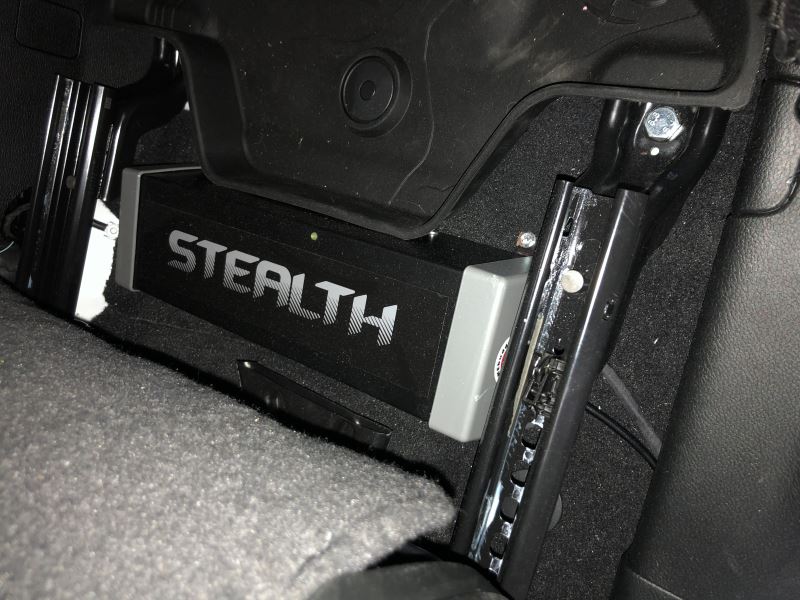
- Main unit installs in an out-of-the-way spot, such as in the trunk
- System automatically functions when RV and towed car are connected
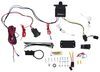
- Controller with digital display mounts in your RV's cab
- Lets you easily adjust braking sensitivity
- Shows braking action and breakaway status
- Doubles as a proportional trailer brake controller
- Built-in battery protection keeps your towed vehicle's battery charged as you tow
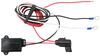
- Main unit connects directly to your towed car's battery
- Vacuum pump restores your car's vacuum after each braking event
- Puts less strain on your towed car's brakes
- Ensures compatibility with hybrids and other continuous power-assist vehicles
- Low-profile, 7-way flat connector offers simple hookup and a clean look
- Built-in breakaway automatically activates towed vehicle's brakes if plug disconnects
- 4-Way vehicle-end plug connects to 4-way of tail light wiring kit (sold separately) on towed car
- Flex-Coil adapter lets you easily hook up your towed car to your RV
- Specially designed 7-flat connector plugs into the port installed at the front of your car
- 7-Way, blade-style connector plugs into your RV
- Nite-Glow connector lights up to confirm connection between your RV and vehicle
- Coiled cord won't drag on the ground
Specs:
- Actuator box dimensions: 14-1/2" long x 5-3/8" wide x 3-3/8" tall
- Controller dimensions: 3" wide x 5" long x 1-1/4" tall
- Power draw: 5 amps
- 5-Year warranty
A supplemental braking system is crucial when you tow a car or truck behind your RV. Without it, the weight of the towed car can create a safety hazard, strain your RV's brakes, or affect your RV's warranty. Most states require a supplemental braking system.
Automatic, Proportional Braking
Instead of being a time-delayed system, which brakes at a preset level, the Brake Buddy Stealth is a proportional system that delivers consistent braking. The Stealth will activate the brakes in your towed car with an intensity that matches the braking action of your RV. The result is smooth, even braking across your entire flat-tow setup.
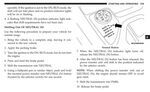
Brake System Controller
The Brake Buddy Stealth controller mounts in the cab of your RV and functions like a proportional trailer brake controller. This means that the braking intensity of the system is based on your RV's deceleration. So, if you slam on the brakes in your RV, your towed car's brakes will activate with that same harsh intensity. And if you gradually slow down as you approach a red light, your car will steadily brake in the same light manner.

The above diagram shows the controls and components of the Stealth controller unit.
A. Mode indicator
B. Sensitivity adjustment button
C. Power level control buttons (trailer braking mode only)
D. Digital display
E. Test button (supplemental braking system mode) or manual override (trailer braking mode)
F. Mode control button
G. Mounting bracket slots
Internal Inertia Sensor
As long as the controller sits level on a horizontal plane and is pointed in the direction of travel, its internal inertia sensor will sense how your RV brakes and respond to the deceleration of your RV. It signals the actuator box to move the cable that attaches to your towed car's brake pedal so that the car's brakes activate with an intensity that matches your RV's braking.
Adjustable Sensitivity Settings
You can fine-tune the power output on the Stealth by adjusting the sensitivity of the internal sensor. Set the sensitivity low and the Stealth will only respond when you step down hard on your RV's brake pedal. Set the sensitivity high and it will respond even when you lightly tap your RV's brakes.
Use the adjustment buttons on the top of the controller to set your preferred level of braking intensity. Level 1 offers the least amount of sensitivity, making it ideal for lighter loads. Level 7, the highest level, provides the harshest braking. The heavier your load, the higher you will want to set the brake sensitivity.
Easy-to-Read Digital Display
On the front of the controller unit, there's a digital display that is designed to keep you informed about your towed car's braking action. This screen shows the braking sensitivity level, power level, and any error codes that might appear as you tow, such as a short circuit.
Mount Controller in Your RV's Cab
Mount the controller anywhere in your RV's cab that is within easy reach. It's recommended that the controller be mounted at an angle between -20 degrees and 70 degrees. Note: The Stealth controller must be mounted on a level horizontal (side-to-side) plane and must be lined up with the direction of travel for the internal sensor to function properly.
To install the controller, you will have to splice into your RV's wiring and connect the unit to your battery, stop light switch, and 7-way trailer connector. To do this, you will need some additional wiring and either a 20-amp circuit breaker or an in-line fuse. If you don't already have a 7-way trailer connector at the rear of your RV, you can use etrailer.com's exclusive 7- and 4-way brake control installation kit (ETBC7 - sold separately).
Trailer Brake Controller Functionality
The Stealth controller doesn't just work when you're towing a car. It also acts as a proportional trailer brake controller for when you're towing a trailer. Just press the mode control button on the side of the controller to switch from supplemental braking system mode to trailer braking mode. Then hook up your trailer to your RV. The Stealth controller works with trailers that have up to 4 axles (8 brake assemblies) and electric brakes.
When in trailer braking mode, the Stealth controller allows for the same smooth, proportional braking that you'll receive when you're towing your car. Slamming on your RV's brakes will signal your trailer to brake just as intensely. Steadily slowing down before a red light will signal your trailer's brakes to react just as gradually. Just set the initial power level, select your sensitivity setting, and you're ready to go.
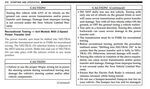
Low-Profile, Semi-Permanent Installation
Some proportional braking systems are bulky, and they must be repositioned and reset before each use. And if you want to drive your towed vehicle, you need to remove the unit and find a place to stow it. With the Brake Buddy Stealth, a 1-time setup is all that's required, making it faster than ever to get your car ready to tow.
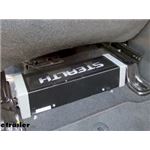
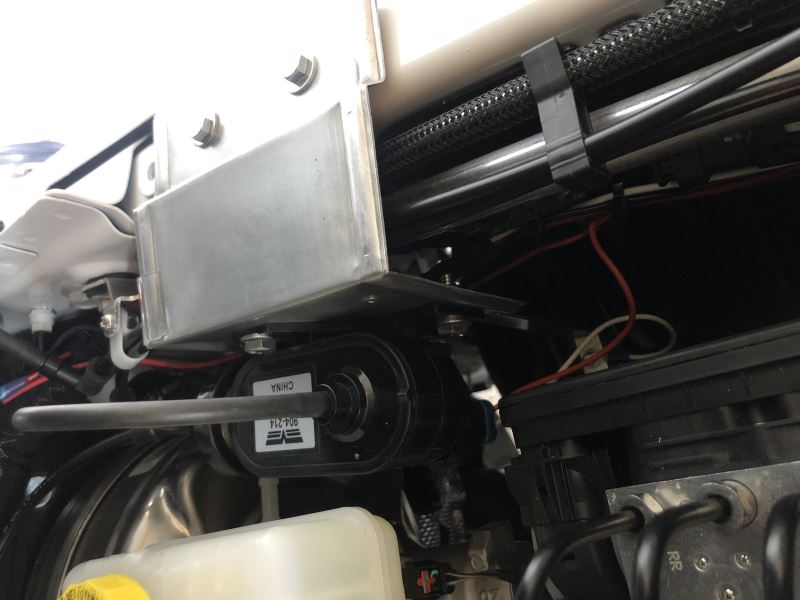
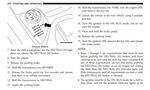
Actuator Box and Cable Pulley

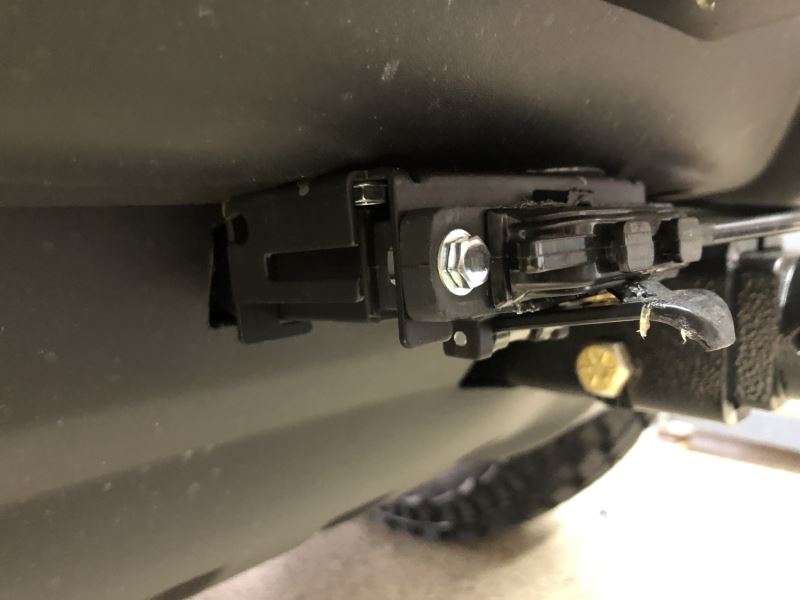
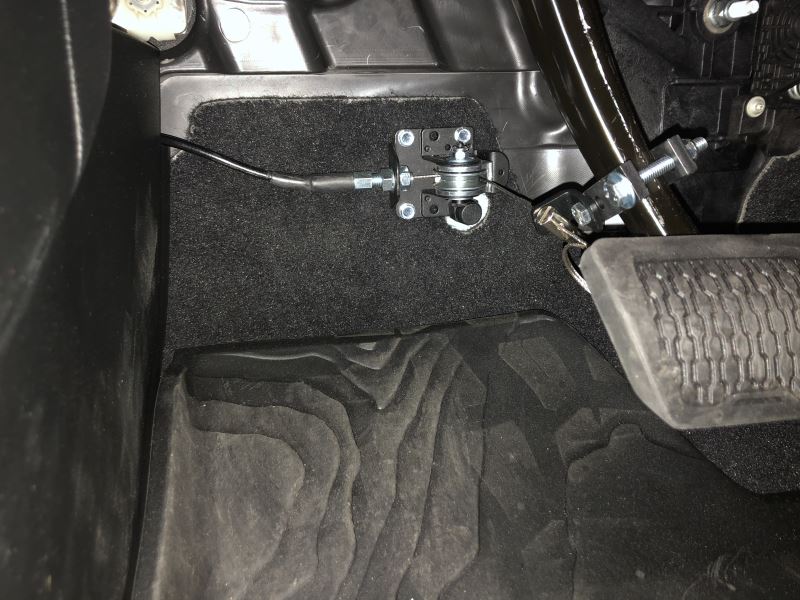
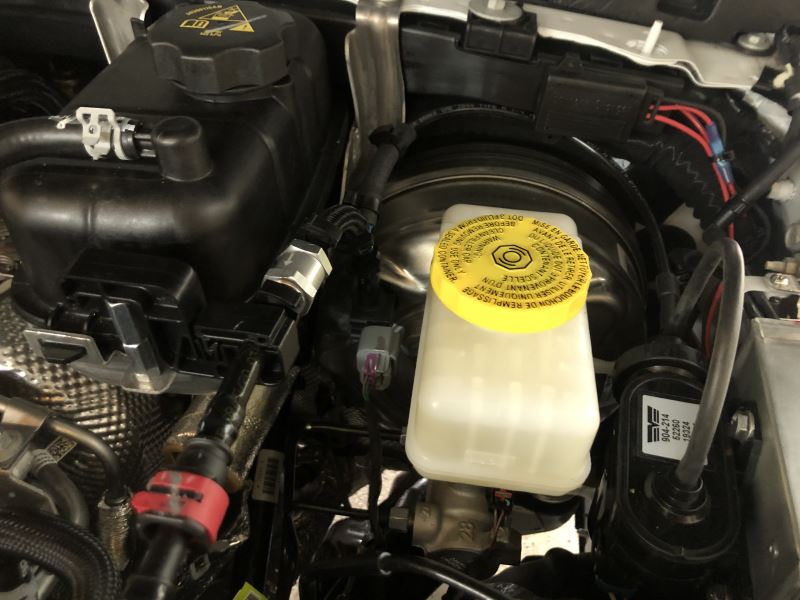
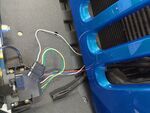
The main actuator box installs in an out-of-the-way location in your vehicle, like in the trunk. The box's wiring connects to the 7-way flat connector that installs on the front of your towed vehicle. The black cable runs to the cable pulley system that installs on your car's brake pedal, so that the brakes can activate properly.

Because the installation is semi-permanent, you don't need to reactivate any parts when you're getting ready to tow, nor do you need to remove anything when you're done towing. The Brake Buddy Stealth can stay in your vehicle year-round. Once you're ready to tow again, just plug your towed car into your RV and the system will automatically begin functioning.
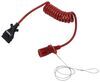
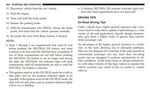
Exclusive Connector and Adapter Cord

The Brake Buddy Stealth uses a novel 7-way flat connector that mounts at the front of your towed vehicle. Unlike standard 7-way connectors, this low-profile socket stays out of sight when you're not towing. A dust cover is included to cover the connector when your vehicle is not connected to your RV.

All of the electrical functions that you need are built into this single connector.

The diagram above shows how the 7-way flat installs.
Wire 1 connects to your vehicle's battery.
Wire 2 connects to the vacuum pump included with the Stealth.
Wires 3, 4, and 6 connect to the corresponding, color-coded wires on the Stealth's main unit. These wires have quick-plug ends for simple plug-and-play connecting.
Wire 5 is the ground wire. (Note: A ground wire extends out from the main unit as well. Both the 7-way flat and main Stealth unit must be grounded.)
Typically when you wire your towed car to get the signal lights required for towing, you will run a 4-way to the front of the car. This 4-way then has to be connected to your RV with a separate loop every time you tow. But with the Stealth, a wiring harness with a 4-way flat, vehicle-end plug is built into the back of the included 7-flat connector so that you can just plug in your towed car's tail light wiring kit.

The Brake Buddy Stealth system includes a coiled adapter cord that connects to your RV's 7-way, blade-style socket on one end and to the 7-way flat socket that installs on your towed car at the other end. The RV-style plug has Nite-Glow technology, so it will illuminate when connected to confirm that the plug is receiving power from your RV.
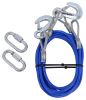
The adapter cord also comes with a built-in breakaway cable. If the cord comes unplugged from your RV while you're towing, the Stealth system will enter breakaway mode and your towed vehicle's brakes will activate. Note: The dust cover must be inserted into the connector when the car is not being towed to prevent the Stealth from going into breakaway mode.
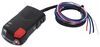
Vacuum Pump

For many cars, trucks, and SUVs, the vacuum-assist function of their brakes stops working when the engine is off. As a result, many supplemental braking systems have to apply an extreme amount of force to activate the towed vehicle's brakes when it's being flat towed. The Brake Buddy Stealth's vacuum pump is designed to restore the vacuum force in your towed car's brakes each time the brakes are activated. No need to have a system that exerts a large amount of force to bring your towed vehicle to a stop.
Install the included vacuum pump under your towed car's hood to ensure that its vacuum-assist brakes operate correctly while the car is being towed.
Note: If you have a vehicle that has continuous power-assist brakes, you do not need to install the vacuum pump.
39530 Break Buddy Stealth Fixed Proportional Towed Volkswagen Golf Braking System by Hopkins
Installation Details Alternate Instructions
California residents: click here


Customer Satisfaction Score:
85% were satisfied with this product
15% of customers were not satisfied
- Wrong item was ordered
- Too difficult to install
- Product did not meet expectations
Customer Reviews
Brake Buddy Stealth Supplemental Braking System - Proportional - HM39530
Average Customer Rating: 4.2 out of 5 stars (78 Customer Reviews)
Get fully proportional braking with a system that never has to be removed, replaced, or reset. Actuator installs out of sight and remains virtually invisible when your car isn't being towed. Controller also works as a trailer brake controller.by: Sam J04/14/2022
I am a proficient DIYer (and was an auto mechanic many years ago). The installation took a lot of time - perhaps 8-10 hours for the brake controller. The most special tool needed was a rotary cutter (e.g., a Dremel tool). A cordless impact driver was also very helpful, especially with the self tapping screws.
Getting the pully in the perfect position under the brake pedal took some trial-and-error to get perfect. Also, the included bolts for the brake pedal bracket where too short to accommodate the width of the brake lever - easily remedied with slightly longer standard bolts. Be very mindful of what is on the other side of the sheet metal you are planning to drill into.
The brake supplemental vacuum system was a bit of a challenge, as the instructions are very vague regarding how to mount, and the space I had to work with was surprisingly tight. I ended up creating a mount on the inside front fender, and bolting the pump to that. Also, tapping into the vacuum lines took a couple of tries to get a leak-free connection. Think ahead about this, and be prepared to get a few small parts like hose clamps or right-angle hose connectors. This would be a potential consideration for any vacuum boost added on any vacuum power-assist application with any controller.
I mounted the Brakebuddy main unit under the rear seat - that was a perfect location, and much better than the often suggested location under the driver's seat. I was very pleased with the installation result.
I paired this with a Nighthawk tow bar. Be warned that the tow bar's included cable will not be compatible with the Stealth, as the Brakebuddy uses a proprietary connection at the towed vehicle. The upside of this proprietary connector is that all connections are build in, including the brake away cable and the battery charging line.
(I modified the Nighthawk by replacing the included cable with a 4-pin cable to power the lighting system on the bar. This is just for extra safety and cool looks - I could have just not used the tow bar's included cable).
With 1,200 miles of towing behind us, I can say I am very pleased with the performance. I rarely notice any difference in braking effort or effectiveness - which is a big advantage for a proportional system. My favorite feature is the ease and speed of connecting or disconnecting the towed vehicle.
I'd give this a 4.5 stars out of five if I could, because I did need to add a few parts and make a couple trips to the hardware store to complete the installation. However, the excellent performance and ease of use once installed more than makes up for the inconvenience during initial installation.
Special appreciation to the people at eTrailer, especially Nicole T, who provided support and guidance from pre-sales to installation. Also, I called Brakebuddy's support line with a concern, and they immediately picked up the line, addressed my question, and offered to immediately ship any parts if needed.


by: Jerry J01/23/2021
I choose the Brake Buddy Stealth for my 2021 Jeep Wrangler because I wanted a “stay in place” brake system and felt it would be a clean looking installation. I finished the toad side of the installation today and thought I’d leave some notes on what turned out to be a bigger project than I’d anticipated. Again, this is my experience on the 2021 Jeep Wrangler 2-door. Your experience on other vehicles may vary.
I started this install after installing a Demco Tabless Base Plate. Right out of the blocks, there’s really no convenient location to mount the cable connector to the Demco baseplate. I chose to mount it to under side of the bumper on the driver’s side. To provide clearance and a route for the wires, I had to cut a notch into the plastic air dam. I used one of the already screw screw holes and used self tapping screws in the other three locations. For added strength I epoxied the connector to the bumper as well. Since the bumper would be unremovable if the connector were hardwired, I added a waterproof connector. The kit is stingy with wire lengths, so I substituted my own wire.
The Stealth unit itself i mounted beneath the driver’s seat. Don’t be fooled into believing there is clearance when testing with the driver’s seat positioned for rear seat access. Once the seat is returned to normal operation it lowers a bit and the box keeps the seat from being move forehand aft. I solved the problem by installing 5/8” thick nylon washers under the rear end of the seat slides. I also cut away a bit of the carpet under the front, inboard corner of the box. You will need to remove the driver’s seat in order to attach the front screws of the box. Be sure to disconnect and isolate the neutral battery terminals to prevent inadvertent air bag discharge. After removing the interior trim from the A-pillar, the door sill, and the driver side foot well, The wiring and cable tucked nicely away along with the OEM wiring and wiring for my taillights. I mounted the pulley horizontally behind the brake pedal.
Installing the vacuum pump was my biggest worry and challenge. Instructions are to zip tie it “somewhere”. That seemed pretty casual for a safety system. I chose, instead, to fabricate an aluminum bracket that attaches to the lip of the engine compartment and to the wheel well (this latter attachment point is necessary to keep the pump from vibrating).
Finally, the kit comes with 3/8” fittings to tap into the brake booster vacuum lines. The Jeep, however, uses 8mm nylon tubing. Brake Buddy, via etrailer.com, stated that the tubing would stretch and all would be good. Again, this felt casual for a safety system. Instead, I purchased an 8mm check valve and a 8-6-8mm barbed tee through Another online retailer to do the job right. I had to heat the Jeep tubing to fit even the 8mm tee, so the is no way the larger 3/8” fittings would have worked. See photo of my finished vacuum line installation.
Bottom line, it was a POA install, but looks great. Hopefully it will stop the Jeep when towing. I’ll find out soon. :D

Jerry J.

1/24/2022
The Brake Buddy performed fine on all of our trips in 2021, including some mountainness terrain. We learned early, however, that the Stealth unit installed in the Jeep is temperature sensitive. On chill morn8ngs we need to start and run the Jeep with the heater at full blast for 5-10 minutes before setting out. Otherwise we get false breakaway signals in the cab controller. The connector on the Jeep side is also touchy resulting in turn signal failure notices on our motorhome dash. The manufacturer hasn’t been very sympathetic nor helpful with either issue. In short, we are able to use the system, I’d not recommend this product today.

Tom M.
8/3/2022
Finally stable. The vehicle side connector is difficult to mount and quickly got corroded. The built-in trailer breakaway function did not fail but the wire that is used to send the signal to activate the brakes was very flakey. It caused several false breakaway signals in the RV. I also had trouble with the wire from the front of the RV but the vehicle mounted connector was the main problem. Eventually I moved the breakaway wire to the closed contacts of a relay and added a conventional breakaway switch. The relay is necessary because the supplemental brake system senses a breakaway when a circuit gets opened and the conventional switch makes a connection. Mounting the pulley under the brake pedal was a pain but no more so than with a different system I installed in a different car. Now that it is working I think it is a good system but if I do it again it will be a system that doesnt depend on a signal from the RV. A more serious hassle is the brake actuator cable. Make sure you mount the actuator box on a position that allows for the absolute straightest and shortest run of actuator cable. The longer it is, the straighter it has to be. Tech support was really awesome! This system is more sophisticated than others I have considered but that sophistication makes it harder to have a reliable system.
by: Vincent04/02/2024
Install was not that difficult. But I could never get it to work properly. The idea of the inertia sensing being on the sending unit in the coach was an issue. It was never able to be adjusted correctly. I could go for hundreds of miles without an issue but then when entering an on ramp or exiting a ramp the brakes on the car would lock and disengage then lock again. I would have to go five MPH for it to allow the car to not apply its brakes. Then it was fine for a day or two.
To be 100% fair I never really liked the tow vehicle, a 2023 Buick Encore that was the tow either. I have always had Jeep Grand Cherokees and setting them up to tow was simple. This Buick was a PIA to say the least. At least once every three or four days it would not start after five or six hours of towing. It had a charge wire but that didn't seem to do a lot of good. It needed a Knife brake switch on the ground post, which it had, yet it could and would turn on the radio or wipers all by itself, so the ground knife switch was being bypassed someplace. I had this car due to the motorhome I was using was a MB chassis. I was a Porsche Tech in my past life so settign this unit up should not have been this difficult.
I’m happy to say that motorhome is gone and replaced with a Diesel Pusher like I had before and the car is gone and replaced with a Jeep Grand Cherokee as well. I have gone back to an Airforce One unit, and all is well.
So was it the Brake Buddy that was the issue or was it the Buick. In either case they do not go together very well.
by: Tim 04/03/2024
Installation was straightforward. It works great and does not drain battery since it has built in charging. This was an important aspect I was looking for in an installed system. Be sure to keep dielectric grease on connector so it does not inadvertently engage brake. Over 10,000 miles of flat towing with no problems.
by: Gary02/19/2024
The Brake Buddy has been working great. I just wish they had made the plug a more standard mount. It doesn't fit the standard mount point on my Roadmaster baseplate. I had to make a little bracket to adapt it.
by: Justin 01/14/2024
Excellent non-obstrusive system. It is a fairly involved installation (took me a few evenings), but after is hands-off and very quick hook-up.
My one worry is the proprietary flat connector used for the electrical hookup at the front of vehicle. I've had a couple of times where the pins on the vehicle side have compressed enough to not make a full connection, including one time that triggered the emergency breakaway system. I've cleaned and tweaked it, and it's been stable the last few months. But I worry what happens if it has an issue and leaves us without a good connection and nowhere to get a replacement.
Even with that I would highly recommend this for someone looking for a hands-off braking system.
by: James12/16/2023
2019 Ford Ranger
My brake buddy started applying itself, when not being towed. Leaving me in dangerous positions and holding up traffic. Contacting E trailer gave info contact information. However the company could not provide any trouble shooting information. There only help was telling me to pull fuse so that it would'nt activate. I had allready disconnected the cable at the brake pedal.
by: B Walker09/11/2022
2019 Ford E-Series Cutaway
Installation in 2014 2-door Jeep Wrangler JK with manual transmission
The seat in my Jeep is very different from the pictures in installation videos. There is absolutely no way the main unit can go under the seat 'crosswise'. Additionally the heavy cross bar at the rar of the seat doesn't allow the unit to be positioned fore-aft without a bit of additional work.
I found that installing oriented for-aft running the cable under the carpet gently curving to the left and turning back to the pulley worked pretty well. It's using up some foot space for rear seat passengers, but we very rarely carry passengers so it works for us. There is a fairly large 'hump' in the floor under the unit. I screwed down the rear most tabs with some rubber washers underneath, and then used the longer self-tapping screws in the kit to attach the front tabs without creating any stress in the unit.. just a little snug does the job.
For most of the screws I used 3/4", the included 1" are much longer than necessary. Likely could have used 1/2" in most places.
So far it seems to work pretty well. I dropped a start mostly due to the documentation being a bit vague and poorly worded.
For example regarding testing when disconnected from the motorhome, the instructions seem to imply that you connect and then disconnect the dummy plug and it should apply brakes. When I tried that the unit indicates breakway (flashing green light), but did NOT apply brakes. After some fiddling around, I found that I needed to have the dummy plug installed, connect fuse (or disconnect for a few seconds and reconnect fuse) and THEN within 3 minutes pull the dummy plug. That's very different from the manual which states "may be tested by attachinga and removing the dust cap".
Installation manual specifies installing the pulley with the cable connection pointing down without any mention of other options. This is a bit disconcerting, videos of Jeep installs seem to always run the cable in from the left side. How is the end user to know if that's okay? Maybe it was okay when the videos were made, or the videos are wrong..etc. A brief mention that in cases where the cable can't be routed below the pulley, running it through the side/top..etc. is okay.
Lastly various areas of the documentation say to call, they are open 8AM - 5PM CST. I only found ONE mention that they are open Monday-Friday... it's a simple detail that should have been caught a long time ago. I expect technical documentation to be accurate.


by: John 10/19/2023
The order was filled over a weekend when I ordered it and showed up before it's scheduled time. Everything was as I expected it after talking to ETrailer support before ordering. Thanks ETrailer another great experience.
John
10/30/2023
I have this system installed. It was fairly easy install. I had an issue with controller installed in my Motorhome it did not work properly but contacted manufacturer Hopkins support and they immediately sent new unit and it worked great.

by: Craig Scheepers04/01/2023
Are we sending this car to the moon?
What is with the overengineered crap you are sending me and on top of that you are sending me another cable set for my lights hookup?
$[XX]+ later for the overengineered brake buddy which has electronics which WILL break sooner than later.
I asked for a NON electronic supplemental braking system.
Just where is all this junk going to be fitted ? AND what am I going to do with ALL the extra wiring you sent?
What is it going to cost to install this???….or is it a matter of “he has an RV, he must be loaded!” I am not and definitely not after this!
And I specifically asked for a kit that will not break the bank.
I am definitely not happy with this. You can expect my returning this “brake buddy”
There are simpler ways to stop a car.

Brooke M.
4/11/2023
I hear you, these can be pretty labor intensive to install. The perk to this part is that once it is installed, it is a one and done deal.
by: William06/30/2023
Please ket me know if the control module can be installed, so that it is not always drawing battery power?.
When in storage, or parked.... there is No way to turn unit off without disconnecting the battery cables under hood. Terrible inconvenience to have to go through this!? What about an on/off switch? I like the unit, but not the fact that it constantly drains my battery! Help???
by: Douglas03/31/2024
Horrible product, would not ever buy again. This product is much more complicated than it needs to be. It is subject to the poor workmanship of the RV dealer mechanics. Do NOT buy.
by: Eben05/11/2023
Works great but it took some time & effort to install. Hooking up to RV is easy and has been good - except when I forget to replace the wire harness cover for the car.
by: William 10/27/2023
Paul was fantastic in getting me what I needed.
by: Rich03/07/2023
Helen in customer service is great, very knowledgeable and helpful. She set me up with a Road Master Nighthawk tow bar, I have used it multiple times and it works great!
by: SteveW01/28/2023
Great item but the vacuum pump provided is inadequate, especially if you often deal with mountain passes or other travel that requires more than an occasional single brake application. We upgraded the vacuum pump and now the system is awesome - easily the best we've ever had.
by: Richard 01/11/2023
GMC Canyon
Installing was a bit time consuming I installed behind the drivers seat on a GMC canyon extended cab. It was a tight fit and O added a bolt to the slide rail of the seat adjustment so the seat wont hit the controller. there seems to be a sequence when connecting the tow vehicle as some times the light is in error mode and I have to reset it to be active. As for stopping the tow vehicle I have no idea as I can't tell its back there anyway. 4 stars is because I have to reset it once in a while.
by: Dave09/21/2023
Works great, completely satisfied with these!
by: Carl11/05/2021
To date I have been unable to see how the system works. Unknown to me it will only work with the Brake controller they send with the unit. Now I have to uninstall the built in factory unit out of my Ford, and install theirs under dash. This is not only annoying but I'll have two controllers to confuse anyone other than me,, and have received no call backs from [Brake buddy] tech support with any other options.

Sierra K.
11/8/2021
I spoke with Hopkins and they confirmed that the Brake Buddy Stealth # HM39530 can only be used with the included brake controller.
Helpful Links
by: Michael I09/09/2022
Love that the Brake Buddy is out of the way when installed in our Rubicon. We don't even notice it until we need it. It was straight forward to install the system; just follow the included instructions and all parts needed were in the kit. We installed our unit behind the driver's seat against the sidewall. It fit there and doesn't take up much room. We put a piece of interior carpet on the top for an armrest. It brakes perfectly, when needed.
by: Schef10/02/2022
Brake Buddy arrived with 2 missing parts. Contacted manufacturer and got parts 2 weeks later. Plastic "T" fitting broke, and installer had to improvise using a brass fitting rather than wait for a replacement part that isn't durable anyway.
by: Zac06/09/2021
This system, when sorted, works pretty well. It's also extremely easy to hook up and go, requiring none of the traditional nonsense associated with braking systems. Their all-in-one connector is excellent, and really works well. That said, it's been a long road (over a month) to get it installed and at a point where it safely stops the towed car.
June 9: I ordered the Brake Buddy Stealth kit for my 2017 GMC Acadia V6.
July 5: I set about installing the kit, and realized that I was missing the harness and umbilical from what appeared to be an open box item. Called Hopkins tech support, and they stepped up and sent replacement parts for what was probably an unscrupulous customer's swindle. Kudos!
July 12: Install attempt round two. This time the install is successful, however, the controller that mounts in the towed vehicle is acting like it's fried. I called tech support and again, Hopkins stepped up and sent a replacement controller.
July 18: Receive controller and install. Appears to have fixed the problem. But now, the brake pedal is only pulling in a quarter of an inch when testing breakaway or trying to actuate it with the test button on the controller. I called tech support again and determined it's a bad main unit. I ordered a whole new kit, figuring I'll get good parts from one kit and send back the bad parts.
July 21: New kit arrived. I replaced the main unit and it changed nothing. Start advanced troubleshooting. Check voltages at the main unit under varying conditions - everything checks out. Detach the cable from the brake pedal and determine that the thing actually does stroke about four inches. Turns out the overload protection in the main unit is functioning as intended because too much effort is required to move the pedal. I test the vacuum pump and it's working as designed.
I then moved the cable attachment point to the very bottom of the brake pedal for leverage. This isn't what was shown in the instructions, but I was able to make it work and it did help - brake now moved about 2 inches. Then I tried testing it with the towed car idling (to provide good vacuum) and found that the pedal would move about 4 inches before the protection overload would stop it. The conclusion - not enough vacuum.
I tested the car's booster line with a vacuum gauge while running, and noted that it was pulling 25 inches of mercury (inhg). Tested the vacuum with the pump doing the work (engine off), and found that it would kick on at 10inhg and shut off at 15inhg. So the reason the system only works when the car is running is because the supplied vacuum pump is inadequate, providing ~10 less inches of vacuum than the car needs for proper booster operation.
Then I did some research on the Dorman vacuum pump in the kit. It's used in Ford trucks to provide accessory vacuum when starting the car for stuff like the AC controls. It's really not intended for something as significant and critical as braking. In any event, I took it apart and found that I had some wiggle room on the thresholds. I adjusted the contacts in the vacuum switch, and got it to the point where it would kick on at 15inhg and run it up to about 20inhg. Reinstalled the pump and took the car for a tow test, and it worked pretty well for well spaced braking events.
However, the vacuum pump ran every time I pressed the brake, and did so for 90-120 seconds. That wasn't going to cut it for multiple braking events within a one to two minute period (think traffic). Also, it sounded like it was working really hard to build 20inhg, and I suspected that it wouldn't be lasting very long. If it were to fail, I wouldn't have towed car braking, and that's no good since I'm taking my wife and four little kids on a cross country trip next month.
So rather than start over, I set about fixing the vacuum deficit at the beginning of August. For around a hundred bucks, I was able to get a Volvo brake booster vacuum pump and a multicomp vacuum switch (search [online vendor]). I made a mounting plate and used these two pieces with a relay to power the pump directly from the battery (picture attached). The result is that I can maintain vacuum between 19-23 inches, and the system now seems to work great. This vacuum pump is far superior, and only runs for about ten seconds between braking events.
Despite the fact that I'm good to go now, the vacuum pump included with the kit is sub-par and is now sitting in my parts bin. I contacted Hopkins with all of this information, and while they were responsive and helpful throughout this adventure, their engineers' final determination was that the provided vacuum pump should get the job done. That may be true for a Honda Civic, but in practice (and in fact) is was not adequate for my Acadia. In other words, unless you're really technically competent, I'd consider other options.
by: Tom07/31/2021
The design concept is great but I have had a couple problems. I have not yet contacted the manufacturer. It has acted like a breakaway situation after disconnecting the cable even though I put the cap on the jack i.e. the brake pedal stays active.
Sometimes when driving the toad it loses vacuum assist. I tried putting in a check valve in the line from the vacuum pump but that did not help. I disconnected that vacuum line and capped the tee and did not experience loss of vacuum assist. I reconnected the line to the vacuum pump had trouble twice but after a fair amount of driving, did not have trouble again. Mostly the problem occurs when first putting the car in gear after starting the engine.
TIP FOR ALL TOAD TOWERS:
I mounted a bright red LED strip to the front of the toad and wired it to the actual brake light switch in the toad. The light allows me to use the RV's backup camera to confirm whether the brake pedal is getting activated and released properly. Unfortunately, I have not had a chance to road test that. (Use a switch or quick disconnect so that it can be disabled for regular driving.)
by: Erik05/24/2022
2006 Suzuki Grand Vitara
I installed the break buddy in my 06 Suzuki Grand Vitara. I was looking for a way to get braking when I flat tow the Suzuki but would be unobtrusive when I am just driving around. The break buddy was the answer. Except for the clamp above the break pedal I would not be able to tell it is installed but when we pull the Suzuki, I have lights and breaks.
by: Joe04/03/2022
did not fit under seat as shown but managed to locate it hidden away. Also, hard to find a flat place on firewall to mount bracket and bolts to mount to brake pedal are barely long enough since brake pedal arm gets wider closer to pedal. Parts seem generic not specific to vehicle.

Jenny N.
4/11/2022
I recommend watching the video installation video that we have on a 2020 Jeep Wrangler.
Helpful Links
tv-install-brake-buddy-stealth-braking-system-2020-jeep-wrangler-unlimited-hm39530.aspx
25
78
Show More Reviews
See what our Experts say about this Brake Buddy Tow Bar Braking Systems
- Product Comparison Of The Brake Buddy Stealth and Demco SBS Stay-in-Play Braking SystemsBoth the # HM39530 and the # SM99251 are both good options but for your needs I recommend the # HM39530. It uses a 7-way flat connector, which is included, and can plug into your lighting system with a 4 pole connector it has coming off of the 7-way flat connector. It also comes with a battery charger that will keep your battery charged as your tow. The # SM99251 does not come with a battery charger so you'd have to purchase a separate battery charger like the # BB54FR. Both braking systems...
view full answer... - Flat Towing A 2021 Chevrolet Silverado 1500 4x4Digital odometers only work when the vehicle is on and power is running to the odometer. Since you'll have to remove the negative battery cable to flat tow your 2021 Chevy Silverado there will be no power running to the odometer for it to account for any miles traveled. If you're needing the equipment to flat tow your 2021 Chevy Silverado 1500 4x4 I have the following recommendations for you: Base Plates: # RM-523199-5. These base plates are a confirmed fit and will has brackets that...
view full answer... - How To Connect The Brake Buddy Stealth To Diode Wiring In A 2017 Jeep WranglerYou just need to install some diode wiring like the Roadmaster Universal Hy-Power Diode Wiring Kit # RM-154 in your Jeep and use the trailer style connector (pictured below) to plug into the wiring for your Brake Buddy Stealth # HM39530. The trailer style connector is on the shorter length of wire so I recommend just cutting it off with about a foot of wiring and then cutting the vehicle style connectors off of the longer length of wire and connecting the trailer style to one end using...
view full answer...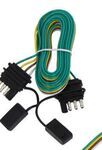
- Flat Tow 2021 Cherokee TRAILHAWK 4X4 Sport Utility# RM-521452-4 is not a confirmed fit for your vehicle because it excludes the Trailhawk editions. I recommend # RM-521451-4 which is a confirmed fit instead. I also recommend the following needed equipment required to flat tow your vehicle: Tow Bar: # RM-522. Tow Bar Wiring: # RM-154. Braking System: # HM39530. Safety Cables: # RM-643. There are some additional steps to getting your vehicle flat tow ready so I attached pictures of the owner's manual showing the steps. I highly recommend...
view full answer...
- Flat Towing A 2017 Jeep Cherokee Overland 4x4 w/Active DriveAs stated in the manual you're going to need the Mopar flat tow wiring kit from your local Jeep dealer to safely tow your vehicle. I've attached the flat towing portion of the manual for in the pictures below. As long as you follow all the rules in the manual and use the properly rated equipment for you vehicle it should all be easy and safe. You'll also need the following items to flat tow: Tow Bar: Roadmaster Nighthawk All Terrain, Non-Binding Tow Bar w/ LED Lights - RV Mount - 8K Item...
view full answer...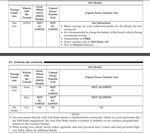
- Braking System And Wiring For A 2004 Subaru ImprezaTo flat tow your 2004 Subaru Impreza it does require additional wiring for your lights. I recommend the Roadmaster Universal Hy-Power Diode Wiring Kit Item # RM-154. This kit allows you to tap into the factory wiring behind each taillight so the vehicle can receive light functions from the motor home. The Diodes protect the vehicles factory wiring in the event there is a wiring issue between the two vehicles. Once installed it is unnoticeable. If using the Brake Buddy Stealth Supplemental...
view full answer... - Troubleshooting Issues With A Brake Buddy Stealth Supplemental Braking Systems If you already trimmed the excess cable off when installing the Brake Buddy Stealth Supplemental Braking System - Proportional Item # HM39530 you might not have enough to add more slack to the line. Around the 8 minute mark of the attached video David explains installing the cable and adjusting it to the correct length. The cable being too tight would cause your issues with the hard braking. The issues with proportional braking can be attributed to the controller not being mounted at...
view full answer... - Wiring Options for Flat Towing 2015 Jeep Wrangler Unlimited Behind MotorhomeWhat specific questions do you have? There are three types of taillight wiring options for the 2015 Wrangler Unlimited. What we typically recommend is a diode system like the Roadmaster Diode Kit, part # RM-152-98146-7. This is a permanently mounted system that provides everything necessary to set up your Wrangler Unlimited so it's taillights operate in tandem with the taillights of the tow vehicle. The included umbilical includes extra circuits which can be used for a battery charge...
view full answer... - Where Should Power Source for Brake Buddy Stealth Connect toYou should run the power of the Brake Buddy Stealth Supplemental Braking System # HM39530 to the battery like the instructions recommend so that it will always be powered regardless of what circuit you might deactivate.
view full answer... - Is the Demco Stay-IN-Play Required if I Have a Brake Controller in my RVYes. A trailer brake controller will not operate a flat towed vehicle's brakes in the same manner that a supplemental braking system for flat towing like the Demco Stay-IN-Play DUO # SM99251 will. There are options like the Brake Buddy Stealth # HM39530 that can act as a trailer brake controller and also comes with the parts needed to install on the tow vehicle to allow it to function as a supplemental braking system. I've linked some review and installation videos of these for you to...
view full answer... - Brake Buddy Stealth Supplemental Braking System Not Charging Towed Vehicle BatteryIf the Brake Buddy Stealth Supplemental Braking System, # HM39530 is failing to charge the battery in your Jeep while under tow, your RV may not have continuous 12 Volt DC charging on the 7 way connector. I suggest looking for a loose connection that is causing failure of continuity with movement. You'll want to check the pin at 1 o'clock when looking at the RV's receptacle using a circuit tester like the # PTW2993. If this shows to be the issue, you will want to add the charge line kit,...
view full answer... - Relays Needed To Flat Tow A 2022 Jeep Wrangler Unlimited Willy's With The Brake Buddy Stealth SystemThe Brake Controller of the Brake Buddy Stealth Supplemental Braking System # HM39530 is going to completely bypass the brake light switch wire on your 2022 Jeep Wrangler Willy's and connect to the actuator. It will however connect to the brake light switch wire in your motorhome. So you will not need the Roadmaster Stop Light Switch Kit # RM-751490. As for the Roadmaster Brake-Lite Relay Kit for Towed Vehicles # RM-88400, your Jeep has combined wiring so you will need this relay to prevent...
view full answer... - Troubleshooting Little to No Power on Brake Buddy Stealth Supplemental Braking SystemThanks for reaching out about the Brake Buddy Stealth Supplemental Braking System # HM39530. The Stealth is a bit of a different animal when it comes to the supplemental braking family but I have some things for you to check. Since the pump is not vacuuming the brake lines you'll want to make sure you are getting power to the vacuum pump when the towed vehicle is plugged into the RV. You also need to make sure the sensitivity is turned up. If it's on a 1-3 then you'll need some pretty...
view full answer... - Why Are My Brakes On My 2021 Jeep Grand Cherokee Engaging After Unhooking From RV?I spoke with Hopkins about your Brake Buddy Stealth Supplemental Braking System # HM39530, and they recommend that you ensure that you install the dust cover after you unplug the coil cable so the breakaway disengages. You'll want to ensure that the dust cover in plugged in tight as well. If you have checked this already and are still experiencing the same issue, let me know and we can continue to troubleshoot.
view full answer... - Recommended Flat Towing Equipment For A 2021 Chevy Silverado 1500To flat tow a 2021 Chevy Silverado 1500 it will need to be 4WD with 2-speed transfer case that has neutral and 4-low settings. You'll also need a tow bar, tow bar wiring kit, base plate, braking system, and safety cables to safely tow your vehicle. I have the following recommendations for you below: Tow Bar: Roadmaster Sterling All Terrain, Non-Binding Tow Bar - Motorhome Mount - 2" Hitch - 8K Item # RM-576. This tow bar has a non-binding design that allows you to release your vehicle...
view full answer... - Flat Towing Recommendations For A 2000 Jeep Cherokee To flat tow your 2000 Jeep Cherokee you'll need the following items: Tow Bar: Roadmaster Falcon All Terrain, Non-Binding Tow Bar - Motorhome Mount - 2" Hitch - 6,000lbs Item # RM-522. This tow bar will work with the base plates I recommended and comes with a non-binding feature that will make unhooking the arms from the base plates easier on uneven surfaces. Tow Bar Wiring: Roadmaster Universal Hy-Power Diode Wiring Kit Item # RM-154. This kit will splice into your vehicle's tail lights...
view full answer... - Flat Towing Recommendations For A 2020 Jeep Wrangler JL Unlimited RubiconFor tow bar wiring I recommend the Roadmaster Universal Hy-Power Diode Wiring Kit Item # RM-154. It's a one time setup that splices into your vehicles lighting so you don't have to carry around the magnetic lights and run them every time you want to tow. For braking I recommend the Brake Buddy Stealth Supplemental Braking System - Proportional Item # HM39530. This braking system is a one time setup as well and also comes with a battery charger to keep your battery maintained while towing....
view full answer... - Is Battery Disconnect Needed With Blue Ox Patriot Braking System on 2012 Chevy ColoradoThe Roadmaster Automatic Battery Disconnect # RM-766 is actually not required when using the Brake Buddy Stealth Supplemental Braking System # HM39530 on your 2012 Chevy Colorado. All you need is the Stop Light Switch # RM-751442. I've added links to video reviews of both for you to check out.
view full answer... - Most Cost-Effective Way to Flat Tow 2012 Ram 1500There are quite a few parts you will need to flat tow your 2012 Ram 1500, and you will need an appropriately-rated tow bar, as well as base plates, safety chains, a lighting system and a supplemental braking system; I will give you the most cost-effective options for each for this truck. - Base Plates: Roadmaster Crossbar-Style Base Plate Kit # 52289-1 - Tow Bar: Roadmaster StowMaster Tow Bar # RM-501, which will require your current truck have a ball mount and 2" hitch ball. You will...
view full answer... - Recommended Flat Towing Equipment For A 2018 Ford F-150Before flat towing any vehicle you must check the owner's manual to ensure your vehicle is capable of being flat towed and if it is that you follow any steps it lists to protect the transmission of your vehicle. If capable you'll need a tow bar, tow bar wiring kit, base plate, breaking system, and safety cables. I have the following recommendations for you below: Tow Bar: You said you have a receiver and linked to the #BX4330. I would recommend against using this receiver for your truck....
view full answer...
- Recommended Tow Bar Wiring Kit For Flat Towing A 2021 Jeep Wrangler UnlimitedAt this time there currently is not a plug in tow bar wiring kit available for a 2021 Jeep Wrangler Unlimited. Instead I recommend going with the Roadmaster Diode 7-Wire to 6-Wire Flexo-Coil Wiring Kit # RM-15267. Although this won't be as easy as just plugging in some connectors I do recommend splicing kits over the magnetic light kits that you'd have to reinstall every time you want to tow and could potentially lose while towing. This wiring kit comes with everything you need and the...
view full answer... - Brake Buddy Stealth Supplemental Braking System, Proportional for 2019 Jeep CherokeeYes, I suggest the Brake Buddy Stealth Supplemental Braking System - Proportional, # HM39530. This too is a a proportional braking system that remains in the Jeep same as the Demco. It is an equivalent product to other originally recommended from a different, but very reputable company. See the attached link for a product review and installation video of this product on a Jeep Wrangler.
view full answer... - Recommended Flat Towing Equipment For A 2022 Ram 3500 Longhorn DRW 4x4 For your 2022 Ram 3500 Longhorn DRW 4x4 you'll need a tow bar, base plate, tow bar wiring kit, braking system, and safety cables. I have the following recommendations for you: Tow Bar: etrailer XHD Non-Binding Tow Bar for Roadmaster Direct-Connect Base Plate - 2" RV Mount - 10.5K # e84ZR. This tow bar features non-binding latches and telescoping, self-supporting arms that make connecting/disconnecting your vehicle on any terrain easy peasy. This tow bar comes with safety cables included...
view full answer... - Best Supplemental Braking System for 2013 Honda Fit Towed by Motorhome With Hydraulic BrakesThanks for the kind words about the site and you can definitely get everything you need in order to flat tow your 2013 Honda Fit, including the supplemental braking system when you are flat towing it with your motorhome that has hydraulic brakes and not air brakes. Let's talk about the best and most reliable system, which is the Stay-IN-Play DUO Supplemental Braking System # SM99251. This is a permanently mounted system that uses a vacuum pump, and though you mentioned a fraying cable,...
view full answer...
Do you have a question about this Tow Bar Braking System?
Info for this part was:

Expert Research:
Mike L

Expert Research:
Jameson C

Edited by:
Lindsey S

Video Edited:
Jeff D

Video Edited:
Jacob T

Video Edited:
Dustin K

Video Edited:
Chris R

Video by:
Joshua S

Video by:
Jonathan Y

Video by:
Michael B

Updated by:
Leah S

Updated by:
Wilson B

Updated by:
Mike S

Updated by:
Noah M

Written by:
Alexander C

Test Fit:
Shane H

Test Fit:
David F

Test Fit:
Ryan G

Test Fit:
Bradley B
At etrailer.com we provide the best information available about the products we sell. We take the quality of our information seriously so that you can get the right part the first time. Let us know if anything is missing or if you have any questions.
Product Experts Available Now!
Call 1-800-940-8924
Sam J.
4/15/2023
Using this set up could not be easier. The only maintenance needed is keeping the connectors clean and refreshing the terminal grease. Operating is true plug and play though I always test the setup before driving off in tow. We did have a suspected issue with the original cable between the RV and vehicle I contacted support and they said it might be a bad connector or might just need to be cleaned. But well send you a cable just in case. I couldnt be happy with their response. It has worked since. I do wish the vacuum booster pump included with a kit drew more vacuum. It does indeed charge the brake booster, although I suspect not quite at the same high levels as the vehicle does one operating normally. I am certain the brakes are being applied with the booster, and the breaking effort seems balanced between the RV and the vehicle towed. I contacted engineering through customer support about this as well, they assured me that the design pressure was to specifications.