
To see if this custom-fit item will work for you please tell us what vehicle you'll use it with.
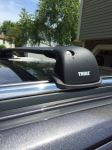
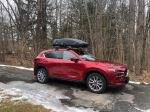
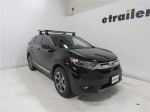
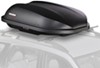
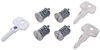
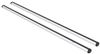
This strong Thule roof rack lets you carry gear on your vehicle. Galvanized steel crossbars accommodate clamp-on accessories. Polymer coating provides extra grip for your cargo. Installs on your vehicle's naked roof.
Features:
Specs:
 Alternate Instructions
California residents: click here
Videos are provided as a guide only. Refer to manufacturer installation instructions and specs for complete information.
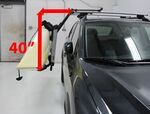
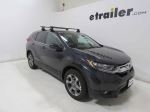
If you are looking for a roof rack for your 2020 Honda CR-V, well, this Thule roof rack is probably one of the most popular options for this vehicle. We're going to go over why it's very popular, but we'll also go over some of my tips and tricks so that you can get the most out of this roof rack. That way, if you want to carry around kayaks, standup paddle boards, if you need extra cargo space and you want to get a roof box on your CR-V, we can help you find the best fit for a roof rack system to help you get there. Thule did design this roof rack for the most versatility for carrying items, meaning, where they have this set up, this is going to be ideal if you have longer kayaks, canoes, long ladders. The crossbar spread is measured from the front bar to the rear bar, and for us, that's going to be 27-1/2 inches apart, which is very helpful for most types of accessories, whether you have a roof box, roof basket, ski and snowboard carrier, 27-1/2 is right on the money for that good range. Another thing I like to measure for is height and clearance.
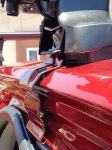
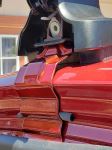
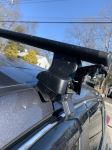
So the first thing there is how much space do you have underneath the bar Well, if I measure from the top of the roof to the top of the crossbar here in the back, I have it a little closer to 2-1/2 inches. And then up front, it's just going to be a little closer to 2-3/4 inches, which is on the smallest side. So be mindful if your accessories have those large U-bolts and tools to tighten down, you may or may not have clearance. If it just has a low-profile clamp or strap, though, you are set. Now, with that, the second measurement I like to get is how much height this is now at the top of the roof.
So let's measure from the top of our sunroof to the top of the bar. I have it at around closer to 4 inches, maybe 3-3/4 inches, depending on where I measure. And that means that your cargo is also low to the roof. So, if you have skis with tall bindings, make sure to look into accessories that might give you that extra height and those extra clears. We have ski and snowboard carriers like that here at etrailer.
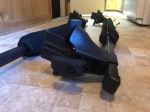
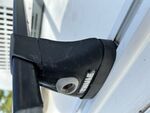
Same thing applies to all the other accessories. We have our square bars, we have our Thule Evo towers, but finally, we have our custom pad and hook on this car. So, all these are kitted together for your CR-V. I do like how Thule has that very robust pad, and then their hook is probably one of the most low-profile fits I've seen for this car. It's really important to make sure you get the right kit for your vehicle.
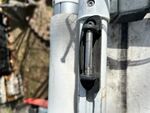
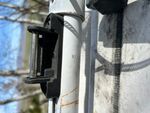
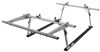
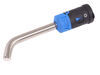
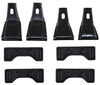
Something I recommend you doing is go to our site, use our fit guide. Here at etrailer, if you put your year, make, and model at the top of the page, and then you select roof rack, you can then find all the different fits for your specific CR-V. The CR-V has either a naked roof or a raised rail, so double-check the top of your car to make sure you have the right one for the right type of roof. And if you have any questions at any point, please feel free to reach out to us. Now, the reason I know that the square bar kit is very popular is because I've heard stories and reviews from plenty of people that are looking for something simple that has a really high weight capacity because, oftentimes, I hear they're moving from one place to another. So they need to carry a lot of stuff, and that's totally understandable. But I also recommend looking into what other things you might be carrying to make sure you get the best fit for you, your accessories, your cargo, and your journeys. Now, if you're curious about how I got this installed on the CR-V, well, stick around. Getting this roof rack installed might be a little overwhelming at first because you have different hook numbers, pad numbers, kits, and parts, but it's pretty straightforward once you know what you're doing. Now, I already mostly installed the rear crossbar, so we get to install the front crossbar together. The very first thing is unpacking your square bar from its box. When you flip it over, you might notice that stored inside are the end caps. So we're just going to slide those out of our bar. And then we can see that underneath, we have this channel. So this channel is where you would install your towers. So look at your towers, unpack those. Notice that when you press this lever, the top part of the tower lifts up. So press that lever, have that pinched, as you slide the entire tower through that bottom channel, and then let go on the right spot. Where's the right spot, you might ask Well, if you look underneath the bar, you'll see these numbers here, and those make it a little easier to slide it up to the measurement you may see in your fit kit. For the case of the square bar Evo, I see 47-1/2. Once you have both towers on, that's when you'll be able to see which one is going to be the right as well as the left, or what other people say, passenger side, driver side. Now, on your fit kit, you're going to have some different numbers there, depending on if it's passenger, driver side, or front, or back. So, for example, what we are setting up here today is going to be the pads. On the pads, there'll be a number. We're going to put 208 by the passenger side, and then 207 by the driver side. These will pop onto the bottom of the towers. Now, it might not be as straightforward of a pop, so you do have to go around the rubber pad, making sure all the edges fit into that plastic bracket. Once you finish all of that, we can put the end caps on. By the way, when you do the rear crossbars, this process is going to be the exact same, although you may have different numbers. So just keep referencing that as you install. Having those rubber pads properly secured is very crucial as you gently put your put-together system onto your roof. Now, the location of that is in the instructions for the first measurement. As for where you put it, well, for the front, you do have to measure from the top edge of your windshield. And ours is 11 inches and 3/8 of an inch, and that will be measured up to the front of the tower. Your goal is to get that rubber pad lip right there on the side. So you can see on the CR-V, how you have where that wind strip is. And in that tab, that's where your crossbar pad goes. With all the towers lined up, you're also going to make your management for your rear bars from your front bar. So get that lined up and then secured with your hooks. For your front crossbars, your hooks are going to have a number 154 stamped on the top. These hooks simply push in to your crossbar. See how that's secured right there And then we're going to leave it here as we go put the other hook on. Once the other side is hooked in, now is when I start tightening down. But I don't tighten down all the way, I actually like to tighten down till about 50% or when the hook starts to feel snug, and then I go over to the other side and do the same there. That way, I'm not pulling the whole system tight to one side while the other side is loose. The tool to tighten down is actually a torque tool, so to prevent over tightening, just continue turning this tool until it clicks. And I like to have it click twice, just like a gas cap. And then you'll make sure that all four towers click so you know that they are properly tightened. You can go ahead and close the door on your towers, and then fit that end cap on. And that's going to be it for the installation. This is going to be really easy to remove if needed, as well as to reinstall. My recommendation is to keep the tool that was included with this kit in your glove box or somewhere convenient if you do need to make those adjustments or remove the system. And hopefully, this video was helpful for you for seeing how this gets all installed. You just saw a look at the Thule roof rack system with the square bars right here on a 2020 Honda CR-V.


Do you have a question about this Roof Rack?
Info for this part was:
At etrailer we provide the best information available about the products we sell. We take the quality of our information seriously so that you can get the right part the first time. Let us know if anything is missing or if you have any questions.


Thank you! Your comment has been submitted successfully. You should be able to view your question/comment here within a few days.
Error submitting comment. Please try again momentarily.