


Troubleshooting Solera RV Slide-Out Awning Creasing When Rolling Up
Updated 11/04/2024 | Published 11/03/2024
Question:
I have installed the awning following all the instructions and watching the videos you guys have on your website. I seem to have a problem with getting the awning material to roll back up with no creases. It rolls up with all kinds of creases in the material. When it is extended it is nice and flat, measures perfect side to side and the layers even roll up looking at the ends as it rolls up right on top each other, yet looking at the material as it rolls up it over laps you can see it creases when it rolls up. I have tried making adjustments to the brackets that mount on the slide where the roller attaches to, no luck. What do you guys recommend? If you need pics or video let me know... I will need to pull my trailer out of my carport.. I have 2 trailers parked side by side.
asked by: Jesse P
Expert Reply:
Hi Jesse; I would say it is either bad tension or the bead is moving around on the # LCV000182037. Did you install the screws to keep the bead in place on the awning extrusion? If not, that is probably the issue since the fabric can move around. If you did install the screws then I would try adjusting the tension. You will need to remove it from the bracket and rotate the awning roller about 14 times (Lippert says 12-16) to add enough tension to the springs.


Product Page this Question was Asked From
Solera RV Slide-Out Awning - 121" Wide - Black
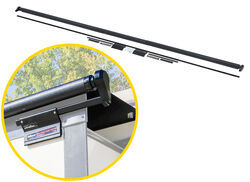

- RV Awning
- Slide-Out Awnings
- Extends 4 Feet
- 10 Feet Wide
- 116 Inch Wide
- 117 Inch Wide
- 118 Inch Wide
- 119 Inch Wide
- 120 Inch Wide
- 121 Inch Wide
- Black
- Solera
more information >
Featured Help Information
Instructions

Continue Researching
- Search Results: king pin
- Search Results: fifth wheel king pin
- Shop: Buyers Products 2" Forged SAE Trailer King Pin with 3/8" Bolster Plate - Weld On
- Shop: Replacement Kingpin Head for Curt CrossWing 5th Wheel
- Q&A: No Spark When Turning Knob on Furrion 2-in-1 RV Range Oven
- Shop: Trailer Hitch
- Shop: Replacement Ignition Knob for Furrion 2-in-1 Range Oven
- Search Results: waste tank
- Shop: Solera RV Slide-Out Awning - 121" Wide - Black
- Shop: Curt Trailer Hitch Receiver - Custom Fit - Class III - 2"
- Shop: Trailer Wiring
- Article: Trailer Wiring Diagrams
- Video: Firestone Ride-Rite Air Bags with Easy Mount Compressor Feature Breakdown
- Q&A: What is the Difference Between a Class II and a Class III Hitch?
- Search Results: trailer hitch
- Search Results: trailer wiring
- Article: Brake Controller 7- and 4-Way Installation Kit (ETBC7)
- Q&A: Lug Nut Torque Chart for Trailer Wheels
- Shop: Universal Installation Kit for Trailer Brake Controller - 7-Way RV and 4-Way Flat - 10 Gauge Wires
- Video: How to Choose a Trailer Brake Controller
- Shop: Suspension Enhancement
- Shop: etrailer Anti-Rattle Hitch Collar for 2" Hitch Receivers
- Search Results: trailer tires and wheels
- Q&A: What is the Difference Between a 4-Way and 7-Way Trailer Connector
- Article: How to Measure for Trailer Hitch Drop
- Q&A: Installation Time for Blue Ox BX1128 Flat Tow Base Plate Kit for 2016 Jeep Grand Cherokee
- Article: Wiring Trailer Lights with a 7-Way Plug (It's Easier Than You Think)
- Search Results: trailer jack
- Shop: Brake Controller
- Video: Clean Up Your Trailer Wiring

on RV Awning













Jesse P.
11/4/2024
Hi Robin, Thanks for the info. I did install the screws in the awning rail through the bead, 1 inch from each side like the guy in your video said. Can you clarify how to adjust the tension? I am not sure what the process would be to do that. When you say remove from bracket, do you mean remove it from the awning rail or do you mean another bracket. If you have a video or detailed instructions that would help. This is my 1st trailer and installing my 1st awning, so the more info I have the better.