


Brake Controller Error Message with 2012 Dodge 2500 4x4 Towing 2002 4-Star Horse Trailer
Updated 03/14/2014 | Published 03/13/2014
Products Featured in This Question


Question:
I bought a 2002 4 Star horse trailer in Oct 2013 and as we were driving back from the Midwest everything seemed fine until I turned on my headlights. When I turned on the headlights I would get a trailer brake error message that indicated that I had no trailer brakes, and my trailer lights worked fine. As soon as I turned the lights off the trailer brake message went away would start working properly again. I ended up stopping by a Dodge Dealer in North Idaho and had them check out the wiring on the pick-up and was told it was fine and that I probably have a trailer issue. After arrival home I checked all the plug wires one at a time and moved them to different location to narrow down the problem but every time I change the wires around I got a new/different problem, so the wiring seems to be hooked up correctly,but I dont know what else to do. Any suggestion?
asked by: Ken
Expert Reply:
The problem you describe of your brake controller displaying an error message when your tow vehicle lights are turned on suggests several possible causes.
One potential cause is damage/corrosion in the trailer connector(s) that could be causing two separate circuits to be bridged. It can happen that corrosion in a connector can actually create an electrical connection between two adjacent circuits, in this case the brake circuit and the running light circuit. Another possibility is that the trailer connector on the Dodge is mis-wired. There may also be a short in the wiring on the vehicle. Check both the vehicle and trailer connectors themselves and the wiring leading to them for any signs of damaged or worn insulation.
If thorough visual inspection of both trailer connectors reveals no obvious corrosion problems you can, if you have access to either or both another appropriately-equipped tow vehicle or trailer, test these with your vehicle or trailer to see if the problem still occurs. This may help isolate the problem to either the tow vehicle or trailer.
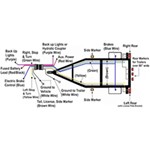
However, the best method for troubleshooting is to disconnect the trailer and apply a circuit tester like # PTW2991 to each contact on the vehicle trailer connector one at a time while each function is activated. You will want a helper on hand to assist. I have included a photo of an RV-style 7-way vehicle-side connector with labels for each of the functions as they are typically wired. In case you are using a different connector I have also linked an article that includes these same function/pin assignment for other types. A video also is provided to show how the tester should behave.
Ground the circuit tester and apply it to each pin on the vehicle connector as your helper activates each function one by one. The pin at the 11-o-clock position should carry the running light signal; you should detect a steady signal on this pin only when the headlights are turned on. The center pin carries the reverse light signal and should have a steady signal only when the vehicle is shifted into reverse. The pin at 3-o-clock carries both right turn and brake light signals; this should carry a signal only when the right turn signal is activated (the signal should be blinking - on and off) or when the brake pedal is pressed (when the signal should be steady as long as the pedal is pressed). The pin at 5-o-clock carries the brake controller output for the trailer; this should have a signal only when either the brake pedal is pressed or when you engage the manual override on your controller. The pin at 9-o-clock should carry blinking left turn and brake signals like the pin at 3-o-clock.
If all of the pins on the vehicle have the correct signals then the issue may be in the trailer. If not then you may have damaged wiring in the vehicle, a mis-wired connector or a bad connector. Inspect the vehicle 7-way on both sides for signs of damage or corrosion and replace the connector if necessary; you can use part # HM40975 from Curt. Also check the wires leading to the connector for signs of worn insulation, cracked insulation or spots where the wires may touch sharp edges on the vehicle frame. You can test the wires themselves, before they reach the connector, to see if only the connector is bad. Repair or replace any damaged wires or the connector as needed.
Pay particular attention to the (usually brown) wire for the running light circuit; if this wire has an intermittent short it could be that when you turn on the headlights the short is causing the brake circuit to lose power, which could cause the error message.
If the vehicle side appears okay then you can move on to testing the trailer. I suggest you use a 12V battery to apply power directly to each trailer circuit one at a time to verify that all functions are correct. Connect the negative terminal to the trailer frame and one by one apply +12V to each contact on the trailer-side connector. You should be able to get your brakes to lock up when you apply the 12V power directly to the pin for the brakes.
I have also linked another article with troubleshooting steps for brake controller installation.


Product Page this Question was Asked From
Dexter Electric Trailer Brake Assembly - 12" - Right Hand - 6,000 lbs

- Accessories and Parts
- Trailer Brakes
- Electric Drum Brakes
- RH
- 6000 lbs
- Brake Assembly
- Manual Adjust
- 12 x 2 Inch Drum
- Dexter
more information >
Featured Help Information
Miscellaneous Media


Continue Researching
- Video: In-Depth Review of the Curt 7-Way to RV Socket LED Circuit Tester
- Shop: 7 Way Trailer Connector Vehicle Tester
- Shop: Curt 7-Way to RV Socket LED Circuit Tester - Vehicle End
- Q&A: What Does Flashing C5 or CS Error Code Of Journey HD Brake Controller Mean
- Shop: Brake Controller
- Q&A: Should Light of Reese POD Brake Controller be On When Trailer isn't Connected
- Q&A: Er or E1 Error Message on Trailer Brake Controller
- Q&A: 2019 Dodge Ram 2500 Power Wagon Trailer Fuse Location
- Shop: etrailer Magnetic Hitch Receiver Reducer Sleeve - 2-1/2" to 2" Hitch - 5" Long
- Q&A: Looking For New Brakes And Hubs For Trailer With Hub Number 8-201
- Article: Trailer Wiring Diagrams
- Q&A: What Is The Difference Between Dexter Electric Brakes 23-180-181 and 23-105-106?
- Q&A: Converting Trailer from Surge Brakes to Electric Brakes
- Article: Trailer Drum Brakes vs. Disc Brakes: Making the Decision
- Article: Testing Trailer Brake Magnets for Proper Function
- Article: How to Adjust Your Trailer Brakes | The Ultimate Guide
- Article: Parts Needed to Add Electric Drum Brakes to a Trailer
- Article: Most Popular Wheel Bearings
- Article: Adding Electric Over Hydraulic Disc Brakes