
Thank you! Your comment has been submitted successfully. You should be able to view your question/comment here within a few days.
Error submitting comment. Please try again momentarily.
Features:
California residents: click here
Videos are provided as a guide only. Refer to manufacturer installation instructions and specs for complete information.
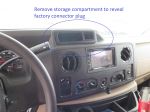
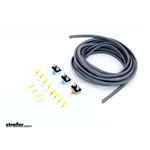
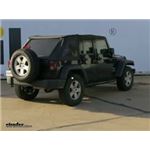
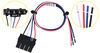
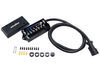
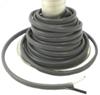
Today, we're going to review and install the wiring kit for the wiring kit for 2, 4, 6 and 8 brake electric brake controllers, part number 5506. This is a great wiring harness to use if you already have a pre-existing center seven pole or six pole connector on the back of your vehicle and you want to upgrade it to use it with a brake controller. We'll go ahead and start with our part number 5506 first, our wiring kit. We're going to work with this and then we'll work up to our brake controller. Let's go ahead and cover the parts that come with that. We got 25' of cable right here, which is ten-gauge material with two wires inside the sheath. We've got a variety of ring terminals here to connect up to your battery, and also ring terminals to connect up to the included circuit breakers.
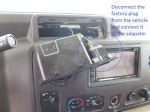
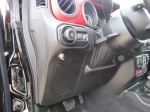
The circuit breakers you have are going to be 20, 30, and 40 amp. Pretty much in every situation you're going to use this kit on, you're only going to use two or three. It depends on which amperage circuit breaker you need for you're particular break controller. It also includes four butt connectors to help hook up your wires. To give you an idea of what we're working with on our truck, our truck already has a seven pole connector wired up to it for just lights alone. We have our extra wires coming out from here, so we can hook up the rest of our wire harness too.
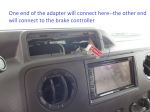
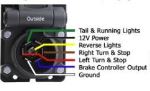
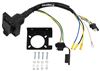
This one has a blue wire and a black wire. The blue wire is going to be used for the output from our brake controller and our black wire will be used for a 12 volt power supply going out to our trailer. On this style connector, it makes everything pretty easy to connect to and convenient. However, if you have a different style connector, it's the same principle applies. Still look for the blue for your trailer brake output and black for your 12 volt power supply. we'll go ahead and remove the sheath on our two wires here to get access to our wires.
One note, of course this is not going to be an exact color match, we're still going to ours black to black and then white to blue. Let's go ahead and strip back our wires and get them ready to install. Now let's get our other wires ready. Our butt connectors, the inside has been sitting out and corroded up a little bit; we're going to use some of the new butt connectors that come with the kit. Now I'm going to use some electrical tape to help protect our connections here. Now we'll go ahead and run our grey cable through our front of the vehicle.
Just make sure you stay away from anything moving, like suspension components, or anything hot, like the exhaust. What we did in this case is we ran our wire up along side the frame, over the hitch, and up and over our top of the frame. We'll zip tie it to keep it up and out of the way. We went over these components and lines and hoses . just went over the top of it, just ran it down along side the frame. There is space between the frame and the gas tank, we just kind of stuck it between there over the bracket for the gas tank. Again, followed the frame, zip tying where we could. There happened to be a little bit of an opening right here that we was able to run our cable through . that held it up for us. Then, we ran it up towards the engine compartment. There's a little heat shield right here that we'll be able to sneak or cable through and hide it up, and once we pull up from the top it'll take up all our slack and it'll be hidden on the inside. None of of our parts come with any zip ties like we're using here today, but you can use part number DW05726-25. For our Nissan here, it was pretty easy to push the wire up from the bottom and up into the opening right here so that we could easily reach it. If it was a little bit harder to get to you could use a pull wire. Basically, you would use any type of material, we use an old piece of airline tubing, but a coat hanger or any piece of material that you can manipulate . push down here and tie off and pull back up. We'll go ahead and pull up the slack. Make sure it's not interfering with anything on the engine. Then, we'll go ahead and use another zip tie to help hold it in place. We're just going to tie off to the vacuum line right here and cut off our excess. Next we'll go ahead and run our wire out to our power supply, which will be our battery. Let's go ahead and see how much length we need. We'll follow the existing wire harness. We'll go to the positive side of our battery. Next, we'll go ahead and find a location to install our circuit breakers. To help us with our installation, we're going to attach them using some self-tapping screws. We'll be using part number 101131802. When we install our circuit breakers, it's a good idea to be as close to our power supply as possible. In this case, we're going to use the sheet metal right here. We're always going to use a 40 amp circuit breaker for a 12 volt power supply for our trailer. In this case for our brake controller, we're going to use a 30 amp circuit breaker. To install the screws, we're using a 1/4" nut driver. We'll just overlap the tube mounting tabs and use one screw to hold everything together. With our circuit breakers mounted, now we've got a better idea of where we're going to run our wires to for through those and through our battery here. We'll go ahead and cut off our excess. Next, we'll go ahead and take a moment to split the wires apart . We'll go pretty far back on our wires and split them. Let's just go ahead and put our white wire off to the side, eventually that will go inside the vehicle. Let's go ahead and work up our black wire. Our 12 volt wire is going to go through our 40 amp circuit breaker, which is located right here. Pretty simple to install. We'll go ahead and cut the wire in half, strip them back, and we'll install a couple of the small ring terminals. Our circuit breakers are actually labelled. This copper one is labelled BAT, so it goes to the wire that goes to the battery. This sliver one is labelled AUX. We're going to our battery. We'll go ahead and take our black wire, put it into place and loosely install our hardware. Our wire going out to, eventually, our trailer will go on top. We can go ahead and snug those down using a 3/8" deep well socket. Now we'll take the other end of our wire and we'll go ahead and get it stripped back. We're going to attack one of the large ring terminals to it. This will eventually connect to the battery in this location right here. I like to leave the connection to the battery as one of the last things I do, so I'll just leave this off to the side. Next up is to go ahead and use our leftover length of wire and use that to run between our brake controller from the inside and out to our power supply once again. This will provide our ground and our power for the brake controller. However, of course, whatever we have left is way to short for the job, so we'll have to use some additional wire. This will happen in situations where your battery is located on the passenger side of the vehicle. The extra wire that we're going to be using is part number 10-2-1. This is Deka 2 wire, ten gauge brake wire. Now we've got our extra length of wire here, we're going to have maybe about maybe a ten foot chunk, and we're going to combine it with our white wire here that's separate. We're going to run that through a grommet to the inside of the vehicle. The grommet's going to be located in this corner right here. We'll make a slit into that using a utility knife, or actually a pocket knife works really good in this application, and just make a slit in there, just enough for it to run our wires through. Just make sure we stay away from the wires on the side. I'm going to bundle my three wires together temporarily with some electrical tape and we'll push on through. I'll go ahead and push it in, and chances are it's going to be hidden behind the insulation a little bit, on the inside of the vehicle. We'll go ahead and take our new cable here and follow the path of our original black cable. Now we'll go ahead and see how much wire we need going from the circuit breakers and to our battery. This time we'll also need to accommodate for going to the positive side of our battery and also our ground, or negative, side of the battery. We'll go ahead and cut off our excess one more time. Let's take a few moments to go ahead and separate our wires, give us some working room. We'll also separate a small section here to get access to our black wire. Let's go ahead and cut this black wire in half and we'll connect it up to our 30 amp circuit breaker just like we did with our other wires. We'll go ahead and take two more small ring terminals and add it to our wires. Our one wire that's going to our battery will go to the copper side and our brake controller will do to the silver side of the circuit breaker. We'll cut our black wire off short, we don't need all that length, and add our large ring terminal. We'll also do that to the white wire as well but we'll leave it at its original length. Once again, I'm going to leave my connection to my battery as the last thing I do, so let's tuck them out of the side for now. Now we'll go ahead and take a moment to zip tie our wires up, and bundle them up, and keep them safe and secure and out of the way from the engine. At this point we've got all our wires ran into the inside of the vehicle and it's ready for the brake controller of your choice. Remember that our single white wire will go back to the blue wire for the output on the brake controller, and then your black and white wires that are still in the sheath here will go black to black for power and white to white for ground. I'm going to go ahead and cut them off even and strip back the wires. Let's get our wires for our brake controller out, this is the wires that do come with the P3 brake controller. We'll go ahead and loosen them up and we'll use the supplied butt connectors that do come with the brake controller . Strip the wire back and add our butt connectors. Our brake controller comes with two smaller butt connectors, which isn't going to be enough for our white one, but our wiring kit does come with that extra butt connector that we can use for that purpose. Let's do our easy ones: black to black and white to white. Then our single white wire we'll connect up to our blue wire. We have our single wire remaining, which is our red wire; this will connect up to the cold side of brake switch. When you hit your brake pedal that turns on the brake lights and that's the circuit you want, so that'll turn on our brake controller when it's needed. To tap into our brakes that go on our truck, we're going to use a quick splice wire connector; we'll be using part number 564. On our Nissan, we're going to tap into the wire right behind one of our brake switches here. Follow our pedal up . we found out this yellow wire here is our brake signal, so when we pressed the brake pedal. it gets hot. To use the quick splice connector is pretty simple. Just connect it over the wire that you want to use and then the wire that you want to tap into or add to it we slide next to it. This is going to be pretty tight up in there, so give me a moment, I'll have this hooked up and you can see what we did. You can see here, with my quick splice in place and our red wire sitting next to my yellow wire here, and our quick splice doing the job. Now we'll go ahead and find a place for our brake controller. The rules are pretty simple, basically you just want to make sure you have it in an easily accessible area so you can manually activate it if you need it in an emergency situation. Make sure it's in a straight line with the vehicle and as little twist left to right as possible. You can install it up or down and get 360 degrees of rotation to install it. If you want to you can install it this way, vertical, and look down on it if it'll work out better for you. In this case, I think we're going to use this location right here so it's easily accessible. Our mounting bracket consists of two pieces. We have this piece right here that gets bolted to the truck, and then we had the secondary bracket that attaches to this one with some screws and it holds the brake controller in place. This also allows you to remove the brake controller easily if you want to transfer between different vehicles. If you want to permanent set up, you could also use this included metal bracket as well. Let's go ahead and put our small bracket in place, we'll need a phillips bit screw driver to run the screws in. Always double check to make sure there's nothing behind it before you run your screws in. Make sure it's straight where we want it. Then we'll install the second screw. We'll go ahead and use the machine screws that are also included with the brake controller as the rest of its hardware. To push it in, using a phillips screwdriver we'll install the machine screws. This will cut their own threads into the plastic bracket. By the way, you can also use the screws that we used for circuit breakers will work in the same place as well. This smaller, stubby screw driver works in a tight situation like this. Let's go ahead and take our wire harness, plug it into the back of the brake controller till it clicks. Then these corners right here will go into the corners of the bracket and will snap into place. Next we'll go ahead and take a few moments and zip tie our wires, and, once again, making sure we're safe and secure and don't interfere with working with the pedals. I'm going to use a small piece of loom material here to help hide the color of our wires. You could also use electric tape to accomplish the same thing. Back underneath the hood, we'll go ahead and hook up our wires. Let's start with the positive side first. Loosen up this nut using a 12mm socket. We'll put our two ring terminals on there and replace the nut. Then we'll go over to our negative side of our battery and we'll use our 10mm socket for that side. Let's go back to our brake controller, and we've got the screen lit up, so that shows us that we've got power. At this point, it's a good idea to go ahead and plug up a trailer and try it out. With our trailer hooked up, we can see the display changes and shows a small icon of a truck and trailer. That tells us we've got good connection to our trailer brakes, and all you've got to do now is take it on a couple of test drives and adjust the brake controller to your liking. That'll finish it for the wiring kit for 2, 4, 6, and 8 brake electric trailer brake controllers, part number 5506.
Customer Satisfaction Score:
96% were satisfied with this product
4% of customers were not satisfied
Ratings & Reviews

used for wiring in my brake control on 2010 town and country
The kit comes with a great assortment of connectors. Durable wire cover.
It's a roll of wire, how hard is it to get wrong?

The wiring was everything I needed to wire my 92 GMC 2500. This kit will have all you need to install wiring. Order a break controller and a rear 7 way and you will have a complete kit.
I would order this kit again, wire is of the correct gauge and the breakers work as designed. You will not be disappointed.
Than you etrailer for providing me with the parts I needed once again.
The eTrailer hitch for my 1999 Chevy 1500 Silverado longbed has been a very good sturdy choice. The impressive part about this company is they care enough about product quality to have you mail back a hitch at their cost if there are any problems. They are heavy and somebody dropped it in shipping, bending it just enough the bolts would not aline with the frame. The second hitch went right on, no problems.
Used this to install a brake controller in my 2015 Jeep Wrangler Unlimited. I ran the wiring up through the frame from the hitch to the engine bay, then back through the grommet in the firewall. Plenty of wire and connectors to get everything connected up. I had tried ordering wire and fuses from another company and it got lost in the mail, after trying to get them to replace for weeks I gave up. This came quickly and was delivered early. I will say that for this install I would recommend about 18 inches of heat shielding for the section that travels near the exhaust below the battery.
I should have added a brake controller a long time ago. I found an etrailer video with the exact year and make of my truck that assisted with installation. That paired with YouTube made this pretty simple.
Just what i need to instal my Prodigy P3 on a 1964 f100. A couple self tapping screws and about 4 ft of blue wire would of made life easier. But in the end i had enough wire i just had to make sure to remember colors. Would buy again.
Arrived fast and the items were just as described!
First of all thanks for the tutorial on you tube you guys make that makes more easy to install the product for now I don’t have a picture but I still enjoy it work really good thanks again.
This was exactly what I needed. Also, the customer support was very helpful when I had questions
Product had everything needed to install my trailer brake in my 2008 Jeep Grand Cherokee Overland. Installation took about 30 minutes.

Daniel S.

2/17/2020
Everything is still working perfectly. No corrosion and no shorts.
I recommend some changes:
1) add an equivalent length of blue 10g wire.
2) If all three 30A breakers are used, I would suggest supplying two more #8 ring terminals (the smaller ones)

Jake O.
6/12/2018
So far very well, however 1/4 of crimp connections failed, requiring soldering.
Moving up to the engine compartment, two circuit breakers from the ETBC7 kit were installed on the firewall. 40A for the hot wire back to the 7-Way connector, and 20A for power to the brake controller. The black conductor from the 10 gauge wire was connect to the silver (load side) of the 40A circuit breaker. This wire supplies power to the AUX post in the 7-Way connector. The white conductor from the 10 gauge wire is fed through the firewall and connected to the blue conductor from the brake controller. A separate black (10 gauge) wire is run from the silver post on the 20A circuit breaker, and this wire is connected to the black wire of the brake controller. The two wires leading through the firewall were achieved by making a small slit in the existing wiring grommet with a pocket knife. Finally, a separate black wire is jumpered between the two copper posts on the circuit breakers and run to the hot terminal of the vehicle battery. This is the final connection, after everything else is done.
I used the 5506 to wire a brake controller for a 2016 Toyota Tacoma SR5 Crew Cab with a 6' bed (no towing package). By the way, if you're searching for the cold side of the brake switch on a third-gen Tacoma I found the blue wire to be the correct one.
The good: There is plenty of 10-2 duplex wire to make it from the hitch to the engine compartment and make the jumper wires from the breakers to the battery. There is also enough to run a positive wire to the brake controller and an output wire from the controller to the hitch.
The not so good: I would like to see a "complete kit" to install a brake controller. This would include the following; 6 self-tapping screws (4 to be used on the breakers and 2 to mount the controller (don't order self-tapping screws from e-trailer because you only get 1 for about $2.50), 10' of 16 gauge wire to run from the brake pedal switch to the controller, 1 quick splice connector to tap into the cold side of the brake switch, and 15' of 10 gauge wire to ground the controller. Also, make sure you have extra 10 gauge butt connectors on hand, the ones provided are cheap and don't grip well. I purchased more at my local auto parts store that are actually threaded to grip the insulation on the wires.
Overall, I would recommend this kit for non-towing package vehicles. The cost to buy 25' of 10-2 wire separately is $86.50 ($3.46/ft) then add the individual breakers and you well exceed the price of the kit.
I have a 05 ram 1500 Thunder road edition the video was on a 08 ram 1500 not much different in body styles.I ran my wires from front to back and over the gas tank like the video but didn't run it down side the frame rail my wiring harness ran on my truck on top of the frame rail passed the gas tank going to the front of the truck I zipped tied and ran it up away from the exaust on the truck .The only complaint I have is not enough connectors if you screw up you have to buy them and zip ties the brake controller works great still have just a little fine tuning to do with it but I will get it very happy with the people of Etrailer they were a big help.
I had my P2 Prodigy installed in my 2015 Town & Country yesterday. Found out that the T&C with the factory towing package and 7-pin connector was wired all the way to the front of the vehicle. All we needed from the 5506 kit was the 30 amp breaker and a number of the wire connectors. And of course the 20127 plug-in harness for the P2. Installation went smoothly and we are pleased with the result. Thank you for your assistance.
I used it to hook up my Mopar 7 pin trailer connection on a 2011 Jeep Wrangler unlimited. Worked great. No issues I could not have hooked it up without it.

Ben
5/5/2015
Works the same as when I installed it, perfect. Zero issues at all
The quality of the wire, relays, and connectors was excellent making the installation very professional once finished. I would like to add however that since this is being installed in the engine compartment were it will be exposed to extreme heat and moisture; the crimp terminals and butt connectors should be covered with heat shrink rather than electrical tape and the terminals/butt connectors should be the type designed for moisture prone areas. It would have also been convenient if the kit included tie wraps to allow ease of a professional installation.
Very happy with the product. Relatively easy to install following etrailer installation video. Bit disappointed did not also include the self tapping screws. would recommend for someone looking to add brake controller to vehicle
The quality of the twin lead is excellent. The kit should include one or two dual in-line wire crimp terminals used to connect the white and brown stop/brake wire indigenous to the Jeep products to the blue brake input wire of the controller. In addition, the kit should include an insulating boot or jacket in which to protect the circuit breaker terminal bolts.
My third order from etrailer came in Saturday and I installed the prodigy2 brake controller using the wiring kit 5505. The videos and instructions were perfect for my 2009 Ford Escape. I plan on going camping with my Scamp trailer this weekend of the 4th of July and I will write another review when I come back .
Thank you Etrailer!
Dave Harris
Installed on a 2014 150 crew cab, 5.5ft bed. Ran up the frame rail, into engine pay, where I split. One with through the firewall to brake controller, one across the bay to the battery. Perfect length for my application. I was happy with the quality of the kit.
Does not include mounting hardware for the circuit breakers. That would have made sense...
I will say I added the product to my cart, came back the next day to order and it went up three or so dollars. This is a bit aggravating, and etrailer lost my business on several other items that went up way more than that, but this was still the best price on 10g duplex brake wire. All in all a decent value, but the perceived pricing games are frustrating.
Exactly what I needed.
The hitch and accessories were professionally packaged and arrived in great shape. I installed the hitch in 25 minutes ( by myself) with no problems, great fit to my truck. I am also going to install the adapter in the next few days, but i see no problems with the aid of the installation video you provide on your website. All-in-all, great parts and great instructions provided by a great organization. Thanks

Info for this part was:
At etrailer we provide the best information available about the products we sell. We take the quality of our information seriously so that you can get the right part the first time.


Getting D.
2/8/2018
Product is still working with 0 issues