
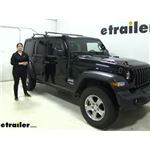
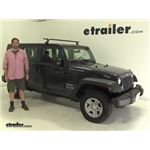
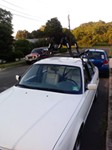
2011 Jeep Wrangler Unlimited Roof Rack by Yakima
Roof Rack Includes:
Yakima RoundBar Crossbars - Steel - Black - 58" Long - Qty 2
Yakima 1A Raingutter Towers - Qty 4
Part Numbers: Y00409,Y00101
Retail:$373.10
Our Price: $328.89
You Save: $44.21
This item qualifies for Free Shipping
In Stock
Thank you! Your comment has been submitted successfully. You should be able to view your question/comment here within a few days.
Error submitting comment. Please try again momentarily.


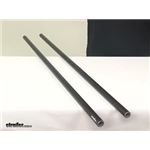
Yakima RoundBar Crossbars - Steel - Black - 58" Long - Qty 2
part number: Y00409
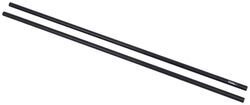
These multipurpose, galvanized steel crossbars supply the backbone for your aftermarket roof rack system. Works with accessories that clamp around the bars. Pair with Yakima towers, fit kit, and RoundBar SL Adapter to create a complete roof rack.
Features:
- Sturdy, round crossbars let you build an aftermarket roof rack for your vehicle
- Pair with Yakima towers, fit kit, and RoundBar SL Adapter (sold separately) to create a complete roof rack
- Accommodate accessories that clamp around the bars
- Optional RoundBar end caps (sold separately) keep out dirt and grime
- Constructed from vinyl-coated, galvanized steel
Specs:
- Quantity: 2 crossbars
- Dimensions: 58" long x 1-1/8" diameter
- Limited lifetime warranty
8000409 Yakima Round Crossbars - Steel - Black - 58" Long - Qty 2
Yakima 1A Raingutter Towers - Qty 4
part number: Y00101
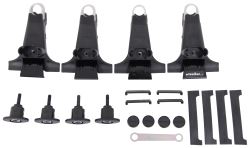
For vehicles with rain gutters, start building your Yakima roof rack system with these 1A Raingutter Towers. Towers provide the base for your system, attaching to traditional rain gutters and holding crossbars (sold separately) in place.
Features:
- Clamp onto vehicle rain gutters
- Provide base for Yakima roof-rack crossbars
- Adjust to non-parallel rain gutters
- Are lockable with Same Key System (SKS) Cores (sold separately)
- Cores lock crossbars to towers and towers to vehicle roof
- SKS Cores can be changed out to make all your Yakima locks keyed alike
- Constructed from tough Zytel nylon
Specs:
- Quantity: 4 towers
- Weight capacity: 165 lbs
- Always observe your vehicle's maximum roof load capacity
- Additional components required for a complete roof-rack system:
- Crossbars (sold separately) to provide attachment point for accessories
- SKS Cores required: 4
- Height: 7-1/4"
- Can be increased by 3-1/2" by 1A HiRise Spacers (Y01101), sold separately
- Lifetime warranty
8000101 Yakima 1A Raingutter Towers (QTY 4)
Video of Yakima RoundBar Crossbars - Steel - Black - 58" Long - Qty 2

Videos are provided as a guide only. Refer to manufacturer installation instructions and specs for complete information.


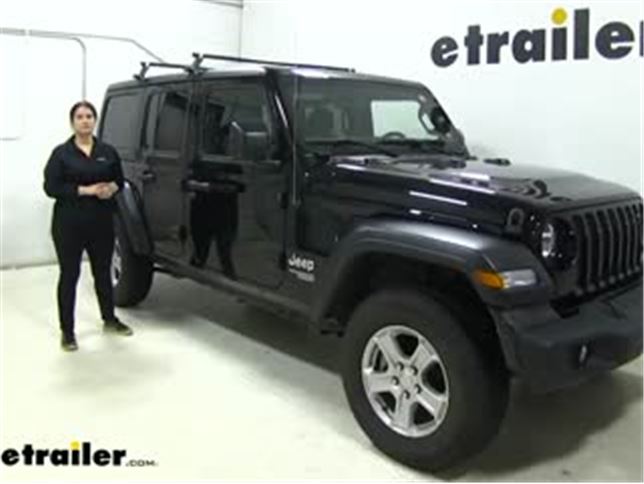
Video Transcript for Yakima Roof Rack Review - 2020 Jeep Wrangler Unlimited
Carla: Hey guys, Carla here with etrailer.com. Today we're going to be taking a look at the Yakima RoundBar Gutter Mount Roof Rack System on our 2020 Jeep Wrangler. This roof rack right here, if you're going for more of a rugged look, this is definitely the way to go with the round bars. A lot of customers are used to that look and it looks pretty cool on a Jeep. Let's go ahead and take a closer look at it.One thing I want to point out, as per the instructions, you do want to install both bars on the non-removable portion of your top. As you can see, this right here divides the front portion that is removable.
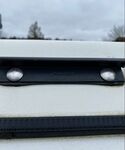
So you can leave your hard top on, but remove this portion. You don't want to put the bars on the front.All right. Basically what we have right here is an outer clip. As you can see it as rubberized, so you don't have to worry about any scratches.On the inside we have sort of what looks like a wedge that's going to fit right inside your rain gutter, and it does have these nice pads. Again, rubberized to avoid any damage or scratching to your rain gutters on your top.What we've got right here in the center is an actual knob.
How it works is as you're tightening this down, it's pushing the two together, pinching your rain gutter and securing it to your roof.Right in the center here, what we've got is a spot where you can use the Yakima Same Key System. Not only will that secure your roof rack to your top, but it also allows you to use the same key if you've got other Yakima accessories.Right up here, we've got our 58 inch round bar. It's a steel bar, so it's very, very sturdy. As you can see, it adds a really cool, rugged look to the Jeep. There is one bolt in the center here that I can show you here in a little bit, and that's going to tighten down and make sure that your bars are not going to be able to slide once you have them set in place.All right, right in here, we've got our bolt and that's the bolt that I was talking to you about earlier.
The first step to get this on there would be to use this tool. Even though it is included, you can see it's kind of hard to get in there. Especially if you're coming from the bottom, you don't really have a step stool, it's kind of hard to get in there. If you are looking for something that's a little bit easier to install, if you plan on putting it on and off quite a bit, then Thule does have one that doesn't require any tools and you can just adjust it from the outside.That being said, let me go ahead and give you some measurements that you may be wondering about for this system. If you have RoundBar accessories already, or you plan on getting those, you're going to want to know your clearance right here from the bottom of the round bar to the top of your Jeep top.
From right here to this portion, we're right at about three inches. That's the space you have, so really good amount of space to be able to put any kind of accessory. Other than that, these bars do have a weight capacity of 165 pounds, but you do want to double check and make sure you're not exceeding the capacity of your top.Now that we've gone over some of the details, let's go ahead and show you how to put this on. I'm going to show you how to assemble your rain gutter foot right here. We have it partly assembled on this side. What you're going to want to do with the first step is go ahead and put these rubber pieces on the inside right here of this foot, just like this. Might need to stretch them out a little bit to get them up and over, and push them all the way in. Just like that. What this is going to do is going to prevent anything from scratching the rain gutter on your top. This piece right here is already rubberized, so these two, make sure that there's no contact that's not rubberized, all right.The next thing we want to do before we want to slide our foot on the bar, we got to loosen the bolt, which is right in here. This bolt right here, we're going to loosen it up so we can get this on the bar. This is an included tool that comes with it. So we're just going to go ahead and loosen it up. Now we can do it with our hand. As you can see, this piece moves and allows that hole to open up to accept our bar, just like that.All right, with that in place, we want to make sure that we insert it with this clamp or clip on the outside and it slides right over. Then you want to get it started with your hand too, so that it's a little bit easier to work with. I'm going to go ahead and start tightening it down here a little bit. But not too tight because you still want it to slide.All right, what you want to do is go ahead and put your end caps in now, just so that when we go up there to fit it on, you don't have the feet sliding off of the bar. I'll go ahead and throw them on. And with that on there we'll go ahead and throw this on top.All right. What you want to make sure is that your rain gutter right here is going be in between these two, in between the foot and the clip, just like this. Once that's on there, you can see, I can still adjust the bar. I'm going to go on the other side and make sure that we have it in the exact same position. Now you do want to measure your overhang, and that's going to be the overhang of the bar coming out of these legs to make sure that they're the same on both sides.At this point, before you tighten anything down, you want to go ahead and also measure your crossbar spread, and that's going to be dependent on your accessory. So whatever your accessory requires, you want to go ahead and measure from the center of the bar to the center of the other bar. Now there is a maximum crossbar spread of 60 inches on this one, and there's really not a minimum one, but we tend to recommend not going anything smaller than 24 inches, as most accessories are going to require a little bit longer than that. With that in place, we'll go ahead and use the included tool to tighten down our bar.At this point, if you do have access to a ratchet, it's probably the best time to pull it out so that you can save time doing this. Otherwise, you can keep using this tool, just take a little bit longer time. While you're tightening this, you want to make sure you push on the clip on the outside so that it doesn't touch, so that there's still a gap between it and your top.As we're tightening this bolt down, you may notice your metal piece on the foot starting to come apart from this. What you want to do is go ahead and pull this to this position so that when it's tightening down, it goes down smoothly.Even after turning this a couple of times, I could tell that it was still quite loose, so I found an easier way of going about it. Again, while you pull this up, I'm going to go ahead and use my fingers on both sides to just turn the nut on here. Once you can't turn it anymore with your fingers, then you can go ahead and finish using the tool here. Just finish up tightening this where your bar is secure on the foot. We'll go ahead and repeat the process on the other side.All right. So our next step is going to be to thread our tool right here, our nut. What you want to do is push up on this to make sure that it is making full contact with the bottom of this rail. When you do that, it pulls the clamp together. If you can see right in here, we still have a gap. We're really not touching the edge of our top.In some applications, when you do tighten this all the way down, you get close to it and you may have some contact. If that is the case, if it's still touching when you're pressing down on this and trying to keep it straight, Yakima does provide this protective plastic piece. What that would look like is you would just clamp it on the inside here, but like I said, we don't need it for this cheap application.We'll go ahead and tighten and you do want to alternate, on the other side, tightening. So I'll leave this, not all the way tightened, I'll go on the other side, and then come back and finish it up.So we'll finish tightening this up. Real quick, if you can see right down here, there's a screw. That screw does have to be pushed all the way in flush with this, to be able to allow you to turn this all the way in. You don't want to overtighten this, just turn it by hand. If you feel like there's not enough for one whole turn, you can stop right there. As you can see, it's very secure.Now that we've installed our roof rack, I will go ahead and give it a good shake. You can see how the entire car is moving, so it's on there very well. And now we can throw our skis or boards up there and hit the road.
Customer Satisfaction Score:
92% were satisfied with this product
8% of customers were not satisfied
- Product did not meet expectations
- Wrong item was ordered
- Arrived Damaged
Customer Reviews
Yakima RoundBar Crossbars - Steel - Black - 58" Long - Qty 2 - Y00409
Yakima 1A Raingutter Towers - Qty 4 - Y00101
Average Customer Rating: 4.8 out of 5 stars (15805 Customer Reviews)
These multipurpose, galvanized steel crossbars supply the backbone for your aftermarket roof rack system. Works with accessories that clamp around the bars. Pair with Yakima towers, fit kit, and RoundBar SL Adapter to create a complete roof rack. For vehicles with rain gutters, start building your Yakima roof rack system with these 1A Raingutter Towers. Towers provide the base for your system, attaching to traditional rain gutters and holding crossbars (sold separately) in place.by: John K08/17/2012
Honda Element
Free delivery that showed up in 3 days!!! Can't beat it. The crossbars with the Control Towers and LandingPad 9 fit perfectly on my Honda Element. Had them installed in about 30 mins. Don't have my cargo box yet and wanted to test strength, so I had my 110lb wife standing on them with no issues (yes, the car was parked). Plan to take a long camping trip next week with a cargo box on top...wife will be in the vehicle:-)

by: steve Z06/16/2012
1994 BMW 5 Series
roof racks showed up in great condition, and showed up as one package.... I should have ordered the J racks from here but I found them cheaper locally so Thule J racks compliment the whole setup and i am just about ready to hit the water :)

by: Paul D.08/19/2012
A great company to do business with, and lots of merchandise in stock. I orderd a roof rack for my truck on Tuesday morning and it was on the porch when I returned from work on Thursday. I will deffinitely order more from etrailer.com


by: Todd04/06/2022
Thank again, etrailer. You always have what I’m looking for. I already had the bars, but I needed the towers.


by: Shaun05/16/2020
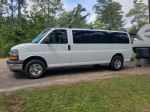
2017 Chevrolet Express Van
etrailer never disappoints! Every product I need, I check that etrailer has it before purchasing anywhere else. Thank you for the excellent service, the fast delivery, and the email updates on order status.

by: Keith05/10/2020
Fits awesome on my 2016 jeep unlimited. Some wind noise but not a problem.


by: Stephen F.07/23/2019
Yakima Crossbars were as you would expect - steel bars coated in a soft black coating (be mindful when you are utilizing these with the top mounts as the clamp will eat through the soft coating when you tighten them down). I had issues with my yakima round bar setup as the brackets and tower system were allowing water to leak in. This is in no way reflective of what youll experience but Yakima has superb support. I spoke with them twice on my issue and out of their kindness they shipped me an entire setup to replace my existing one for free.
by: Barry 02/20/2024
Dodge
Fit the 79 Dodge van perfectly
by: Lee11/22/2021
The roof rack is great. Solid.
by: Pat G08/29/2013
Great first experience dealing with you guys! Shipped fast, and was a faster install. You gave me the right parts and it went together in a flash.
Will definitely be doing business with you all again.


by: Lawrence B08/17/2017
Toyota Prius
I ordered a Yakima Roof Rack for my Toyota Prius from eTrailer.com. Part of the reason for purchasing from eTrailer.com was the promise that the racks were made specifically for the car and would not dent the roof.
I received the rack on July 31, and installed the racks on my Prius according to instructions included with the racks. Our tandem kayak is 65 lbs . The towers were placed on the outer most part of the roof as indicated by the instructions. Yakima saddles were attached to the crossbars to hold the kayak. Nothing was close or touching the top of the roof. We transported the kayak to a nearby lake, 6 miles, and back. The next day we removed the racks from the roof and noticed 4 dents on the top of the roof. It was obvious that transporting the kayak on the rack caused the dents.
We had to pay $100 to have the dents removed from the Prius roof.
I cannot continue to use this rack that puts dents in the car's roof. I was extremely disappointed in the racks. In reading the Toyota manual and contacting them by phone, there is no mention of using or not using roof racks.
I was shocked to learn from Rachel at eTrailer.com that your company takes absolutely no responsibility for this Yakima product they sell. The best they can do is to pass the buck and refer us to Yakima.
Very disappointed, and out a lot of money for a product that damages your car. Will not recommend or buy here again. eTrailer.com does not even deserve one star in this review.
by: John04/13/2019
Typical Yakima cross bars. Coating is a little too easy to cut or gouge, but probably needs to be that way to get the grip it provides. Good enough solution for me, and allows me to continue to use all the attachments I've accumulated over the years that require a round bar
by: Blaine 09/19/2021
GMC Terrain
I chose the Yakima A1 raingutter towers for mounting a 96" Yakima crossbar for my Humvee wildfire rig rooftop gear rack. The towers are sturdy and able to handle the constant jarring expected in wild land fire fighting in rugged terrain.
by: Tom03/19/2023
These Yakima towers just work. They go on easily and stay tight. No issues whatsoever. They are a little pricey, but it's nice to have something that just works well without any drama.
by: Steven02/24/2021
Awesome Company!
In the time of COVID doing business with this company was a great experience. I was kept informed by email by their CSR team as to when they would ship product and when it would arrive. Worked like a champ. Product fit my 1974 VW Baja as promised and now I can finally add the much needed Roof Rack System.
Thanks etrailer for being there and taking such care of your customers.
Steve
by: Carl12/03/2019
Yakima rack arrived a day earlier than expected. All the parts were there instructions were clear took about half hour to install. The rack is a little noisy at highway speed. Darn, guess I'll have to take the back roads! Thumbs up to both etrailer and Yakima.
by: Ramon01/11/2019
2018 Jeep Renegade
The bars were prefect and allowed me to use my old Yakima low rider towers. I just had to cut the bars from 58 inches to 53 inches so I wouldn't have to much over hang. I used a hack saw, tape and a car hose camp. Old trick I learned, you use the hose camp as a guide for straight clean cut.
by: Shane 04/17/2020
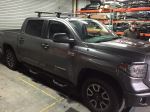
2012 Toyota Tundra
This is the second thing that I've ordered from etrailer.
Was looking for 58" Yakima round bars.
Excellent website,prices and shipping.
Product was exactly like it was described.
Perfect transaction, service all around, Next time I'm looking for something I'm searching etrailer first!
by: Richard 09/21/2021
I have used Yakima products for decades and never have had issues. Even now I still trust them thus still purchase their products. This was for a gift so spreading the product name and trust.
by: Paul11/23/2021
Added a bike and ski racks and all performed well
by: Patricia Douglas02/14/2022
Went Over and beyond on helping me solve a difficult problem on
how to fine and put a roof rack on a very difficult car...
Best Customer Service of any company I have ever worked with.
Great service before and after the sale to make sure everything
went smoothly. Can’t thank them enough. Very happy customer.
by: Deborah07/27/2023
Great service - great price
by: John07/06/2020
I received the Rain gutter riser, 66' round bars, boat loader and SKS lock cores all well packaged and in good shape. These are for a 2020 Jeep Wrangler JLU Rubicon. The products were easy to install and will work great for loading and transporting my Hobie Outfitter Kayak. The Outfitter is a heavy kayak at 75 lbs unloaded. The Yakama Boat loader makes it easy for one person to load and unload the kayak. The rain gutter mounts and round bars securely hold the kayak for transportation. When not transporting the kayak the whole system quickly removes.
A big plus with ordering through etrailer is the excellent custom service, they will be my go to for future orders.
by: Harold05/15/2022
These shipped very quickly and fit great. While I couldn’t get the bars I wanted until August, I was able to get them elsewhere. Thanks for your help. Would have been 5 starts had I been able to get everything from etrailer
by: David K.07/23/2017
The roof mounts were fairly easy to install with the help of the well written installation instructions. I am looking forward to using my new Yakima roof rack for hauling my ladders or a rooftop clamshell cargo bin that I have.
25
377
Show More Reviews Ask the Experts about this Roof Rack
Do you have a question about this Roof Rack?
- Will Yakima 48-Inch Roof Rack Crossbars Fit the 2013 Dodge Dart
- The Yakima roof rack component that you referenced, part # Y00409, is a 58-inch bar that is part of a complete rack system that fits the naked roof on your 2013 Dodge Dart. Installation of this system on your vehicle is shown in the linked video.
Crossbars that are 48-inches will not be long enough for your vehicle. The shortest crossbars that will work on your Dart are the 50-inch size.
No matter which rack you choose you will want to verify in your owners manual (or with your local
view full answer... - Best Roof Rack Fit for 2020 Jeep Gladiator
- The best roof rack for your 2020 Jeep Gladiator consists of the Yakima 1A Raingutter Towers # Y00101 and Round 58" CrossBars for Yakima Roof Rack System # Y00409.
As you can see from the accompanying photo, which is from Yakima, this roof rack system will give your Gladiator a fantastic way to mount accessories like bike racks, kayak carriers or cargo boxes so you can get to your destination in style with all your needed gear.
I also recommend using the Yakima Same Key System (SKS)
view full answer... - Roof Rack for 2014 GMC 1500 Crew Cab
- Yakima offers a roof rack option for your Sierra.
You can construct a rack using the following parts:
58 Inch Round Crossbars, part # Y00409
BaseLine Towers, part # Y28TR
RoundBar Adapters, part # Y03536
BaseClip Fit KIt, part # Y06122 (you need two kits)
You can see current pricing by clicking the links to the product page for each of the items mentioined above.
view full answer... - Crossbar Recommendation for Yakima JayLow Kayak Carrier and 2015 Jeep Grand Cherokee
- The best roof rack we carry for using long crossbars is the Yakima RoundBar system. Since the bars slide through the mounting points on the feet you can essentially use whatever length of bar you'd like. I do caution you to not get bars that extend out further than the side view mirrors though.
The Yakima system that fits your 2015 Jeep Grand Cherokee with the black and chrome roof rails is the SkyLine system. You need the SkyLine towers # Y53TR, RoundBar adapter # Y03536, and Landing
view full answer... - Parts Needed for Yakima 58 Inch RoundBar Roof Rack on 2016 Toyota 4Runner
- All you'll need to do is order the # Y03536 RoundBar SL adapter kit which comes in a quantity of 4 and the
# Y33TR TimberLine towers, also sold in a quantity of 4.
Since you already have the 58 inch RoundBars, that's all you'll need.
I've linked to the parts, just click each product link, add the parts to a cart and you'll be good to go!
view full answer... - 2015 Ford F-250 Super Duty Single Cross Bar Roof Rack
- We do have an option for a single bar roof rack for your 2015 Ford F-150. Best option is the Rhino Rack that consists of part numbers # RRVA150B, # RRRLKVAH, and # DK190H.
Any other brand of rack is going to require you to buy more parts than you'd need. This is an aero shaped bar too which will minimize wind noise/resistance.
view full answer... - Roof Rack Recommendation for a 2016 Toyota Tundra Crewmax
- Yakima makes a roof rack that is confirmed to fit your 2016 Toyota Tundra Crewmax. For that you would want the part numbers # Y00409, # Y28TR, # Y03536, # Y06121, and # Y06129. Your moonroof would be compatible with this rack.
I also was able to get a picture of this rack installed on a Tundra very similar to yours.
view full answer... - Roof Rack to Fit a 2014 Toyota Prius to Carry Bikes and Skis
- Since you're looking at a number of components (a roof rack, 4 bike carriers, and a ski carrier) I recommend sticking with one manufacturer for all the pieces so you can have the locks all keyed the same if you choose. For the roof rack I like the Yakima round bar system using the 58 inch crossbars # Y00409, BaseLine Towers # Y28TR, adapter # Y03536, and BaseClip # Y06117.
For the bikes a great carrier is the Yakima FrontLoader, part # Y02103. It'll fit on the round bars nicely and
view full answer... - Recommendation Roof Rack For 2014 Ford Fusion with Naked Roof
- With a naked roof, I recommend looking at the Yakima roof rack system that is a custom fit for your 2014 Ford Fusion. This system includes:
Round CoreBar Crossbars, Item # Y00409
BaseLine Towers, Item # Y28TR
RoundBar Adapter, Item # Y03536
Base Clips and Pads, Item # Y06110 & Item # Y06102
If you want securely lock the roof rack then you will need Yakima Same Key System locking cores, Item # Y07204.
For a more economical option, I recommend the Inno Roof Rack system. This
view full answer... - How to Use Yakima Round Crossbars on 2017 Honda Ridgeline With Naked Roof
- The Q Towers have been retired by Yakima, so while we have a way for you to use your current Round 58" CrossBars for Yakima Roof Rack System # Y00409 on your 2017 Honda Ridgeline with a naked roof, you will need new towers, fit kit, and round bar adapter. The correct parts are the follwing:
- BaseLine Towers for Yakima Crossbars - Naked Roofs # Y28TR
- BaseClip Fit Kit for Yakima BaseLine Roof Rack Towers # Y06152
- RoundBar SL Adapter # Y03536
view full answer... - Wider Spread Roof Rack Recommendation for 2015 Toyota Venza with Naked Roof
- The only wider crossbar roof rack we have available for your 2015 Toyota Venza is the Yakima part numbers # Y00409, # Y28TR, # Y03536, # Y06129, and # Y06131 that you mentioned which has 33 inches of crossbar spread.
Most Thule roof accessories that are designed for square bars are also designed for round bars so this should still work great for you.
view full answer... - Carrying a Fishing Kayak on a 2012 Honda Accord Coupe with Sunroof
- I can't directly recommend a roof rack setup for your kayak as the 2012 Honda Accord Coupe may not have a high enough weight capacity.
If you can verify the weight capacity of your roof with Honda, you can use the Yakima roof rack system consisting of the following parts.
Round 58" CrossBars # Y00409
BaseLine Towers # Y28TR
RoundBar SL Adapter # Y03536
BaseClip Fit Kit # Y06119
This rack is rated for 100 lbs and you'd also need to add locks # Y07204.
view full answer... - Kayak Carrier and Roof Rack Recommendation for 2006/2007 Mazda 3 Hatchback
- For a two kayak carrier that would work great on both of your Mazda 3's you would want the Yakima BigStack part # Y04041. This will carry your two kayaks easily and comes with all of the needed straps to secure them.
For both your 2007 and 2006 Mazda 3 the same Yakima roof rack will fit and work well. You would need the part numbers # Y00408, # Y28TR, # Y03536, # Y06143, and # Y06111.
view full answer... - Roof Rack for a 2013 Jeep Wrangler Unlimited Sahara
- I recommend the Yakima 1A Gutter Rack, a kit consisting of:
Yakima 58 inch Round Bars, part # Y00409
Yakima 1 A Raingutter Towers, part # Y00101
This will give you an excellent rack for your vehicle with the hard top equipped and be very easy to install.
Because of the easily accessible knobs, I recommend picking up Yakima's SKS cores, part # Y07204 to add an extra layer of security to the rack.
view full answer... - Roof Rack Recommendation for 2020 Hyundai Palisade With No Rails or Crossbars
- Although we don't offer a roof rack option that would provide the side rails, we do offer roof rack options that would work for your 2020 Hyundai Palisade.
For a Yakima round bar roof rack, you'd need the following parts:
• Yakima 58 inch round crossbars, part # Y00409
• Yakima BaseLine Towers, part # Y28TR
• Yakima SL Adapters, part # Y03536
• Yakima Base Clips # Y06145
• Yakima Base Clips # Y06138
You might want to consider going with an aero-style crossbar, however. The
view full answer... - Is the Yakima LockNLoad Platform Compatible with Yakima Round Bars
- Yes. The Yakima Rain Gutter Towers # Y00101 can be used in a complete roof rack system using the Yakima Round Bars # Y00409 to mount the LockNLoad Platform Rack for Crossbars - Aluminum - 55" Long x 49" Wide # Y05044-39. You won't be able to mount the LockNLoad directly to the roof though.
It looks like you might have a 2020 Jeep Gladiator, so if you wanted to mount directly to your roof the best solution is the Rhino-Rack Pioneer Platform Rack with Backbone Mounting System - 48" Long
view full answer... - Yakima Roof Rack that Fits 2018 Kia Sorento
- The RailGrab style of the Yakima roof rack was phased out couple years ago but Yakima does offer a round bar roof rack for your 2015 Kia Sedona with part numbers # Y00409, # Y00145, # Y03536, and # Y06006. If you have round bars already you could still reuse them.
Or we have an aero bar fit too with part # Y00426, # Y00145, and # Y06006 which would give you a quieter ride quality.
view full answer... - Yakima Roof Rack Options for 2015 Ford Edge Sport with No Existing Roof Rails
- The Yakima round bar roof rack we offer for your 2015 Ford Edge Sport with no existing rails or crossbars is composed of 5 parts, items # Y00409, # Y28TR, # Y03536, # Y06102 and # Y06139, which are the items you referenced.
All four Yakima roof racks for your 2015 Ford Edge are shown on the linked page. The BaseLine system with black bars consists of parts # Y00422, # Y28TR, # Y06102 and # Y06139.
view full answer... - Yakima Roof Rack Recommendation for a 2012 Hyundai Sonata
- The only option for installing a Yakima roof rack on your 2012 Hyundai Sonata will be to use the door clamp setup as there isn't a gutter or fixed mounting point option available.
You would need the following to complete the rack:
Round 58" CrossBars for Yakima Roof Rack System # Y00409
BaseLine Towers for Yakima Crossbars # Y28TR
RoundBar SL Adapter # Y03536
BaseClip Fit Kit # Y06144
BaseClip Fit Kit # Y06153
view full answer... - Recommendations on How to Safely Carry 12 Foot Jon Boat on Roof of 2013 Hyundai Tucson
- A great choice would be a Inno Square bar roof rack, which would be made up of the following parts:
54 inch square profile crossbars part # INB137
Inno Feet for Crossbars, part # INSUT
Vehicle specific clamp kit, part # INK605
To secure the boat to the roof, using ratchet straps like # IMF14256 hooked over the crossbars would provide a secure hold for the boat. Using foam blocks like # MPG152 would protect the roof rack from the boat and vice versa, as well as adding some friction
view full answer... - Roof Rack for a 2022 Jeep Wrangler Unlimited with OneTouch Skytop
- I do have an option for you. I checked with our manufacturers and was able to find one roof rack that will work for your 2022 Jeep Wrangler Unlimited with OneTouch Skytop. This rack will fit and still allow you to open the top as long as you use the recommended spacers. All of the parts needed for this rack are listed below.
- Yakima 1A Raingutter Towers # Y00101
- Round CrossBars for Yakima Roof Rack - 58" # Y00409
- HiRise Spacers for Yakima 1A Raingutter Towers # Y01101
You can
view full answer... - Why Aren't Rubber Boots Included for the Outside Raingutters with Yakima Raingutter Towers
- I assume you are talking about the hook part of the gutter feet. A rubber boot would cause fit issues with the Yakima Raingutter towers # Y00101. Rubber or plastic can flex and move which could lead to the clamp part of the tower to come off. The hooks are coated so as to avoid metal on metal contact.
If you want you could place protective clear film, # 853-5481, in the desired locations. This is a set of 4 film sections so that works out well since there are 4 towers. But you may need
view full answer... - Non-Roof Rack Towers for a 2016 Jeep Wrangler
- For your possible application, I recommend a set of Yakima A1 Raingutters, part # Y00101. These are a confirmed fit for your 2016 Jeep Wrangler, and have individual loops on the top that can be tightened to fit your application.
Unfortunately, these only come in a four pack, but depending on what you plan on using them for, this can be useful as additional contact points.
I recommend a kit of SKS locks, part # Y07204, as these use a simple screw-on assembly and the locks will secure
view full answer... - Recommended Spacing Between Yakima Rain Gutter Towers on 1998 Jeep Cherokee
- When mounting rain gutter towers, # Y00101, there is no specific distance apart they must be placed. What you will want to look at is where you can mount them (the strongest points on the roof would be ideal) and how far apart you need them to mount various items like bike racks, canoes, kayaks, cargo boxes, baskets or any other accessory. Just remember that if you place the bars too far back then items on the roof may hang over the back end too much. Same for the front.
In addition
view full answer... - Can Yakima Raingutter Roof Rack Work With 2011 Jeep Wrangler Unlimited
- The Yakima roof rack that uses the 1A Raingutter Towers is confirmed as a fit for your 2011 Jeep Wrangler Unlimited. There is no drilling required for installation.
The weight capacity of this roof rack is 100 lbs. To order this roof rack you will need part # Y00409, and part # Y00101.
The Thule Roof Rack does not require drilling for installation either. This roof rack features steel square crossbars and has a weight capacity of 165 lbs. To order this roof rack you will need part
view full answer... - Kayak Rack and Roof Rack Recommendation for a 2016 Jeep Wrangler Unlimited
- Yakima also offers a roof rack solution. Crossbars can be installed using the Yakima 58 inch crossbars, part # Y00409 and Rain Gutter Towers, part # Y00101. However, this rack can only be used when the soft top is removed. With the soft top on there are no solutions we can provide.
I would recommend the Thule Stacker Kayak Carrier, part # TH830 for use with this rack.
view full answer... - Rain Gutter Roof Rack Availability for a 1959 Rover P4
- The Yakima Tower Kit we have for Rain Gutters is part # Y00101. This has never been tested on your 1959 Rover P4 but it is designed to fit rain gutters like what you have. You would need two crossbars part # Y8810023 as well.
The height of the gutter feet is 7-1/4 inches. I looked at pictures of the roof of your vehicle and it has a pretty rounded roof. If you needed a taller setup you would also need the spacer to increase the height part # Y01101 which will ad 3-1/2 inches.
view full answer... - Are Yakima Q-Clips Available to Put a Roof Rack on a 1997 Toyota Previa
- I have a solution for you, but you won't be able to use the Yakima Q Towers because there are no Q-clips available to fit your 1997 Toyota Previa. Instead, you'll need to use the Yakima 1A Raingutter Towers # Y00101 to attach a roof rack to your vehicle. The Yakima 1A towers mount in the rain gutters on your Previa and will provide you with the mounting points needed to create a roof rack system.
For crossbars you can use either the Yakima 58" Round Bars # Y00409 or 48" Round Bars #
view full answer... - Carrying Kayaks And Operating The Sunroof On A 2021 Jeep Wrangler Unlimited
- The Yakima 1A Raingutter Towers (QTY 4), part Y00101, is not tall enough to work with the one touch sunroof on your 2021 Jeep Wrangler Unlimited. In order to operate the sunroof you need the tallest, 11", rain gutter towers. If you add the HiRise Spacers for Yakima 1A Raingutter Towers, part # Y01101, your towers will have the necessary height. You can add the Round 58" CrossBars for Yakima Roof Rack System (QTY 2), part #Y00409. This rack will have round bars, so any of our kayak carriers
view full answer... - Yakima Roof Rack Parts Needed for a 1999 Ford Econoline Van
- The components needed to install a Yakima roof rack on your 1999 Ford Van that has rain gutters are the part # Y00410 for the crossbars and then the part # Y00101 for the raingutter towers.
Feel free to send me pictures of your van if you like and I will check them out if you like.
view full answer... - Yakima Roof Rack Recommendation for a 2011 Jeep Wrangler
- The difference between the two mounting brackets is that the # Y08001 moves the attachment point for the Raingutter tower part # Y00101 out further to clear a roof that is tall or has steep or square sides.
The # Y08002 is the regular one used for roofs that are shorter and have less steep sides.
It really depends on the profile of your roof and how high/low you want to install the gutter tower.
If you are installing the rack high on the roof you would want the # Y08002. If you
view full answer... - Roof Rack for a 2000 Jeep Wrangler with Aftermarket Hard Top
- In order to install a roof rack on the aftermarket hard top on your 2000 Jeep Wrangler you will have to do some drilling. You would need to use the Yakima side loader brackets # Y08002, to create artificial raingutters.
Then you will need Raingutter Towers, # Y00101, and CrossBars # Y00409.
At this time there are no non-drilling options for the 2000 Jeep Wrangler with an aftermarket hard top that does not have raingutters.
view full answer... - Artificial Rain Gutter Recommendation for a Trailer to Allow a Yakima Rain Gutter Roof Rack to Fit
- Since you have Yakima Rain Gutters towers like part # Y00101 all you would need is their set of artificial rain gutters part # Y08001 to install the roof rack you have on your trailer.
We do not offer a way to attach your Yakima components directly to a square bar setup that you may have.
view full answer... - Parts Needed to Install 3-Crossbar Yakima Roof Rack on 1989 Toyota Land Cruiser
- Yes, you can use 2 of Yakima Replacement 1A Raingutter Tower # Y8810137 to add a third round crossbar # Y8810025 to the roof of your 1989 Toyota Land Cruiser. You will want to order the following items and quantities to get your 3-bar rack system.
# Y00410 = 1
# Y00101 = 1
# Y8810137 = 2
# Y8810025 = 1
# Y8810136 = 1
These items will give you a total of three bars and six towers.
view full answer... - Recommendation on a Roof Rack and a Kayak Carrier to Fit a 2016 Ford F-150 Super Cab
- I have a solution for a roof rack and kayak carrier for your 2016 Ford F-150 Super Cab.
I recommend the Yakima JetStream Roof Rack System, # Y00426 JetStream Crossbars, # Y28TR BaseLine Towers, and # Y06122 BaseClip Fit Kit. The JetStream bars are an aerodynamic aero design that will cut down on wind drag and noise when in transit. The crossbars are constructed of lightweight and sturdy aluminum and full length design allows for maximum space for carrying roof mounted accessories.
For
view full answer... - Will the Yakima 1A Raingutter Towers Work with the Kwik-Rail Mounting Brackets # Y08002?
- From the looks of your photo, you have the Side Loader Mounting Brackets for Yakima 1A Raingutter Towers # Y08002. I confirmed with my tech at Yakima that the Yakima 1A Raingutter Towers (QTY 4) # Y00101 fit these Kwik-Rail mounts. For theft-deterrence, I recommend the Yakima Same-Key Lock Cores # Y07204.
If you need Yakima RoundBars to go with the towers and the brackets, I recommend one of the following crossbar sets:
- Round 48" CrossBars for Yakima Roof Rack System # Y00408
-
view full answer... - Roof Rack System for 2008 Jeep Wrangler Unlimited with Factory Hardtop
- According to Yakima, the drip rails on that factory hard top are not structural. When used in this installation, the crossbars are intended for use with skis or snowboards only. The maximum allowable load would be 6 skis or 4 snowboards. When used within this limited scope, the drip rail mounts will not damage the rain gutter or drip rail. If used for any other purpose, they would most likely be damaged.
If you decide to install the Y00101 Raingutter Towers and 58 inch load bars, keep
view full answer... - Will Yakima Round 48 Inch Crossbars # Y00408 Fit My 1997 Toyota Corolla
- Yes, the Yakima Round 48 Inch Crossbars, part # Y00408, will fit your 1997 Toyota Corolla. To mount the # Y00408 Crossbars, you will need to use Yakima 1A Raingutter Towers, part # Y00101.
You will want to check the roof load carrying capacity of your Corolla as stated in the vehicle owners manual as you will not want to exceed it.
I have linked an FAQ roof racks that you may find as a good reference. Also linked are all the roof racks we have available for the 1997 Toyota Corolla.
view full answer... - Alternating Sides When Installing Yakima Raingutter Towers On 1987 Volkswagen Vanagon
- One problem that many folks have when installing a roof rack is that they will work on one side of the vehicle to tighten it down and then move to the other side only to find that they cannot get it to tighten up as they need.
When installing the roof rack it is recommended to tighten each side evenly which means you will need to tighten one side a little and then move to the other side and tighten that side the same amount, alternating until the roof rack is secure, much like tightening
view full answer... - Recommended Roof Rack for 2006 Dodge Sprinter
- Yes, we do offer roof rack options for a 2006 Dodge Sprinter which mount to the rain gutter channels. I recommend the Yakima Rain Gutter Round Bar System which consists of part # Y00101 and part # Y00410. These crossbars will allow you to use all sorts of rooftop mounted accessories. They are made of galvanized steel so they are both strong and long lasting.
I have linked our watersport carrier selection below for you as well.
view full answer...

Yakima Accessories
Fit to this rack on your 2011 Jeep Wrangler Unlimited


Info for these parts were:

Expert Research:
Mike L

Expert Research:
Michael H

Expert Research:
Reno H

Expert Research:
Jameson C

Expert Research:
Adam R

Expert Research:
Jeffrey L

Test Fit:
Zack K

Test Fit:
Carla M

Test Fit:
Robert C

Test Fit:
Adam E

Video by:
Andrew K

Video by:
Zach D

Written by:
Tyler C

Video Edited:
Jacob T

Video Edited:
Dustin K

Video Edited:
Chris R

Updated by:
Wilson B

Updated by:
Alex H

Updated by:
Michael B

Updated by:
Noah M
At etrailer.com we provide the best information available about the products we sell. We take the quality of our information seriously so that you can get the right part the first time. Let us know if anything is missing or if you have any questions.
Jeep Wrangler Unlimited Accessories


Product Experts Available Now!
Call 1-800-940-8924
Keith W.
5/16/2021
Still in love with it