Hey Kaysie, thanks for reaching out! Yes, the B&B Top Rear Corner Trim Cover for RV Seam #BM65XR will work for both the left- and right-hand sides of the RV. Just make sure you don't use screws for the left side of the trailer for the right…
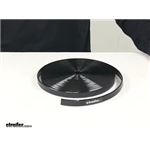
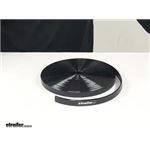
Hey Doug, from what I can see, the Camco RV Vinyl Trim Insert #CAM25312-10 and the Camco RV Vinyl Trim Insert #CAM25212 are the exact same. They both are 100' x 1", have the same shape, and are both made from Vinyl. I'm not too sure why…
Hello Mike, thanks for reaching out. The Replacement Shock for Dexter Model 6 and 10 Brake Actuators #T1242600 may work for you, but we do not carry the Gabriel brand, so the information available to me about their parts is limited. Basically, the…
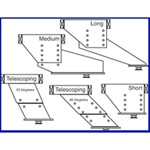
Hi David, that’s a really good question and I’m glad you’re looking at the bigger picture here, because this is exactly where people start thinking about long term stress and not just whether something will fit. Before I get into that, The Gen-Y…
I don't recommend using a higher amp converter as the converter size is based on the load of the trailer and there would be no real benefit of going with an overrated option. That said, if you want to go up 5 amps or so that shouldn't really…
Hey Thomas, welcome back! And thanks for all of the info you listed on your 2021 Forest River Rockwood Minilite. Based on that I would recommend going with the higher rated scissor jacks part #e96VV which are rated for 15k for the pair. Are you…
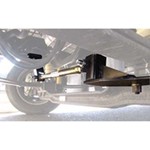
Hello Darin, thanks for reaching out. I do have a solution for you. What I recommend is the Dexter DX7.5 Drop-N-Go Brake Actuator #099-175-00. This is made for trailers with drum brakes, and it attaches to a 2" ball. It does not come with an…
To determine if the Replacement Shock for Titan Model 6 and 10 Brake Actuators, part #T1242600 will work to replace your Gabriel number 610712 (T2032) shock, you will need to verify a few quick measurements. Part #T1242600 will work as a replacement…
Hey Dylan, thanks for reaching out! Your UFP HD1377 drums will fit with a 10" brake assembly which means you can use the Replacement Wheel Cylinder #AKBRKR-H7-R for the right-hand (passenger side) or the Replacement Wheel Cylinder #AKBRKR-H7-L…
From my research, the correct replacement for the UFP HD1377 hub/drum is the Trailer Hub and Drum Assembly part #AKHD-545-35-K or the Dexter 5 on 4-1/2 Complete Hub-and-Drum Assembly part #84546UC3. These hub/drums both use a L68149 (1.378"…
The Furrion Chill Replacement RV Air Conditioner for Dometic Brisk Setup - 15,500 Btu #FR42PV has multiple drain holes throughout the bottom of the unit. I've attached a photo from a Furrion tech where she highlighted all of the drain holes.
Explore 100 Feet Long RV Trim for Your Next Adventure
Discover the versatility of 100 feet long RV trim, perfect for extensive projects. This length offers flexibility for various applications, ensuring a seamless finish. Whether you're replacing old trim or customizing your RV, this option provides ample material to work with.
Installing 100 feet long RV trim can be a bit challenging, especially on curves or radii. It's important to ensure the trim is fed correctly into the channel for a smooth finish. Some find it helpful to have an extra pair of hands to keep the trim in place while installing.
Quality varies, with some trims being more supple and easier to work with, while others may be too thin or stiff. Look for trims that maintain flexibility over time and provide a smooth, rounded finish. Be mindful of color variations, as some trims may appear darker than expected.
100 feet of RV trim is generally sufficient for most standard RV projects, including replacing worn-out trim or customizing sections. It's always a good idea to measure your specific needs to ensure you have enough material, especially if you're covering large areas or multiple sections.
The durability of RV trim can vary. Some trims may shrink or become wavy over time, especially in extreme temperatures. It's crucial to choose a high-quality trim that resists stiffening and maintains its appearance for a longer period.
A common mistake is installing the trim with the wrong side out, which can affect the appearance. Ensure the concave side is facing the right direction. Also, take care to avoid stretching the trim too much during installation, as this can lead to shrinkage or waviness later.


 Filters