
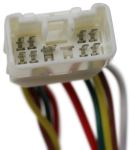
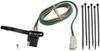
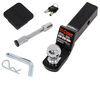
Curt T-Connector Vehicle Wiring Harness with 4-Pole Flat Trailer Connector


To see if this custom-fit item will work for you please tell us what vehicle you'll use it with.
Thank you! Your comment has been submitted successfully. You should be able to view your question/comment here within a few days.
Error submitting comment. Please try again momentarily.


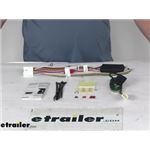
Quickly and easily install a 4-way trailer connector on your vehicle with this custom harness. Connectors plug directly into existing wiring. Powered converter reduces strain on wiring system and is made using SMT to ensure superior performance.
Features:
Specs:
Installation
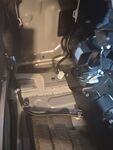
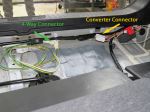
This custom-fit T-connector plugs into your vehicle's wiring harness. The connection point for the 4-way tow harness is located behind the interior trim panel in your rear cargo area. Once you've plugged in the converter, insert the included 10-amp fuse into the integrated fuse holder.
Once installation is complete, the 4-way connector will be stowed in an out-of-the-way location within your cargo area.
It is recommended that you use a small amount of grease on all electrical connections - the plugs on your automobile and the 4-pole connector itself - to help prevent corrosion.
A tail light converter is built into this T-connector. This converter is a circuit-protected, battery-powered unit that bypasses the electrical routes that are used by a basic wiring harness. As a result, there is virtually no draw on your tail light circuits.
Because most trailers run on a two-wire system - wherein the brake and turn signals are carried on one wire - the separate brake and turn signals from your vehicle's three-wire system need to be combined so they are compatible with the wiring system of the trailer. This converter combines the brake and turn signal functions of your automobile so that they run on one wire to properly activate your trailer's tail lights. Note: This will not affect how the tail lights on your vehicle operate.
Curt builds each tail light converter using surface-mount technology (SMT). This method of construction involves soldering electronic components directly to the surface of a printed circuit board. SMT eliminates the need for leads, which are used in older through-hole technology. The result is a circuit board that is smaller yet provides more routing area and that offers superior performance, reliability and durability.
Circuit boards constructed using SMT have been shown to perform better under rough conditions with excessive vibration than those made using the through-hole method. And where would vibration be more likely to occur than in towing applications? Curt converters also produce less heat, leading to increased durability and longer life. In addition, lower levels of resistance ensure better performance, especially for parts that operate at higher frequencies.
Each Curt circuit board is made using high-quality components that are pieced together in the most technologically savvy fashion, leading to greater predictability and reliability in functioning.

California residents: click here

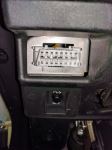
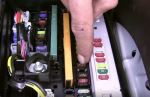
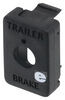
Great product, super easy to install. The video was perfectly helpful. I saw some folks struggling with where to put the fuse, but on my 2015 Highlander it was labeled clearly (see pic for reference). I ran my cable through the drain hole on the back left (under the small storage compartment that you remove in one of the steps) by cutting an “X” and pushing the white connector up through it. I then bought a Curt 58300 wiring harness and mounted it on the rear bumper for my 4-pin connector.

I had my local mechanic install the trailer hitch and wiring kit. It worked out perfect.
excellent product, straightforward installation, leverages the connections built-in to the Highlander. One suggestion: to get the cable out to the hitch, there is a convenient plug in a body port under the starting battery in the left rear of the vehicle. I modified the portal to sneak the 4 flat connector through it and the plug to stay snug to the cable. e-trailer / Curt could provide this product with a molded plug already on the cable and instructions/template for modifying the portal. It would be the cherry on top!
The harness and module has worked as described with no issues for over a year. I'm always a little concerned when buying 3rd party devices for my vehicles but Etrailer's harness was a correct match for my vehicle. Customer service was easy to reach and knowledgeable when I called to discuss verification of the correct harness.
Out of all the etrailer hitches I have install for myself or my friends...this one was the easiest. They are all easy but this one was the cake! Love the quality and the fit. Can't beat the price either! I decided to run my 4 pin flat outside the SUV through a rubber grommet. Cleaner look to me. :)
Installed just like the instructions on my 2012 highlander and has worked flawlessly for going on a year.
Great for this Highlander. Toyota thought ahead and included the wiring from the dash to the tail area in the harness already. This just plugs in one both ends and install a ground wire and done. Two thumbs up.
Only reason I didn't give 5 stars because the ground wire terminal needed to be swapped out for the provided one and the installation video vaguely showed the ground wire so I basically just had to wing that part. Other than that installation was a breeze thanks to the video.
Excellent product! Will ger all my towing needs from etrailer.
After drilling a hole for ground it was plug and play.the directions with pictures made it easy.
At 72 years old, it took me three hours to install the hitch and wiring on my 2015 Highlander. The videos made it easy! No surprises and perfect fit.
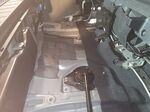
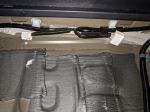
I have a 2019 Highlander and the installation went very well. I bought the Drawtite hitch with the mounting bracket for my wiring plug, so I wanted my wires to go under the vehicle and not through the rear door. Once I removed the trays from the back of the vehicle, there was a rubber plug in the corner that could be removed that allowed access under the vehicle. I decided to use my box knife to cut a slit in the rubber plug. I had to cut my wiring harness across the 4 wires to run them through the rubber plug. I crimped them back together as seen in the photo. I used zip ties under the vehicle and inside the back to clean things up.

Mike L.
1/28/2019
Nice job on the install! I would make one recommendation.. Id use some silicone to seal the hole in the grommet where the wire passes through to prevent moisture or exhaust gasses from entering the passenger cabin.
The website gave me the perfect fit for our Highlander. Shipping was fast and arrived on time. Installation was a breeze with the hitch and wiring harness. Great overall experience. FYI…I installed this entire system by myself in under an hour.

Joshua 
6/12/2023
Works perfect
Shipping was prompt. Arrival was without damage. Instructions were clear and easy to follow. Installation time was about an hour as the instructions predicted. The fit was perfect! The qualtiy seems good and the hitch looks good on my vehicle!

Tom D.
9/17/2018
Excellent..no problems!
Anna A helped me get the right part — after I ordered the wrong one from the website — and helped me initiate a return on the wrong one. Great customer service!
Got the replacement, got it installed, and all is working well now.
Thank you!
Trailer harness plugged directly into factory connections and worked perfectly.
Products are well made and very easy to install. I regret that I didn’t buy a tester but I will hook up to a neighbors trailer to check that all the lights work properly.
This wiring harness fit my 2008 Toyota Highlander Sport perfectly! It's very easy to install, especially if you watch the installation tutorial video. It's literally plug and play. Everything you need comes with it, including the fuse and zip ties to hold everything in place. The only hard part for me was getting under the dash and tucking everything away neatly, but that's because I'm a big guy and there's not much room down there. I ran mine to the outside of the vehicle to the hitch and installed it in a mounting bracket instead of leaving the harness inside the car and pulling it out every time I need to use it. There was an extra hole that had a rubber plug in it near the tail light area where the connector for the harness is. I took the rubber plug out and ran the wiring to the hitch. I filled the hole with silicone caulking on the inside and outside to prevent any water from getting in. I also wrapped all of my connections with electrical tape. The four way has a dust cap to protect the pins from dirt and debris when not in use. I installed it on the hitch using the mounting bracket (item 18144) here: https://www.etrailer.com/p-18144.html . Looks great! I tested my connections and everything works perfectly! Great product, great price, and you save a ton of money on installation by doing it yourself! Thanks, etrailer.com, for the great tutorial and product research!
Hitch arrived w/in a week of placing the order, free delivery! Box was slightly banged up, but hitch was not damaged at all. Please note there is no interior packaging around the hitch. This was a self-install, one man job. Hint: watch the etrailer videos & other videos online as this will help a lot. I had no issues w/fitting the hitch but one of the tips I did use, was to reuse the box the hitch shipped in as support for the hitch during installation. I also used a scissor jack for final mounting to line up all bolts. I tightened to the recommended torque and was VERY pleased w/the final outcome. Passenger side under panel trim did not need trimming, drivers side did require a cutout but you can trim this smaller than the instructions detailed. Hitch looks great on my 2010 Toyota Highlander! Ordering from etrailer was easy & I would do so again, if needed.
Today I installed:
- Draw-Tite Max-Frame Trailer Hitch Receiver (Item #76156)
- Curt T-Connector Vehicle Wiring Harness with 4-Pole Flat Trailer Connector (Item #C56217)
- 7-Way RV Upgrade Kit for Trailer Brake Controller Installation - 12 Gauge Wires (Item #ETBC7L)
It took about 4 hrs at an amateur pace with manual tools.
This is the second time I put a trailer hitch receiver on a Toyota Highlander. My first installation was a Curt on a 2010 Highlander. This time I got the Draw-Tite for my 2018 Highlander.
Few observations:
- The fact that the car comes pre-wired and with welded nuts for the hitch makes the installation smooth and easy. Nicely done by Toyota.
- The Draw-Tite hitch receiver is NOT designed for use with weight distributing hitch, which may be an issue for some users.
- I like the that the hitch is nicely hidden under the rear bumper and comes with the bracket for trailer electric connector. Keeps things nice and tidy.
- The installation can be done by one person (with the aid of a couple of plastic buckets), but I STRONGLY recommend to have a helper. The hitch receiver is heavy and if you drop it can cause some serious damage to your body.
- There is no need to remove the passenger side plastic mud cover behind the rear wheel.
- There is a good reason why they don't show you the cutting and installation of the driver side mud cover in the etrailer videos. It's the proverbial PITA. :-)
- The receiver ends-up about 16" from the ground (with the car unloaded), so you will need a 2-3" rise ball mount to end around 17-18" once the trailer is hooked up.
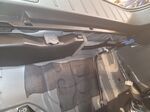
- The cables can be routed nicely through an existing hole under the driver side plastic storage bin. It comes with a rubber plug which can be cut just enough to lush the connector through. This is the cable routing for OEM Toyota trailer cables. And because is it hidden under the plastic mud cover, you don't have to worry water getting in when driving on a rainy day.
- Make sure to protect the cables with a plastic hose or by wrapping them with plenty of insulating tape to prevent chaffing in the places where the cables cross hitch members. Some edges can be sharp and sooner or later will cut through the insulation.
- Trailer wiring and the T-connector are power all the time, regardless of if the key is in the ignition or not. So make sure to unplug your trailer when parked for extended period of time to prevent running down the battery. The T-connector itself draws only about 1 mA when idle, so you don't have to worry as long as the trailer is not connected.
- The fact that you can see the hitch with the rear view camera makes hooking up the trailer a breeze by just person.
Overall, I'm happy with the product.
And etrailer customer services and prompt shipping was, as always, 5-stars. (I am a returning customer)
The customer service, as others have mentioned, is amazing. From the initial order confirmation through product install, they were very helpful. My hitch arrived bent and after a brief call to Bill in customer service, I was up and running in NO time. The online videos were super helpful, thanks!!
Joe M.
5/18/2015
Thanks for the follow up!It?s awesome. Works like a charm!A friend gave me some advice that sadly I didn?t listen to though. He told me, ALWAYS remove the ball hitch when not in use. That way when you walk around the back with groceries you didn?t hit the hitch with your shin! lol Sadly last week, after a year, i had my first encounter with the hitch while carrying groceries! lol Hopefully it?s my last.
etrailer was awesome and their listings were easy to understand.
Pros:
Plugs in easily.
Includes a varirty of fuse sizes.
Adds a 4 wire connector.
Cons:
My kit was missing the dielectric grease
The wire harness in the kit is not wrapped in loom. Buy 10 feet of 3/8 loom and a roll of electrical tape.
IMPORTANT CHANGE: The kit has enough wire to not have to flip the 4 wire out through the tailgate and look junky when you tow.
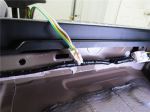
1. Where the interior 4 wire lugs into the factor harness, cut the factory harness tape away and run the factory harness as far to the driver's rear as possible.
2. Wrap the Curt leads in the wire loom.
3. Plug the Curt 4 wire plug into the factory harness, routing it to the driver's rear.
4. Low in the rear you will find a large grommet that cares wire out to the rear, cut a slightly larger hole in it, and push your 4 wire flat through.
5. Feed as much wire as you have into the void space, which is behind the rear bumper, near the lower Driver's side reflector in the bumper.
6. Get under the rear and route the Curt harness to the hitch, there a few obvious points to zip tie the harness, then zip tie to the hitch near the receiver.
This will look and function much better.
super easy install,.. works great.

Roy
7/3/2025
great
I purchased the trailer hitch and wiring harness at the same time. The wiring harness was simple to install, we watched the video and played it along side us as we did the job. The only thing I found was that the large white connector has to be tucked back up out the way or the 'trunk tray' won't fit back in properly. Everything went great, lights tested and worked.......and then where's my Leatherman? Looked all over for it and couldn't find it. Surely I didn't reinstall everything and leave it buried in the bowels of the car...........sure did.
Do you have a question about this Custom Fit Vehicle Wiring?
Info for this part was:
At etrailer.com we provide the best information available about the products we sell. We take the quality of our information seriously so that you can get the right part the first time. Let us know if anything is missing or if you have any questions.


Brooke M.
4/17/2025
Pictures are worth a 1000 words...especially when it comes to instructions ;)