

 Arrives before Christmas
 To see if this custom-fit item will work for you please tell us what vehicle you'll use it with.


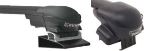
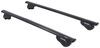
These Through feet help you mount 2 Inno Aero crossbars to your vehicle's factory flush side rails to create an extended-length roof rack. Hand knobs tighten feet in place on rails. Locking covers secure system to roof.
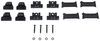
Features:
Specs:
Videos are provided as a guide only. Refer to manufacturer installation instructions and specs for complete information.
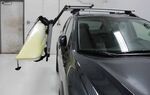
How's it going, neighbors This is Ed here with etrailer.com, and we're taking a look at the Inno Aero Bars on our 2023 Audi Q5. The number one reason a person generally gets rooftop bars is to increase the amount of space they have for cargo and bulkier items. You know, with the Q5, you don't really have a large cargo area, so if you wanna add a rooftop carrier, maybe a rooftop tent, rooftop basket, any one of those accessories, this is gonna work with most of them. It's just a great way to make use of space that you normally wouldn't have to transport items. So you're gonna press the small tab here and remove our end cap, so we can take a look at our T-track. Essentially, this is gonna be about an inch tall, about an inch wide, and you have a under track slot for accessories as well that's about 10 inches.
So overall, if you have most accessories, they're gonna work with this bar. Let's see, as far as your overhang, you don't really have much going beyond the vehicle. But your rise here from the top is right at 2 1/2 inches on center, so that's gonna work with just about everything out there. You also have a keyed alike key for each one of your feet to secure your bars to the top of your vehicle, and that just removes really easily. Once you get this guy installed, if you loosen just the nut on the inside, you'd be able to just remove it whenever you need to take your rooftop bars off, if you need a car wash or you're just storing them for the season.
So let me show you how to install this on your Q5. I'm gonna hop into the install. Take your aero bar, and you'll notice there's a slot on the bottom of it. This is actually where you install your feet. So you're gonna push down the little black button, slide it in, and that'll free up the channel to install your foot.
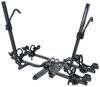
Make sure with the end cap removed, you'll align the cleat at the bottom, and this guy will just snap into place once you pull up on the lever. So now, it's locked in and you can adjust for the spread of your crossbars. I'm gonna do the same on the other side. Grab your rubber pad, and you're gonna put that at the bottom of your foot. This is what's gonna help protect your bar against scratching.
And you're gonna take your pad with the barrel nut and install it on the inside here with the pad side facing the foot. And then the final part, the same way. And as you see, you're creating a clamp that'll wrap around your crossbar. And I just kinda hand tighten the bolt through that barrel nut that's in the inside clamp just to get it started to hold it in place. And I'll do the same on both sides, then we'll put it on top of our vehicle. And once you have your crossbars positioned, I use the fixed mounting points on the raised rail themselves. There's two holes on the back of here where I use my position for my spread, but since there isn't a fixed point for the Inno to work, you can position the spread however you need for whatever accessory you may have. Using the included torque wrench, you're gonna go from side to side, slowly tightening up till you reach your torque spec just to make sure you're getting even tightening, 'cause it can cause one side to lift up, you know, if you do it completely on one side versus the other. So I'm gonna hop to the other side, tighten a little bit more, and then come back, and I'll let you see what that torque click sounds like with the wrench. (nut clicking) (wrench cranking) And that's just the sound of everything settling, and once you hear that click, it'll no longer turn, and you've reached a specified torque requirement. And we're gonna take our cover with our keyed alike key and secure our crossbar to the vehicle. As far as the spread that you have with this guy, on center, you're right at 29 inches. But you do have the usage of the entire length of your raised rails on your Q5. So this has been a look at the Inno Aero Bars on top of our 2023 Audi Q5. Have a great day.


Do you have a question about this Accessories and Part?
Info for this part was:
At etrailer.com we provide the best information available about the products we sell. We take the quality of our information seriously so that you can get the right part the first time. Let us know if anything is missing or if you have any questions.


Thank you! Your comment has been submitted successfully. You should be able to view your question/comment here within a few days.
Error submitting comment. Please try again momentarily.