
Thule WingBar Evo Roof Rack for Raised Rails - Aluminum - Black - Qty 2


To see if this custom-fit item will work for you please tell us what vehicle you'll use it with.


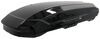
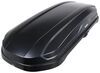
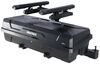
This Thule roof rack lets you carry cargo and gear on your vehicle. Aerodynamic crossbars with split rubber strips in top channels work with channel-mount and clamp-on accessories. Installs to raised rails on your vehicle's roof.
Features:
Specs:

California residents: click here
Videos are provided as a guide only. Refer to manufacturer installation instructions and specs for complete information.
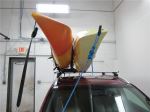
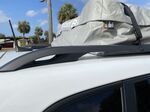
Hey guys, it's Jake here with etrailer. Today we have a 2023 GMC Terrain and we're gonna be taking a look at and I'm gonna show you how to install the Thule WingBar Evo roof rack. Adding a roof rack to the top of your car is going to allow you to haul different accessories, whether you would like to kayak or you wanna put a roof basket or a roof bag or something like that up there. A lot of people use roof mounted, or roof racks to be able to haul roof mounted bike racks so that they don't have to have a hitch on the back of their vehicle just to haul one or two bikes. This roof rack specifically, I really like it because it looks like it was designed to fit these raised rails. You wanna make sure that you do have the gap underneath your rails.
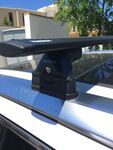
Some of these vehicles will have the, they're called raised rails but they are still connected fully to the roof all the way across the bottom. The reason I like these so much is because you can see the way that the bottom of the foot pack fits and the way that it's shaped, it fits this top rail very, very nicely. You'll see here how our little rubber grommet, our little rubber flap is kinda smashed down. That is going to help to reduce wind noise. You may have looked at a lot of reviews, or saw a lot of reviews that say that adding a roof rack is gonna add a lot of wind noise to your vehicle.
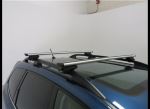
Now we cannot say whether or not this is gonna add a lot of wind noise. That's all based off of what you're gonna put on the rack itself. So like I said earlier, this is for a raised roof kit or a raised rail kit on a roof. It clamps right around it. It has those nice shaped clamps to make sure it's a nice secure clamp on there.
These roof bars I can tell you are not going anywhere. They will have 165 pound weight capacity. You'll want to check with your vehicle's owner's manual to see what your vehicle is capable of carrying and go with the lowest rated component between the vehicle and the roof bars. With these, you can get some roof bar kits that will mount to the fixed mounting points on the inside of these raised rails here. There's two sets here at the back and two sets here at the front.
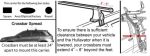
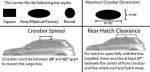
But you are stuck with that crossbar spread. You bolt it to it. I would say they do look really, really good because there's not a clamp on style. It bolts on, it looks very, very factory. With these, you can get up to a 28, maybe 28 1/2 inch crossbar spread. Unfortunately towards the back and towards the front you're not gonna be able to use that portion of the raised rail because they had to support the roof rail at some point. So they put a little support here. You can't go around this 'cause it's too thick. So if you've got that 28 1/2 inches of usable crossbar spread for those accessories that you want to put up here. When it comes to getting those accessories mounted up, I really like how Thule did it with the rubber strip on the top. Most roof bars, you're gonna have to remove the rubber strip, cut it to match or just leave it out while you're hauling your accessories. And then to get the accessory in place, you're gonna have to remove the end cap. Thule just made it to where you just open the end cap and then the rubber strip is split in half. So all you do is take your T-track accessory, slide it in and then this will fold down and your bolt slides in right in between those two rubber strips. It matches perfectly up to any accessory you have mounted up there. And then when you're not using accessory, you slide it back out, you close this lid and then your rubber strip looks like it did from the factory. The roof bars are gonna have an all aluminum construction. The shape of them are an arrow bar so it's designed to reduce that road noise as you're going down the road. The roof bars themselves are gonna have an aluminum construction, so they're gonna be lightweight and durable, they will, we've test fit these on a lot of different vehicles. We put 'em to the test, we beat 'em up a little bit and they prove to hold up over time. They're not gonna rust. What I like about this particular set is gonna be that they have an aero design, which means it's shaped very similar to like an airplane wing. So it's going to be very aerodynamic when you're headed down the road, hopefully reducing some of that wind noise. Again, like I said, they are very nice when there's no accessory on them, but with that being said, any roof bar is gonna sound exactly the same once you've got a bike or a box up there or anything like that. So just something to keep in mind is I think these look the best out of any of the other style bars out there. But you may be able to get a higher weight capacity out of some of the other bars. These are gonna come with plastic lock cores from the factory. If you wanna upgrade 'em to the metal lock cores, you can get all matching keys for all four of 'em. You can match the keys to your Thule bike rack or whatever else you may have. Whatever accessories on your roof, you get 'em all matched so you have one key that unlocks all of 'em. I personally don't mind the plastic lock cores because you can take it either a coin or a key, whatever you got in your car or your pocket to be able to unlock 'em and then just pop the end cap off and then you can take your roof assembly off of your car. With that being said, because you can get them off easily means other people can get them off easily. So if you're worried about that, pick up some lock cores, get those installed and you should be safe. A question we get a lot of times is, "Can I still open my sunroof or my moonroof with this kit installed" And we've got the roof bar as far forward as you can get it and as far back as you can get the rear one, and we've opened up our moonroof here and you can see that it fits just fine. You will want to be careful of any accessories or anything like that that hang down further. A lot of the accessories will mount with the clamp or whatever hanging down around the bar. But just be careful, be cautious. You can try opening it with your accessory installed and that'll give you a good idea whether or not it's gonna fit. Now that we've gone over some of the features of the roof rack, let's go ahead and show you how to get it put together and installed. To get our roof bar assembled, they're gonna assemble the same way. So we've got our front one already installed on our vehicle. We'll show you how to assemble the rear one. We'll take one of our feet and then you'll just wanna make sure that this measuring tape here that's built in, slide that all the way back. We're gonna take the foot, slide it in, then you can take your end cap right away, throw that in at the end. That'll help the foot from sliding all the way out. We're gonna do the same thing to the other side. Put our end cap in, and then from this point, that's what's nice about this kit is that it's ready to go on a roof. I will say the one thing I'd recommend is make sure you loosen up this bolt a little bit so that you can open this gap a little bit more. 'Cause if you get it all the way up there and it doesn't sit right into place, it's kind of difficult to walk back and forth on the vehicle. Now we'll take our roof bar, we're gonna lift it up into place. I'm gonna set it to the widest location so that you guys can see how far back you can go with this. And it makes it easy to measure 'cause we won't have to measure, but we'll set it up there and then we'll push the bar to where it kinda looks like it's even on both sides. And then what we need to do is we'll take a tape measure or you can use these little tabs underneath, push 'em tight and make sure that our spacing is correct on both sides of the vehicle. Once we get the crossbar even on both sides, we're going to just take this bolt, get it as close as we can by hand first. Then we'll grab the tool that comes in your kit. And this is a torque tool so it will only let you tighten it as far as Thule recommends. So we'll give it a little bit of pressure on this side. You can tell by it squeezing down like that. And then we'll go over to the other side, tighten that a little bit, and then come back on both sides and we'll torque 'em down. The way that you're gonna know that this is torqued down all the way is that this little knob here that I'm gripping is gonna click. (knob clicks) Just like that, and we know that it's tight enough. Then we'll take our end cap, pop it in place and we've just got the plastic lock core. So we'll just need to turn that to the locked position and that's gonna do it for the installation. Hopefully this video helped you decide whether or not the Thule roof rack is right for you in your 2023 GMC Terrain.

Do you have a question about this Roof Rack?
Info for this part was:
At etrailer we provide the best information available about the products we sell. We take the quality of our information seriously so that you can get the right part the first time. Let us know if anything is missing or if you have any questions.


Thank you! Your comment has been submitted successfully. You should be able to view your question/comment here within a few days.
Error submitting comment. Please try again momentarily.