
To see if this custom-fit item will work for you please tell us what vehicle you'll use it with.
Features:
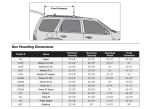
Specs:
 Alternate Instructions
California residents: click here
Videos are provided as a guide only. Refer to manufacturer installation instructions and specs for complete information.
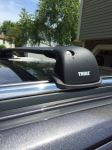
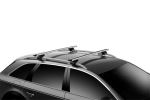
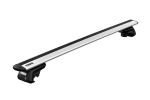
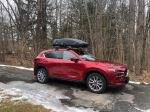
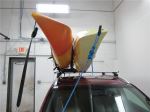
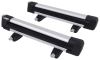
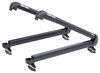
Hello neighbor, this is Curt with etrailer and today we're gonna be taking a look at the Thule WingBar Evo Roof Rack and we're gonna see how it fits and how it installs on our 2025 Jeep Wagoneer. Now, very often when we're planning for a trip, we're gonna run into those situations where we're gonna have gear that either won't fit in the vehicle or we just don't want riding in the vehicle with us. There are options for rooftop cargo such as roof boxes, roof baskets, kayak carriers, ski and snowboard carriers, all sorts of things that can be mounted up there as an alternate to using something in the hitch like a basket or cargo carrier or even a trailer. A lot of times what that's gonna do is just increase the footprint of the vehicle. It's gonna make it more difficult to park and maneuver the vehicle. And frankly, for a Wagoneer it's a pretty big vehicle as it is.
So being able to store something on the roof has a lot of advantages. Now the Thule WingBar Evo is a aero style crossbar, which means that it has this kind of ovular shape, it's gonna make it a lot more aerodynamic. So when you're traveling down the road you won't get that extra vibration and therefore you won't get that road noise. It'll be considerably lower compared to your traditional square or round bars. It is an overhanging bar, however, it does not come out significantly from the tower.
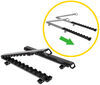
So the clamp mounted accessories it can use on this, you're gonna probably have to stick in between the towers. However, the T slot that we have up here at the top it's accessible right here through our end cap, that you're gonna have the full 53 inches of bar space to be able to use. These are also gonna have a 165 pound weight capacity. However, you always wanna double check your owner's manual and see what the roof cargo capacity is for the vehicle itself. If that number is lower than the 165, that's the capacity you're gonna have to go with.
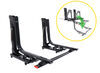
You'll have to go with whatever number is lower. Now let's get up on the roof and take a few measurements and see how it's fitting on the Wagoneer. Now the Wagoneer has these flush rails, so the mounting points that we have for our roof rack are fixed. We're not gonna be able to maneuver these closer or further apart. And there's also a third mounting location further back toward the rear of the vehicle.
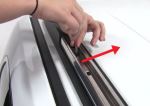
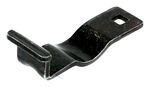
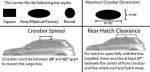
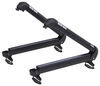
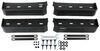
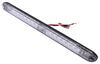
However, you won't be using that on a two bar setup. If you we inchesre to purchase a third bar and put it up, that would be where you would put it, or it's meant for those larger platforms and larger baskets that can install up here as well. But while we're looking at our WingBar Evo here, the first measurement that I want to take is what is my crossbar spread. So I'm gonna measure from the middle of my front bar to the middle of my next bar, and we're at 29-1/2 inches. And the reason that number is so important to know, every rooftop accessory has a minimum and a maximum crossbar spread that it can be used with. And at 29-1/2 inches, that to me, puts us kinda right in the sweet spot. Most of those measurements need to be between 25 and 35 inches. So being at 29-1/2 I'm not too worried about finding rooftop accessories that are gonna go with this setup. The other thing I'm gonna take a look at is how much height this is actually adding onto our vehicle. And this is gonna add another five inches of height to the top of it. So if you're concerned with roof clearance, take your overall vehicle height, add five inches, and then the height of your accessory as well. And you'll know what kind of rooftop clearance you actually have. Underneath our bar we're gonna have 3-1/2 inches of clearance, which is more than enough room for those clamp mounted accessories to reach around. And the other measurement that I want to take is I had mentioned that we don't have much room here on the overhang for those clamp mounted accessories. We're gonna be limited to what we could do inside the bars. So just if we want to know what that measurement is, that's gonna leave us with 45-1/4 inches of bar space to use those clamp mounted accessories. Now, installation, as I said, is fixed. There is a custom fit kit that specifically goes onto these flush rails. So stick around and I'll show you exactly how we got this roof rack on the roof of our Wagoneer. So with the installation, our first order of business is going to be to put up our mounting brackets. There are four mounting bracket locations. There's two on the passenger side. We have one here where we'll be installing a bracket. We have one at the second row, and then on the driver's side, it's the same position directly across from these. So if you've got a trim tool or a flathead screwdriver, go ahead and grab that and we're gonna pop these plugs out to start. Then we're going to take our bracket, which is gonna look just like this. We want basically the rail here to go in where this cavity is with the open side on the outside and the plate of it right here. We're gonna have two bolt holes here that'll line up with our holes there. And we're gonna find in our fit kit these bolts right here and an Allen key that goes with them. This is a security tool, so that's a measure against anybody coming along and taking your rack off of the rails. So we're gonna start by just threading a couple of bolts in and getting them started. Now I am tightening them down by hand. It's just a little bit easier to do than this Allen key. They are pretty close to the roof line, so getting a complete turn on this is a little bit difficult from the jump. Now one of the things that I did notice when putting some of the other brackets on is if I go into tighten one of these bolts, it is an oversized hole that the bolt goes through. So what I notice is if I overtighten it, one side just kind of pops up a little bit too high. So as I tighten these down, I'm also putting a little bit pressure over the top of them to make sure that they go down flush. And when I get 'em hand tightened pretty well, I'm gonna go ahead and grab my tool at that point, since I don't really need to make complete rotations with it, and I'm gonna go ahead and tighten them all the way down. And once all of our brackets are installed, we can move on to assembling our towers. Now all four towers use the same parts. They could all be assembled at the same time. So what you'll do is you'll take your tower here. I'm gonna go ahead and remove this nut, and the clamp parts are gonna be stamped for us, okay, so we're gonna have parts stamped with an A with a B, and with a C, and they're gonna go on in that order. So I'm gonna take this part stamped A, I'm gonna put it in so that the bolt threads through this hole in the middle and these two tabs go into these portions here up on top. It's gonna go in just like that. Now I'm gonna hold that in place and turn it over on its back. I'm gonna take part B, which is this rubber foot pad, and I'm gonna get this installed as well. Now it's important that this back end of the A clamp make sure that that's going over this middle section of your rubber foot pad. We're just gonna press that down into place till it's flush. Then I'm gonna take the C portion and I'm gonna put this on so that this part up here, this tab goes through it and this hole in the middle, the bolt will go through it. So I'm gonna put the tab in there, bring it down over the bolt, and then I'm gonna replace this nut on there as well. Now, I'm only gonna really loosely thread it because I want to have as much of this clamp available to go on my mounting bracket up there, and once that's all assembled, we could get it onto our crossbar. To do that, we're gonna go ahead and depress this tab here and remove our end cap. Then there's this slot up here and these T fittings, we're just gonna slip that on, just like that. And at this point we could just replace the end cap and we're ready to get it up on the roof. So I'm gonna go ahead and send this across over there to my passenger side, just kind of, I don't need to seat it perfectly, I just need to get it in the right neighborhood. On this end, I'm gonna go ahead and this one I am gonna go ahead and seat really well. Now the cavity underneath our foot pad fits pretty perfectly over this mounting bracket. So I'm gonna get that on there and I'm gonna make sure this front portion is gonna be able to reach underneath there and see, it'll sit down on it really nicely once it's in the right position. I'm just gonna give a few turns of this bolt just to make sure it doesn't slide around on me as I kind of maneuver a little bit. And I'm gonna repeat this process over on the passenger side. So at this point, what I'm gonna want to do is measure my overhang. I could slide this bar back and forth a little bit, but what I'm looking for is to get an equal measurement as far as how much this bar is overhanging on the driver's side and the passenger side. I wanna adjust it until that actually matches up, and once I get it to a point where it's matched up on both sides, we can go ahead and get these completely tightened down. Now one of the things is, is as you're tightening this bolt, simultaneously it is clamping down on our mounting brackets to secure it there. It's also tightening down on the crossbar itself to keep it from sliding back and forth. Now to get this tightened down completely, Thule does provide us with a tool to do that, and it is a torquing tool, so it's gonna let us know when we've got it tightened enough. We're gonna hear a nice loud pop just like that. Once you hear that on both the driver and the passenger side, everything's tightened down accordingly. I like to give it a good shake test, make sure nothing's shifting back and forth. The vehicle is moving, but nothing on my roof rack is. So now for the last step, which is to put on our tower covers. Now before I put my cover into place, I just wanna mention something about it. Out of the box Thule is going to give you these plastic lock cores, these can be locked and unlocked with a flathead screwdriver or with a coin like a nickel or something like that. But if you really want that added security, I would highly recommend you take advantage of Thule's one-key system. Thule's one-key system is gonna allow you to buy metal lock cores with the keys to go with them, and you can get them keyed alike to other Thule accessories. So if you have a Thule roof box that you like to use or a Thule bike rack that you like to use, you can actually request that the locks for these be keyed-alike to those. That way you don't have a key chain full of Thule items. You don't know what goes with what. If it's got a Thule lock, you're gonna have the key to go with it. But in order to get this up here onto our tower, there's these two tabs you see here. They're gonna go in right there at the bottom, and it's just gonna kind of click on into place from there. Then you could, in our case, take our flathead screwdriver, get it locked. Now everything's good to go. We can get our roof rack loaded up and head out on our adventure. So that's really it for the installation. Pretty simple process. The most difficult thing is actually getting up there to be able to do it all, but the position of this roof rack to me is perfect. They've got it in a perfect spot to where you could just stand right up here in your door threshold. You're right in between the bars getting perfect access to your cargo and your rooftop accessories. But if you still have questions about the Thule WingBar Evo and about how it fits on the Jeep Wagoneer, go ahead and leave those questions in the comments below. We'd love to answer those for you. It'll help you and other neighbors just like you to make the best decision for yourself. Once again, this is Curt with etrailer. Thanks for stopping by.


Do you have a question about this Roof Rack?
Info for this part was:
At etrailer we provide the best information available about the products we sell. We take the quality of our information seriously so that you can get the right part the first time. Let us know if anything is missing or if you have any questions.


Thank you! Your comment has been submitted successfully. You should be able to view your question/comment here within a few days.
Error submitting comment. Please try again momentarily.