
Inno Aero Roof Rack for Raised Rails - Aluminum - Black - Qty 2


To see if this custom-fit item will work for you please tell us what vehicle you'll use it with.


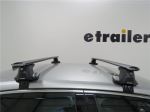
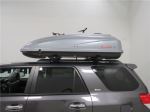
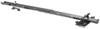
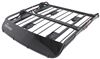
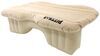
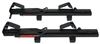
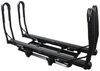
This sleek, aerodynamic roof rack provides space to carry gear on your vehicle. Crossbars with push-down rubber strips in top channels work with channel-mount and clamp-on accessories. Installs to raised rails on your vehicle's roof.
Features:
Specs:

Videos are provided as a guide only. Refer to manufacturer installation instructions and specs for complete information.
Hey everyone, I'm Evangeline right here at etrailer. Today we're taking a look at the Inno roof rack and I'll also show you how to get this all installed on your 2023 Kia Sorento. Now the Sorento we have here today is the X-Line edition, which means you have the raised rails. Other trims are gonna have different types of rails and that's okay because there are fits for roof racks for those here at etrailer. But if you have raised rails just like this one does, well, this is a really good option for crossbars to attach to them so that we can carry all types of gear. Now, my previous personal roof rack was Inno 'cause I love their brand.
They are a Japanese based company and you can just really tell in how they design their roof racks. Something specific to this roof rack compared to other brands is the intentionality of the crossbar size. So the Kia Sorrento actually has a curved roof and Inno has compensated for this with a longer crossbar in the front and a shorter crossbar at the back. So when you install this, it looks more parallel, it looks more sleek and it just looks like a good system on your roof because it is. You have aerodynamic crossbars, really good weight capacity and you have a strap on these towers, which means you have a secure fit onto the raised rails of your Sorento.
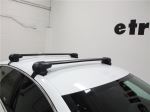
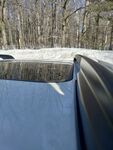
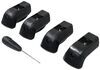
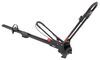
You have a taller part of the crossbar up front and it tapers towards the back and that helps guide wind and air, less noise, less drag. Now there is a bit of an opening underneath, so make sure when you install this crossbar to try to cover that as much as possible. Now on the end, adding to the steepness, you have this end cap, which is my personal favorite part of this roof rack. It is bright, it's shiny and it matches the silver trim on your Kia. And then if you needed to attach or install channel mounted accessories, then you just press down on the rubber strip in the crossbar and you just slide your accessory through which adds to the functionality of your roof rack.
So if you we inchesre the type of person that liked to clamp things to the sides of your roof rack called the overhang, but you realize that you needed to clamp things closer inside or take up more of this space, that's something you can do with a channel mounted accessory. Taking some measurements specific to the Sorento, one is gonna be the height that the roof rack sits. So if you measure from the top of the roof to the bottom of the crossbar, I see about three and a quarter, maybe closer to three and a half inches depending where on the roof you measure. That sits pretty normal for height, kind of on the more sleek side compared to let's say the Yakima roof rack I installed. So that will be good if you are looking for a sleeker look while it still works with most clamps, just be mindful of those U-bolt style clamps that could be extra large or bulky.
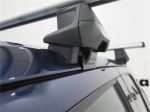
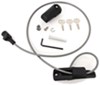
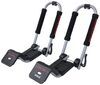
Next measurement is gonna be from the top of the roof to the top of the crossbar and I have it around let's say four and three quarter or four and a half inches and that's gonna be where your cargo sits. So that will be good if you have skis with hull bindings, snowboards, just things that may be large and bulky and might be hanging down. Now if ever you find yourself carrying around accessories that do need the extra height, we have carriers here for you like ski carriers with a little bit of what they call the ski lift that give you the extra height to clear. But with the numbers we have here looks good, you should be good with most types of accessories. You can always ask us here at etrailer if you're not quite sure. So overhang, when you measure from the tower to the end of the crossbar, I have it at around two and a quarter inches. That's just enough for a low clamp to fit around there. And then you can secure items on the overhang. Now if you needed to top channel mount this, you just take off the end cap. If you needed to remove the roof rack system, you can then take off the tower end cap and then when you remove that end cap, you will see this lever that adds to it, you know, making it easy to install and uninstall. Once you remove that end cap, you just twist this lever and then the strap releases from the raised rails or you twist the lever and the strap heightens around your raised rails. So if you're looking for a roof rack that looks sleek, has a high weight capacity, is also very easy to install, this is the one. I'm really glad that this has that strap though because of how I notice a tower fits on those rails. I noticed that the tower does have a little bit of a gap there in the corner. So if you are concerned about the gap, the things to notice here is everywhere else that the tower does touch. You have a lot of touch points here on this side, here along the wall of your raised rail, but most importantly that rubberized metal strap that goes around the whole system. So compared to clamps that just pinch around the tower, having a strap and that folds hutch points design makes this something that gives me more peace of mind when I'm on the road. But always remember to tighten down your roof rack before your trip no matter what brand you do have. So when you have a vehicle with raised rails, there are so many actions when it comes to roof racks. I personally love Inno. I think that they are very reasonably priced with the features that they offer, which is why I have that roof rack for my own vehicle. And really for me, it was always about getting the longer crossbar that had everything included. Other brands may require that you purchase lock cores or that you have extra tools. This one is all inclusive, all included. Now if you are working with, let's say, other accessories that have their own ecosystem, for example Yakima or Thule, then it does also make sense to get a roof rack that matches those accessories because there's a lot of synergy there where everything's keyed alike, and that's something worth thinking about too. Hopefully this video was helpful for you though with just seeing how this roof rack looks, measurements that you may need to consider depending on what you're planning on carrying and just things to look for as you plan out your adventure. If at any point you want advice or you just wanna double check that you are getting all the right things for your adventure, give us a call here at etrailer or send us a message. We love getting people sorted out for their adventures. Now I kept talking about how easy it was to install this roof rack. If you're curious about that process, stick around. Getting your roof rack installed is super simple. In fact, Inno's is probably the easiest roof rack to get installed since there's no tools required and it comes with keys, you don't have to get extra lock sets. So with that in mind, we're gonna start by getting ourselves oriented with the crossbars. I already installed the rear crossbar, which is actually gonna be the shorter of the two that arrive at your house. The longer crossbar goes in the front of the Kia Sorento. When you flip your crossbar over, you're going to see a track on the inside. Now oftentimes your end caps arrive separate from the crossbar, so just pop those right in and then look at the track on the inside. You wanna push this all the way to the inside. You'll be stopped by this button, so just press down on the button and keep on pushing until this is fully open. You're then going to see your tower and underneath it or I guess the top of the tower, you're gonna have these tabs. Well those tabs fit right into that open spot on your crossbar and you just push out. And now that's secure. So super simple to get your roof rack all installed once you're familiar with that track system underneath. So just like that, we're now ready to put this onto our roof. Now make sure you also understand which part's the front and which part's the back. The tapered end of your crossbar, well that's the back and the taller one, that's the front. Gently putting this on our raised rails. Now you can do this process with a friend or you can do it by yourself if you're ready to just walk around the rails to get that strap into place. Now I'm just going to fit the tower in there, nice. And then get this second tower up and around the raised rail. Now where you put it on your Kia Sorento really does depend on what you are planning to carry. This spot right here, I like it brings things a little bit further to the back, not as much up front, but whether you have a sun roof or you're carrying on kayaks or roof boxes, things like that, that will determine where's the best spot for you to put this roof rack. With this being a tool free roof rack, this has a little knob here that controls the strap length. So we're gonna want to push our tower up against our raised rail, see how it fits around that angle, and then we're gonna bring our strap around and then up into these hooks. So notice how it's not quite fitting there. I'm gonna loosen that strap by turning this knob to the left. Now we have enough clearance, we can fit into the hooks and taps. And then I'm gonna start tightening down. Here's my suggestion, do not tighten down one all the way until you get the other side in place and you know exactly where your roof rack sits because you want it to sit in the same spot on both sides so it's not wonky or angled. And then you also want an equal amount of crossbar on each side so it looks centered. So go ahead, make those measurements and make sure it's all in the same spot. Once you're happy with the spot, then go ahead and tighten down. My recommendation is tighten one side down about 50%, the other side down about 75%. It's just something I like to do with roof racks so I'm not pulling the whole system one way to the other just in case. Now this doesn't quite have a torque limiter like some of the other roof racks through. So as you tighten down, you're just gonna feel that tension, you're gonna feel it tighten down. And you're also going to see the strap really cinch up against the rail. So if you try to move the strap and it doesn't move, that shows it is tight against your tower. But also, just give it the good old shake. With all four towers tightened down and double checked, then your final step is put the end cap on. Now all your end caps already have the lock cores and you get two keys. So go ahead, put your key in the lock core and put the end cap in the tower. Turn the key and that's how you know it's secure. Without turning the key, the end cap will just pop right off. And from here what I do is I put one key on my key ring, the other one in my glove box, in my dash, in my console, somewhere safe. If I need to take this off, I can't. But really, that's gonna be it for the installation of your roof rack. Super simple, very sleek looking. The main trip up for most people is just making sure that the front crossbar is the longer one and the shorter crossbar is the back. But this looks really good. You're now ready to load this up with all kinds of gear and hit the road. What you saw today was a look at the Inno roof rack with a 51 inch long crossbar, 54 inch long aero crossbar, and the Inno three feet for raised rails for your 2023 Kia Sorento. My name's Evangeline, I hope you enjoy this journey.
Ratings & Reviews


Info for this part was:
At etrailer we provide the best information available about the products we sell. We take the quality of our information seriously so that you can get the right part the first time.


Thank you! Your comment has been submitted successfully. You should be able to view your question/comment here within a few days.
Error submitting comment. Please try again momentarily.