
# 1
Draw-Tite Max-Frame Trailer Hitch Receiver - Custom Fit - Class III - 2"
I had my mechanic install (2015 outback) so I can’t speak to that but it looks good and towed a 2K trailer so I’m a happy customer
As always I am very happy with the prompt service and shipping as well the quality of the product. My only disappointment is, I chose this Draw Tite hitch because it had the extra hole for the J-Pin (anti rattle device). Mine did not come with it. That was a let down
# 2
Curt Trailer Hitch Receiver - Custom Fit - Class III - 2"
Went with the Curt 13206 for our 2014 Outback after researching prices and weighing options for factory vs. aftermarket hitches and wiring. Our intended uses -- some light trailer and camper towing, plus cargo carriers and bike racks -- were a good match for the Curt's ratings (which exceed the Outback's ratings, just a bit of extra assurance). We also liked the more-rearward placement of the hitch opening. The hitch and accessories arrived quickly from etrailer, with no shipping damage. We were pleased with the aesthetics of the Curt hitch in person (rounded tubing, good finish, quality welds). It might not be the most "stealth" offering out there, but appears very solid and not at all conspicuous once installed. The installation was fairly straightforward, got it done solo in the garage in a couple of hours. The hitch was a tight fit around the spare tire well, had to scrape down a bit of the factory undercoating on each side to get it into place (something a few other customers mentioned). The rubber exhaust hangers also took some awkward wrestling -- probably would have been easier if I'd had access to a lift. Also installed the Curt 56040 wiring harness and Tow Ready mounting brackets (18140 + 18144) for the flat-four plug. Again, relatively easy jobs with the how-to demos on etrailer. Since I had the rear flooring pulled out to put in the wiring, I decided to enlarge a couple of existing taped-over holes in the cargo area to fish the hitch mounting hardware into place (rather than enlarging holes on the underside of the vehicle), as suggested by previous reviewers. Similarly, I routed the flat-four harness down through an existing rubber plug in the spare tire well (added some split-loom), and connected it to the Tow Ready brackets on the hitch. I thought this would be a cleaner and more convenient solution than running wiring through the rear hatch when towing. Have to say that the how-to videos and notes from etrailer, along with the tips, tweaks and suggestions from other customers, made these tasks much, much easier and saved a lot of time. Thanks again for the thorough product selection and documentation, and great service.
 2014 Subaru Outback Wagon
Our Curt Hitch from etrailer.com fits my 2014 Subaru Outback perfectly. It doesn't stick out too far, hang too low and it has the right clearance from the bumper for the bike rack.
# 3
Curt Trailer Hitch Receiver - Custom Fit - Class III - 2"
I think this will serve my purpose. I wish to pull a 4x8 utility trailer with 4-wheeler. My son hopes the bolts are strong enough as intended. I thought the hitch would be more hidden but it will be ok as is. Less expensive than the dealership price. The wiring instructions have it going thru the back and out of the hatch door. Not a good idea so we installed wiring underneath.
Just exactly as the youtube installation video said it would go. My Dad and I noted that the written instructions, hardware kit, and youtube install directions were all in perfect alignment. Excellent quality product that actually went in exactly as it was described! (shocking to us). My Dad was so impressed he's thinking of buying a hitch kit for "Grandma's SUV". Great website, great product videos, great shipping/tracking, and great product! So easy we did it right in the driveway!
# 4
Draw-Tite Max-Frame Trailer Hitch Receiver - Custom Fit - Class III - 2"
Great hitch and delivery came as promised, very quickly. It was a bit tricky installing - being careful and thorough, it took 2 hours. The hitch is strong and will hold 400 pounds, plenty for the 73 pound e-bikes we have.
My Outback had a 1.25” hitch forever. With the 2” adapter, it stuck out 6” from the bumper and probably reduced ground clearance for the bike rack. This is recessed a few inches under the bumper, and will fit a proper 2” rack, so it’s fantastic. I wish I had gotten it sooner. Look up some videos of how to disconnect the rubber muffler grommets with a pair of channel locks and some lube. That’s the hardest part. Everything else installed pretty smoothly with only a little cussing, and no bashed knuckles. I can’t say how long it took since I had to remove the old receiver first so the underside was perfectly set for the new one once I got to it. Probably 2 hours total and at least an hour of that or more was fighting with the rubber grommets and the wrong tools.
# 5
Draw-Tite Trailer Hitch Receiver - Custom Fit - Class II - 1-1/4"
2014 Subaru Outback WagonInstalled hitch on my recently acquired 2014 Outback and towed my surplus furniture out to California from Indiana for my daughter's wedding. Problem-free trip. I also use the hitch to mount a bike rack. Installation was straightforward once I fabricated a cradle out of scrap lumber and used this + car jack to raise the hitch into place underneath the car and then tighten up the bolts.
The Product identification on the website was easy and clear for my car. The order process was super easy. We received the order very quickly, and it was delivered complete and in great shape. My Dad helped me install it, and we were both impressed at how good the customer service is with the access to fantastic video instructions for installation. The little bolt threading aids were brilliant! We used the floor Jack to lift the hitch in to place so that we didn't have to struggle with the weight while lining up the bolts. Lucky for us we had the hole saw in our shop. Had we not, it would have been a 30 mile trip to town and back......We had fun, and now I can haul and carry Stuff. Thanks etrailer!
# 6
etrailer Trailer Hitch Receiver - Custom Fit - Matte Black Finish - Class III - 2"
Easy install, great video on the process. Works great!
Love the way this fits. Not a overly hard install. Be careful of the shavings from step bits, they burn like welder zparks.
# 7
Curt Trailer Hitch Receiver - Custom Fit - Class II - 1-1/4"
Subaru Outback WagonThis is an excellent hitch for the Outback. I have towed several moving trailers and a lawnmower trailer regularly. The hitch didnt miss a beat. Also it seems to be resistant to corosion and has generally held up well. Great purchase.
My hitch and accessories arrived much faster than was originally quoted! Amazing service! The hitch fit was ok ( I have a 99 Outback Limited ), as I had to use some spacers to make it line up correctly. It lined up in the frame/ carriage bolt area just fine, but the area where it hangs down it was a little off and I had to use some elbow grease to make the bolts go through. Haven't hauled anything with it yet, but it looks great and I installed it by myself in a little over an hour. Overall great looking hitch ( looks stock ) and great customer service from etrailer!!!
# 8
Curt Trailer Hitch Receiver - Custom Fit - Class II - 1-1/4"
The trailer hitch itself works fine. Very solid compared to others. The installation instructions could use some additions. The holes you drill for the bolts and brackets to be fished through the frame tube seem to be very small. I could not get the bolt head to pass through this opening. I drilled a third hole towards the back of the vehicle in order to make the opening larger. Also, I used some Rustoleum spray paint to cover the bare metal from the holes I drilled. After the paint was dry and I fished in the bolts and brackets through the opening. Then, I covered the holes that I drilled with aluminum duct tape. I had a difficult time reinstalling the muffler hanger at the rear most of the car. I seem to have to defy the laws of physics to get it to work.
Hitch seems to work well. etrailer provided prompt delivery and good follow up. installing it was not easy and took quite a while.
# 9
Curt Trailer Hitch Receiver - Custom Fit - Class III - 2"
The hitch arrived via UPS yesterday, Oct.17,2024. The box had a gouge in the cardboard, but the hitch was not damaged. I have not begun to install it. In fact we had snow today and I will be working outside when I perform the installation. At this point having taken the hitch out of the box I can only say that it looks good in its shiny black coating and it appears to fit the bolt pattern on the rear bumper mounts of my Outback.
The hitch is awesome and bolted up perfectly to my 2014 Outback. Took me 3 hours to install it solo. The second video on the product page is very helpful. I watched it about 5 times before starting. I also recommend buying a bag of new push fasteners in advance of starting the installation. The cut out in the bumper cover to clear the hitch ended up being 3 5/8" wide x 5 1/4" deep, and dead center on the center mounting tab hole. That less than 1/4" gap all around. Check the fit over the receiver and the bottom push fasteners before completely re-installing the bumper cover. Awesome product!
# 10
Draw-Tite Max-Frame Trailer Hitch Receiver - Custom Fit - Class III - 2"
Installed this hitch last week and used it to haul bikes to the races this weekend. Hitch worked as advertised. Looks nice installed on my outback, I would recommend this product.
Install was smooth on my 23 outback and matched the install video. Appreciated the higher tongue weight capacity without removing bumper!
# 11
Curt Trailer Hitch Receiver - Custom Fit - Class II - 1-1/4"
Wonderful product with speedy delivery. The hitch was installed by myself and my son, it went with just a little drilling and tightening of bolts. Great fit and it looks good. I would recommend etrailer products to anyone. Thanks
To begin, etrailer.com had the best price, easy order process, and quick delivery. They are wonderful to deal with. I had a friend help me install the hitch on my 2013 Outback 6 cyl with dual exhaust. Followed the step by step instructions 100%. The hitch installed quickly (1.25 hr) without a hitch (no pun intended). It looks great and I'm sure will work perfectly for the bicycle rack it was purchased to hold. I couldn't be more satisfied with this hitch.
# 12
Curt Trailer Hitch Receiver - Custom Fit - Class III - 2"
Installed easily and took just under 2 hours to install. Will say video is very helpful but it does leave out the hardest to reach bolt which is the one next to the exhaust, need to hold it to the side while tightening the bolt.
This hitch is solid. Installation couldn't be easier, with the help of etrailer videos, that are top notch. This thing took probably 90min to install, including setting up all my tools, installation, cleaning up, all while pounding beers between steps.
# 13
EcoHitch Hidden Trailer Hitch Receiver - Custom Fit - Class III - 2"
Great instructions and product delivery arrived fast, and unscathed. Install was straightforward and measurements to cut fascia on the bumper worked well.
Subaru Outback WagonFit my Outback pefect, well hidden. I only use it for bike rack. Would definitely endorse for others
# 14
Curt Trailer Hitch Receiver - Custom Fit - Class II - 1-1/4"
Shipped on time as advertised and complete. Instructions were well written and accurate for hitch itself, but missing a couple steps for the electrical connector kit, (as for taking apart the car trim) so took some time to figure out. (The instructions were from the manufacturer and not etrailer.com itself). Connector worked fine on installation.The fit of the hitch was very precise, so precise that at first I thought it wasn't the right model. But I persevered, and it did fit. The close and precise fit is appreciated, it should help eliminate possible looseness, rattling, and weakness. This is my third Curt hitch from etrailer.com on 3 different cars. I would definitely buy from them again.
I've been considering installing a hitch for a long time, but constantly held off due to not wanting to deal with the hassle of dropping my exhaust. So, when 12 years of New York road salt caused my midpipe to disintegrate and my mufflers to become swiss cheese, I figured this was a perfect opportunity to install a hitch in the process of replacing my exhaust. Installing the hitch should be easy if my exhaust is completely removed from the vehicle! I was dead wrong about that. I should have paid more attention to the reviews from people who found their hitch too narrow and interfering with the bumper brackets between the hitch and the fuel tank. The first hitch I received was impossible to get even close to the rearward mounting holes. I cannot figure out how anyone was able to bend something like this into shape either... I also noticed that it seemed like it would be unlikely that the bolt that goes through the tow loop would fit either, as it looked about 1/4 inch too far rearwards compared to the hitch. However since the hitch wasn't even close to in place at the forward mounting ears, I figured it was just an optical illusion/bad angles. I called support, and they said that hitches can sometimes get bent in shipping. They sent out a second one, and it arrived yesterday. The second one was SLIGHTLY wider. It still interfered with the bracket, but not as severely, to the point where, after wire brushing the bracket to remove rust, I was just barely able to get the rearward bolts to go into their holes, then the forward bolts, and I was able to tighten them down despite the hitch rubbing against the brackets on both sides. At that point it was time to get the tow loop bolt in - but it was 1/4 inch too far rearwards to go into the slot in the hitch. I tried, now that bolting it in had bent the ears outwards some, starting with the two loop bolt and then trying to insert the others. But if you have the hitch hanging from the tow loop bolt, once you get one of the "ear" bolts in, on the other side of the vehicle you can't get the "ears" anywhere close to where they should be. That's two duds in a row, I give up... As far as the attached pictures: One shows the rust on the "ears" of the first hitch where it was rubbing against the bracket. One shows the tow loop bolt too far rearwards relative to the hitch The last shows a shot of the offending bracket in question - most of the image has been darkened to highlight the specific problem area, no other editing was performed. You can see that in the rear of the problem area, it looks like there is a weld bead. I'm wondering if on some Outbacks the bead does not extend as far forwards and if this is what's interfering with the hitch. Either way, if the "arms" of the hitch were each about 1/8-1/4 inch longer, the hitch would fit perfectly - but they aren't and the hitch comes close to fitting, but not close enough to actually be installable.
# 15
EcoHitch Hidden Trailer Hitch Receiver - Custom Fit - Class III - 2"
Just finished installing this a few moment ago and I have to say that it really looks good on our 2014 Outback 3.6R. The low profile of the receiver barely extends beyond the line of the mufflers. I dont think it will be as much of a consideration when backing into a parking stall as other systems that I have seen. There were minor issues that I ran into with the install, so it took me about 3 hours to get this mounted at home with no extra help. I also decided to do the bumper removal method. I felt comfortable removing the trim, and it had the added bonus of giving me more room to work. If you dont have an extra set of hands to help align the hitch to the bolts, you can use a ratchet strap thrown around the hinges for the rear hatch. Hook into the loops where you normally place your trailer chains and take up the weight of the hitch. This will allow just enough support so you can have both hands to start aligning the bolts to the hitch. Lastly, I decided to torque everything down and suspended the muffler before I reattached the bumper bar and trim. The part that was the most difficult for me was getting the dual exhaust remounted onto the rubber bungs. I ended up having to grind off about 3/4-1 inch of the rearmost post on the muffler to get it back into the bung hole. I look forward to pulling a trailer and seeing how everything holds up down the road.
2011 Subaru Outback WagonGreat product! We have used this hitch for several road trips and it has been very useful. I was looking for a 2" hitch for our 2011 Subaru Outback that was hidden well and this did the trick. I would normally install my own hitch, but this time I had a shop do it because the amount of modification justified using a proper lift to do it right.
# 16
EcoHitch Hidden Trailer Hitch Receiver - Custom Fit - Class III - 2"
Follow the installation video and you can't hardly go wrong with this receiver hitch. It was intimidating but very straightforward installation. Very happy with the final product, I just wish it would have been packed better. A little bubble wrap around the sharp edges would go a long way.
Easy instal, looks great!
# 17
etrailer Trailer Hitch Receiver - Custom Fit - Matte Black Finish - Class III - 2"
This thing is heavy duty! Following the videos to remove the rear bumper facia made this a quick and simple install. I have a Subaru Outback Wilderness edition - so it has two exhausts, and although installing the bolt on each side with the fishwire was easily done; it was a bit challenging to torque the corresponding nuts which required a deep socket (and required some manipulation of the mufflers to try to get a straight path for proper torque). Other than that - it was a smooth and straightforward install. I love the fact that this hitch is hidden, only a small (and unseen) section needs to be cut out of the facia (unlike the factory hitch), and the receiver alone barely sticks below the facia (which maintains maximum ground clearance). I even designed and 3-D printed a TPU cover with the Subaru logo to finish it off (Goto MakerWorld - 2 inch Subaru Hitch Receiver Cover)
Perfection!! Super high quality powder coat. Simple installation and no BS, just the stuff you need. So glad I went with this instead of OEM. Fantastic value for the money
# 18
Curt Trailer Hitch Receiver - Custom Fit - Class I - 1-1/4"
etrailer pricing, ordering and delivery were first rate. This hitch, promoted as a custom fit for my 2009 Subaru Impreza Outback Sport, was installed by my regular auto body shop, a highly experienced and very reputable outfit. It was they who recommended the Curt model purchased. Hitch installation time was advertised as 30 minutes, but the shop said the installation was a bit tricky and took over an hour due to the complexity of using the fishing wire, lowering the exhaust, expanding some holes and making sure everything remained in place. They installed successfully and were happy to do so, though it gave them a story to tell. The hitch appears very solid. I'm looking forward to attaching a hitch mounted bike rack, the RockyMounts Monorail Solo, to take my e-bike with me to great riding places.
I ordered a hitch for my subaru outback Impreza sport. My costumer service experience was great. All the information I needed to know was discussed before hand to be sure that I was buying the right hitch. I ordered the hitch and it arrived at its destination less than 5 days of ordering it. I would definitely do business with Curt again and highly recommend them.
# 19
Stealth Hitches Hidden Trailer Hitch Receiver w/ Towing Kit - Custom Fit - 2"
I installed this on our 2020 Outback. I like the design and it is totally hidden. I did have a problem with the holes on the tabs that insert into the chassis channels not quite lining up with the holes on the channels. I used a round file to slightly slot the channel holes so it wasn't too bad, but still took extra time. Also, the instructions call for lowering the mufflers but this is not necessary. You can tighten the bolts into the chassis channels with the mufflers in place by using a u-joint with your socket.
NICE ITEM, I LIKED IT.
# 20
Stealth Hitches Hidden Rack Receiver - Custom Fit - 2"
Just had the hitch installed. Plan on using it for my bike rack outside of winter season. Since it is winter and will not be using my bike rack, I have removed the receiving portion of the hitch. Wanted to maximize clearance, and this hitch is just below bumper. Previously owned uhaul hitch was several inches lower on 2014 Outback. Looks very slick, well made and solid. Rubberized lock and receiver attachment covers looks like they will prevent water and salt from entering the locking areas during the winter - tight fit. Receiver drops into hand with turn of release knob, a little awkward yo use when reaching under bumper facial that was cut away. No sign of a hitch when the receiver attachment is removed. Installers took about 1.5 hrs to attach.
How to Install: Curt Trailer Hitch Receiver on your 2014 Subaru Outback Wagon
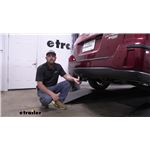
Hey, everybody. Ryan here at etrailer. Today, on our 2014 Subaru Outback wagon, we're gonna be showing you how to install the Curt trailer hitch receiver. Before we get into that though, let's just take a couple minutes, check this out and make sure it's gonna be right for you. Putting a hitch on a Subaru makes sense. You know, people use these vehicles to do a ton of different things, so if you're looking to use accessories or pull a trailer around or a little bit of both, this is going to allow you to do that.
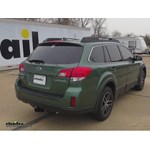
How to Set Up Your Draw-Tite Max-Frame Trailer Hitch Receiver on a 2014 Subaru Outback Wagon
Hello, neighbors, it's Brad here at Etrailer, and today we're taking a look and installing the Draw-Tite Trailer Hitch Receiver on the 2014 Subaru Outback Wagon. Now this is what your hitch is gonna look like when it's installed, and the great part is this is a hidden cross tube, meaning that the only thing that you're gonna see is the 2" by 2" receiver tube opening. And with that size, that's gonna mean that you have plenty of options available for bike racks, cargo carriers, or even a ball mount if you plan on pulling a trailer. Now all of those accessories are gonna stay in place with a 5/8 pin and clip. Now this is not included with the hitch, but you can pick up a pin and clip, and even a locking version of one here at Etrailer. And that's really nice when you have your accessories loaded up, you can lock it in place, and no one's gonna walk away with it.
Installation: etrailer Trailer Hitch Receiver on a 2014 Subaru Outback Wagon
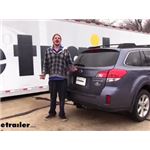
Hi there, Subaru owners. Today, in your 2014 Subaru Outback wagon, we're going to be taking a look at and showing you how to install etrailer.com's two inch trailer hitch receiver.And this is what our hitch looks like when it's installed. Our cross tube is going to be visible down beneath our bumper, but it's tucked back nicely so it doesn't really detract from the looks of the vehicle too much. I actually liked the way that our receiver here fits into the cutout on our bumper, and it almost looks like it was supposed to be that way from the factory.It's a class two, two inch receiver, so it's going to be great for all of your towing needs. Whether you want to put a bike rack in it and load it up with a bunch of bikes, or if you want to bring a pop-up camper with you for the weekend, you should be able to do so with this hitch.This hitch uses a five-eighths inch hitch pin and clip. Now, one does come included with our hitch, but we have plenty here at etrailer.com that you can pick up.
Best 2014 Subaru Outback Wagon Trailer Hitch Options

Today we're going to be taking a look at the best hitch options for our 2014 Subaru Outback wagon. First we have etrailers custom fit trailer hitch. Below that we'll have Curt's. Next down we'll have Eco Hitch's and finally on the bottom we have Draw-Tite's. It's obvious by the appearance here these we're going to install vastly different. The two hitches on top are going to install under the vehicle and the two hitches here on bottom are going to install behind the bumper.
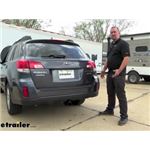
Setting up the Curt Trailer Hitch Receiver on a 2014 Subaru Outback Wagon
Today on our 2014 Subaru Outback Wagon, we're going to take a look at and show you how to install the Curt Custom-Fit Class III 2" Trailer Hitch Receiver. This is part number C13206. Here's what the hitch looks like once we get it installed on our vehicle. As you can see, it's kind of a narrow line hitch, gives that nice, robust, heavy-duty appearance to it which goes right in line with the Outback's go anywhere outdoors kind of mentality, really beefens up the back here for us. It's a 2" by 2" receiver. We've got a collar all the way around.
DIY Install: Draw-Tite Trailer Hitch Receiver on your 2014 Subaru Outback Wagon

Today on our 2014 Subaru Outback wagon, we'll be installing our Draw-Tite hitch, part number 36493. Here's what our hitch will look like once it's installed. Next we'll go ahead and give you a couple measurements to assist you with selecting accessories for your new hitch, such as a ball mount, bike rack, or cargo carrier. From the center of the hitch pin hole to the outermost edge of the bumper it's 6 inches. From he top of the receiver tube opening to the ground it's 16 1/2 inches. Now we'll go ahead with the installation. Now, to begin our install, we'll first need t lower the exhaust. To safety lower the exhaust we'll put a surety strap underneath it first, to help control the weight of the exhaust once you remove the exhaust hangers.
Trailer Hitch Installation - 2014 Subaru Outback Wagon - Hidden Hitch

Today our 2014 Subaru Outback wagon. We'll be installing hidden hitch. One and a quarter receiver tube hitch, part number 90208. Here's what our hitch will look like once it's installed. Next we'll go ahead and give you a couple measurements to assist you in selecting accessories for your new hitch, such as a bike rack or cargo carrier. From the center of the hitch pin hole to the outer most edge of the bumper, it's six inches.
How to Install the Draw-Tite Max-Frame Trailer Hitch Receiver on a 2014 Subaru Outback Wagon

Today on our 2014 Subaru Outback Wagon well be installing the Draw Tite Hitch, part number 75673. Heres what our hitch will look like once its installed. Next well go ahead and give you a couple measurements to assist your selecting accessories for your new hitch such as a ball mount, bike rack or cargo carrier. From the center of the hitch pin hole to the outermost edge of the bumper is 4-1/2 inches. From the top of the receiver tube opening to the ground is 16 inches. Now well go ahead with the installation. Now to begin our install well first need to lower the exhaust. To safely lower the exhaust well put a safety strap underneath it first to help control the weight of the exhaust once we remove the exhaust hangers.


What our customers are saying:
"Hello, I just wanted to thank you for the great hitches you sell! I tried three different hitches on my truck that where not even close to you product. Hidden hitches should be hidden hitch. Take a look at some of the stuff out there, Real garbage. Your hitch is up and absolutely hidden, perfectly even. Absolutely satisfied with you product! And let me tell you it tacks a lot to satisfy me being a perfectionist. Thank you ever so much."