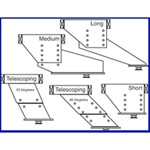
You will have to go with a sliding hitch to allow the trailer to make tight turns. For a trailer 8 feet wide the only bed length that's going to allow 90 degree turns without a slider is a stationary hitch. That being said you have two options.…
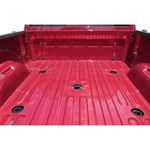
The OEM prep package consists of 4 "pucks" in the bed of the truck that will allow you to drop in puck style hitches for easy installation and removal, that gives you a completely clear bed when not in use. The B&W Companion OEM 5th…
Hey Jerry, GM moved the placement of their puck systems starting with 2020 models so you are correct that the pucks would have the hitch not sit directly over the axle. GM did the math and made sure that this placement wouldn't adversely affect…
Choosing the right height setting for your 5th wheel hitch is a combination of a few different variables. First of all you want your towing setup to be as level as possible. With your Montana High Country 340BH level you will want to measure from the…
Since we don't carry the PullRite line I can't really speak to their quality but from what I can see from there website their 2900 model is fairly similar to the Demco Autoslide 5th Wheel Hitch w/ Slider #DM89GV. Both hitches offer 14"…
Yes, the puck system used on the 2016-2019 Chevy/GMC trucks is different than the pucks used on the 2020 and newer trucks. So you would need a 5th wheel like the B&W Companion #BWRVK3710 for your 2020 GMC Sierra 3500 with an 8' Bed. If you…
Hello Dan, Welcome to etrailer. I am really glad you found us! First off, congrats on the North Point!! You are absolutely right to question the salesperson’s recommendation. Unfortunately, some dealers focus more on moving units than on making sure…
Hey, Ron! I've got just the rails you need! B&W Custom Installation Kit part #BWRVK2401. This kit will come with the rails, frame brackets, and all the hardware needed for the install. Since this is a custom kit you will not have to do any…
With a 2022 F350 short bed, hitting the top of the bed rails should not be an issue with most campers. Turning clearance however, will certainly be a factor. That is one advantage of the Andersen Ultimate hitch #AM3200, as it provides a 9"…
Thank you for the photo of your 2016 Ram 3500's bed rail which sits 59-inches above ground. You are correct that the recommended minimum clearance between a bed rail and the underside of the trailer's overhang is 5 to 6-inches, as shown in…
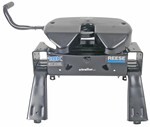
The head alone for the B&W Companion hitch #BWRVK3500 weighs about 70 pounds. Everything else weighs about 130 pounds. So the total weight of the hitch is approximately 200 pounds.
Hey Paul, we have great hitch solutions for the OEM pucks of your 2024 Ford F-350 short bed but whether or not you need a slider hitch is going to be based on the design of the trailer you plan to tow. Normally with a short bed truck you need a…