
To see if this custom-fit item will work for you please tell us what vehicle you'll use it with.
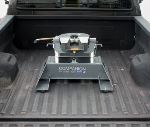
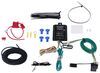
You tow a 5th wheel but still use your truck bed for lumber or pallets. This system gives you a complete 5th wheel hitch with a B&W underbed mounting kit, then breaks into three pieces when you're not towing so it takes up less space.
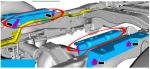
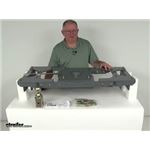
This Demco Recon Stealth separates into three sections when you need to remove it from the truck bed. That changes the job from pulling one large hitch to lifting smaller sections one at a time. The base also folds down when the hitch is not assembled, so it does not leave the same upright profile in the bed. The included MOLLE panel mounts at the front of the bed so you can strap the components in place instead of finding space for them in your garage.
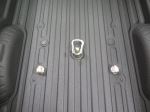
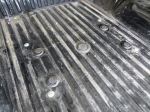
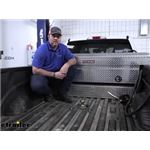
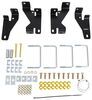
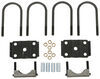
The included B&W underbed kit installs beneath your truck bed and gives you a solid mounting point for the Recon hitch without adding above-bed rails. This is the Turnoverball system, one of the most widely used gooseneck setups, and it doubles as a complete gooseneck hitch when the fifth wheel is removed. A single hole in the bed serves as the connection point, keeping the surface clear when you're not towing.
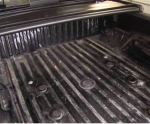
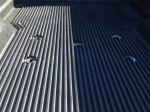
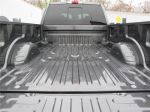
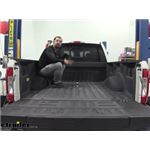
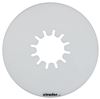
Once the fifth wheel hitch is removed, the bed is open for hauling materials or equipment. The gooseneck ball can be flipped upside down and stored in the hitch, leaving a flat surface for cargo. Safety chain loops sit flush in the bed, so nothing sticks up or gets in the way when you're using the truck for other jobs.
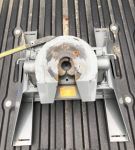
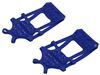
The hitch head uses a wraparound jaw and locking bar that fully enclose the kingpin. That tighter fit cuts down on the movement you can get from looser coupler styles at the hitch. The head pivots front-to-back and side-to-side, which helps it stay aligned as the truck and trailer move through turns, dips, and uneven ground.
This hitch is not compatible with rotating pin boxes, since it is designed for a standard fixed kingpin connection.
The upright uses stacked pin holes so the hitch head can be set at different heights. That lets you match the trailer to the truck more closely instead of towing nose high or nose low. The hitch connects directly to the underbed mounting point, so the adjustment happens at the hitch without changing the setup underneath.
Note: Not compatible with rotating pin boxes.
California residents: click here
Videos are provided as a guide only. Refer to manufacturer installation instructions and specs for complete information.
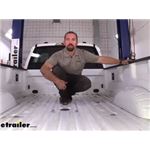
Hello, neighbors. It's Brad here etrailer. And today, we're taking a look at the B&W under bed installation kit for companion fifth wheel hitches on a 2020 Ford F250. So this is going to be great to use for a B&W companion fifth wheel kit. Now, that is sold separately, but one of the great things is you can move this around and still use it as a gooseneck ball. Having the versatility to be able to tow two different trailers with one kit is really nice, especially for something that is kind of a workhorse here.
And, you know, at any point you can swap this over and hook up to whatever trailer you need to. With a three quarter ton truck, it's really nice to be able to use the utility of it and when you have a fifth wheel gooseneck, it's really going to open that up, with bumping that gross trailer weight to 30,000 pounds. So that's going to cover your campers or your heavy gooseneck trailers, so you can actually use your truck. And rather than relying on just a hitch to pull, this is going to bump better quite a bit. Now, you also have a vertical tongue weight, and that's going to be 7,500 pounds.
So, this can hold quite a bit. Now, you can see here, the ball is able to be turned over. So, that's one thing a lot of times with goosenecks, is a lot of people say, well, you lose having the ability to use your bed. Well, that's not the case here because you can simply turn this over, drop it in place and it's essentially flush. Even your safety chain loops here, spring loaded, so they're going to pull them down and keep this nice and flat.
And then, whenever you're ready to tow, you simply pull this up. It's got a nice little handle there. Drop that in place, latch it on the side and you're ready to go. Overall, the kit, while during the install, I noticed is very high quality. The instructions are straightforward.
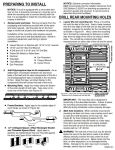
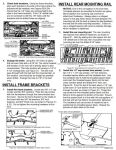
All the hardware is very high quality. The fit and finish is nice. So, that's kind of what makes the B&W stand out from other fifth wheel kits for your truck. So the installation, obviously, you do have to cut some holes. You are under your truck quite a bit, so if you don't have a lift, it can probably get a little tricky if you're doing this at home on the ground. But I'm hoping that, step-by-step, I can walk you through it and make your installation as easy as possible. So now, let's take a look at that. To begin our installation, we're going to lower our spare tire and that's going to gain us a lot more access when installing the gooseneck. Our next step is going to be measuring the distance in the instruction manual back. So we're going to start by measuring here and using those numbers they gave us in the instructions to mark where our hole will be. I'm also going to make sure that we're centered from side to side. So I'm going to go in between the fender wells here. You're going to see, potentially, that the factory dimple, which normally designates where that drill mark would be, this one's actually offset a little further back, so definitely do your measurements that they recommend in the instructions before making any holes. So now, we're going to take our four inch hole saw, and we're going to go ahead and make our drill here. Nice little pilot with my bit. So now, once you have that cut, we're gonna go through and file this down to get all those burrs off and any rough edges. And then I'm gonna come back with a little clear enamel here. And you can use any paint that you have, just to kind of coat that raw surface there. So, since this is a white bed, I'm going to use a little clear. If you have a bed liner, you can use black. Just kind of any paint that you have handy, just kind of coat this edge. So now, our next step is going to be loosening up the bracket for the exhaust so it'll drop out of the way. I am also going to remove the heat, or the spare tire heat shield. And I think that's going to help anyone that's not working on the lifts, and it's also going to help myself. So there's three 13 millimeter nuts here. So you've got one and there's two on the backside. We're gonna go ahead and pull those off. And you're going to want to keep all of your hardware nice and organized, that way when you go back to put it all up, everything's there you're not searching for one piece of hardware. Next, I'm going to be lowering the exhaust down on this back end here. And you have four 10 millimeter bolts. You have two on each side, so go ahead and take those down, and the exhaust should lower down. Okay, that's going to probably give us just enough play. And if we need to, when we raise this in place, to move this down. So now, I'm going to be putting my side plates in and you're going to see the B&W sticker facing outward. Now, the passenger and driver's side are two different lengths. So, your passenger side will be shorter and your driver's side one will actually have the sticker for how to use the handles. So, take your half inch hardware with a flat washer, and you're going to feed that through here. Let me go ahead and put the other one on the other side, as well. You can see our hardware poking from the outside. So, we're on the inside of the frame rail here, and in the kit, there is a side bracket that you can install, but some trucks actually come with these factory installed. So if that's the case, you can set these side brackets aside. Now, on the backside of our bolts, we're going to use our large, flat washer and then followed by a lock washer and then the nut. And you can go ahead and just hand-tight those into place for now. Then we're going to go ahead and repeat our same process on the driver's side. Next step is going to be to take our handle and we're going to feed it here. I'm on the driver's side. Probably right about there. And that's going to allow us a little bit later to have that in place to make it a little bit easy for us. So now, we have our cross member brackets, and what I've done is laid them out as how they're going to fit on the truck. And that's just going to be a little bit easier to visually see where they're going to go. Now in the kit, we do have these threaded bushings. And you're going to see there is a flat spot on top and the openings on the cross member plate actually have a indention here. So, that's going to kind of fit in there with that flat spot. And you can, you might be able to pop it in with your hands, just to kind of get it in place, just like that. And then you're going to want to go back with just small hammer and just slightly tap that down so it's flush. And you can go ahead and do that to all of the brackets. So now, I'm going to start with my passenger cab side bracket here, and really, it's pretty simple. It's going to just have this back plate, will go on the front side of your side plates. And you're going to want to kind of just work that into there. You have to wobble it around a little bit, but you're trying to get those threaded bushings to line up with the holes. So, you have one on the outside of the frame and one on the inside. From there, you're going to take your thread locked supplied bolts in the hardware kit, and you're going to hand tight those in place. I'm going to go ahead and repeat the same process on the other three brackets. And just make sure you take your time and make sure you're putting the correct bracket in the right spot. So next, we have our front cross member, and this is going to join between the front brackets that we just put up. You also have this spacer plate here. So, the way to line it up properly, you're going to see inside where the weld is, and you're going to want that facing up and your bracket facing towards you. So, this is going to go in between those brackets and then we're going to feed our four inch by five eighths hardware through here. So I'm going to get one started, and then we'll get the rest going. So you're going to see the brackets are offset. So we have this one kind of facing towards us, open, and then this one's a little closed space. So we'll just slide this like so. And I'm gonna feed the furthest most hole, so I'll take my five eighths hole. I'm gonna make sure that goes through our spacer plate. And then from there, I'm gonna feed it in through the hole. Now I'm going to put my split washer there and follow it up with the nut. Just a hand tight there. And I'm going to grab the same hardware that I used here and put it on our next hole. Our driver's side will be a little bit different here. We're going to feed it on the furthest most hole. So, in your kit, you're going to find this little spacer washer. Place that first, then follow it up with your lock washer, and then your nut. So now, we're going to do a rear cross member. And that's actually gonna, it's going to sandwich in this gap here, between the brackets and the actual bar of the bed. So this should just slide in, just like that. And you're going to be using your inch and a half by five eighths. You're going to be using a flat washer and then a split washer. And with your hardware in the correct orientation, just go ahead and feed that through. And then you're going to be able to thread that in. Once you have that threaded in by hand, we're gonna repeat this same process on this hole, as well as the two on the other side. Now, before putting our center section in place, these are threaded, and they have this nice coating, but they kind of get in the threads at times. So, to make things a little bit easier for at least hand threading and tighten it down later on, I'm gonna hit this with a little bit of penetrating oil. And then what I'll do is take my supplied bolt here, and I'm just going to run it through. Once I get it hand threaded on, I'm going to run it through with an impact just a few times. And that's gonna loosen up that coating and make it a lot easier for us. In preparation for lifting our center section, I'm going to take our half inch by four inch bolts here and just kind of feed them to where they're, almost have a little bit sticking out. And that's going to be really helpful if you're doing this by yourself. If you have an extra set of hands and you want to grab them for some help, that might be ideal. But if you're by yourself, you can also do it this way. And then, so once we lift it in place, we'll align it and we can just pop those in, and that's going to hold this section up. Looking at the orientation of the hitch, we want our handle here facing our driver's side. So, make sure you do have that over here when putting it in place. Now, these are the four holes that we're going to take those bolts that we put in place and drop them in. And I'm also going to grab my shorter hardware here, and that way I can thread one of these in to hold it in place and make it hands free after the first step. I'll sandwich these two between the front and rear cross member. And let's look. All right, it might take a little bit of wiggling in place here, 'cause you do have that bracket. But, there we go. Once it's through, line your holes up and then you can just pop these in place. And now, that front's held. I'm gonna take my small bolt and just hand thread it in, just for now, to hold that in place. So now we're, our four bolts are poking out. We're gonna just put our flat washers on first, and then we're gonna follow it up with a split washer, and then finally with our nut. You can go ahead, put those in place on all four. Just hand tighten it down. So, coming back with our half inch by inch and a half bolts, you can see that I put a lock washer as well as my flat washer. We'll go ahead and thread these in place. And once you have those three in place, you can actually take this holding bolt and do the same with the hardware. So, during the installation, you might have noticed that we've hand tightened everything, and the reason being is because you want this to align perfectly with the hole drilled. Ours is pretty close, but if you're gonna be doing an install like this, do it right one time and you shouldn't have any issues. So, to pull this up, if you have maybe a rafter or beam that you can attach to, that's awesome. Maybe a chain hoist. But if you don't have that, that's fine. You can use a couple blocks of wood. And we're going to kind of triangulate this a little bit. Using our Cam Buckle Strap here, I want to hook them both on the center of the receiver. And we're just going to cinch this down, and that's going to, see, as you can see, raise that up. And I'm able to kind of move this to align it to where exactly I need it. And that way, when we go to tighten things down, it's exactly where we want it to stay up top. So now, we're going to start tightening down our hardware, since this is in place where we want it to be. And there is a specific process and that way it tightens up properly. And the first ones we're gonna be attacking are gonna be the eight from the center section bolting up. So you're gonna need a three quarter inch. I recommend an impact driver, and then you're also gonna need a socket for the backside, or at least a wrench to hold it in place. So, I'm gonna try to get in here. Now we'll go over to the other side, and that way it kind of balances it out. Now you're gonna tighten down the four on the backside bracket. Now, we won't really need to crank these down super, super tight because we are going to go back with our torque wrench, so we want to be sure not to over torque them, but tight enough with a ratchet and wrench or a socket should be plenty. Next, grab your three quarter inch socket. And I'm using a half inch impact, and we're gonna go through these thread locked bolts on the passenger inside. You can go ahead and tighten those up. So once you tighten your first bolt here, and that's going to be right next to this little bump stock, we're gonna actually go in a diagonal pattern. So, we're going to go to this back one here. And then once we tighten that up, we're gonna crisscross over. So let me tighten this up real quick. Now I'm gonna move over to my forward-facing bolt. And then once that's tightened, we'll crisscross back over to this one here. So next, we're going to be tightening our larger five-eighths bolts that attach to our front cross member to the brackets up top. Now, I'm going to tighten up the bolts that attach our side plates. And, finally, we'll be doing our thread locked bolts on the outside. After I tighten hardware down, I'm just double checking to make sure that our alignment is still correct. And you don't want to be tightening everything down and have it crooked at the end only to have to go back. And now I'm gonna go back with my torque wrench and set it to the specifications in the instruction manual. Now, between the two sized bolts, there are two different torque settings. So, you might knock out all the big ones first and then adjust your torque setting back down for the little ones after. Now, with everything tightened down and torqued to spec, I can now remove or loosen up my Cam Buckle Strap, and we can set this aside. Now, we have our handle fed through here and you're going to see there's the square holes here. And that's going to be for our carriage bolts that drop in the top. Now, to make this a little bit easier, you're going to want to lock this in place. And so, it does hold in place, but just so it doesn't jerk forward or pinch you or anything, you might place something, maybe an Allen wrench or whatever, that way, it kind of locks that in place for the time being. So, now you can feed these bolts into those other squares. And then go with your flanged nuts here and go ahead and hand tighten those down for now. And I'm just gonna take my 13 millimeter, and I'm gonna just tighten it up enough to take a little bit of that slop out. I'm not gonna completely tighten it. I've taken that pin out here, so what I'm gonna do is actually go ahead and release this. And we're gonna be checking to make sure we have clearances. You can see there's wire looms here. Ford's done a pretty good job of keeping those out of the way, but we also want to make sure that there's no other hindrances that can cause this to rub against or bind up. So, take a look underneath the frame and make sure there's nothing else binding. So, we look like we are clear. I don't have anything rubbing against that handle, so I'm gonna go ahead and tighten this down. So now we're going to drill our four holes for our safety chain hooks. Now, we are going to run a small quarter inch drill bit underneath. We want to make it as perpendicular as possible, that way it's not crooked when you're drilling the larger hole. I do recommend putting on safety glasses so you don't get aluminum in your eye. So now, we have our four pilot holes drilled. We're going to go ahead back with a half inch bit to enlarge those, to allow for these to drop in. So I suggest grabbing one of these U bolts, and that way you can test fit to see if you need to drill out anymore. But let's go ahead and enlarge these out. So once you have that fitting, you're going to want to pull this back out. We're going to file these edges down and then hit that with some clear coat, and that way it's not going to corrode. And then we'll just repeat that same process on the other side. Now, before I spray my clear coat, I'm actually gonna vacuum up all my aluminum shavings and that way, they don't get stuck in the clear coat. And then once that's dry, you can drop your safety chain loops in, and then we'll go back to the bottom side of the vehicle. Now we'll be installing our conical springs on the U bolts themselves so, make it a nice, little tornado shape there, and then go back with your nut. And you're gonna want to tighten this down to where this is flush with the bottom of the bolt. Perfect. Now go ahead and repeat that same process on the other three. So, I've gone ahead and put my heat shield and my spare tire back up in place. So now, all that's left to do, drop the ball in, latch it up and get to towing. And that was a look and installation of the B&W under bed installation kit for companion fifth wheel hitches..


Do you have a question about this 5th Wheel Hitch?
Info for this part was:
At etrailer we provide the best information available about the products we sell. We take the quality of our information seriously so that you can get the right part the first time. Let us know if anything is missing or if you have any questions.


Thank you! Your comment has been submitted successfully. You should be able to view your question/comment here within a few days.
Error submitting comment. Please try again momentarily.