

How to Install a Ventline Ventadome Roof Vent with 12 Inch Fan Powered Lift
Updated 09/10/2024 | Published 09/15/2014
Products Featured in This Question


Question:
I purchased a ventline fan/vent with powered lid. Do you have detailed wiring instructions available? Do I need a rocker switch for the powered lid or will a regular on/off switch work? Thanks
asked by: Candice K
Expert Reply:
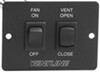
You can utilize a power wall remote switch # VC0533-03-A or # VC0533-02-A (black or white). A rocker switch # BL0108-00 will work and you will need 2 of them.
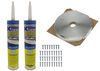
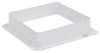
The installation kit # 344270KITW will come with screws, tape, and sealant. You will also need primary 16 gauge wire # DW02359-1 as well as a ceiling garnish # VA0445-35
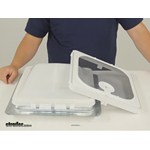
I have attached a picture of wiring instructions for you as well.
Installation Instructions for the Ventline Ventadome Roof Vent # V2119-601-00.
1.Mark desired location for vent. Be sure to choose a location between roof joists.
2.Cut a 14-1/4" x 14-1/4" opening through roof and ceiling. (Or use existing opening if you're replacing a standard 14-1/4" x 14-1/4" vent.)
3.Apply sealant to bottom of flange. Be sure to surround each screw hole.
4.Insert vent through hole with screen frame extending through roof cavity and hinge of vent toward the front of the vehicle.
5.Mount to roof with # 8 screws.
6.Remove screen frame to make electrical connections.
7.Connect to 12-volt DC power source.
8.Replace screen frame.
9.Attach interior garnish piece # VA0445-35 (sold separately) with # 8 screws.


Product Page this Question was Asked From
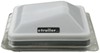
Ventline Ventadome Roof Vent w/ 12V Fan - Powered Lift - 14-1/4" x 14-1/4" - White

- RV Vents and Fans
- Vent
- Roof Vent
- Powered Lift
- 12V Fan
- Plastic and Metal
- White
- Ventline
more information >
Featured Help Information
Miscellaneous Media

Continue Researching
- Video: Complete Breakdown of the Ventline Ventadome Roof Vent w/ 12V Fan
- Search Results: rv vents and fans
- Search Results: ventline v2094
- Video: The Low-Down on the Wall Remote Switch for Ventline Ventadome Roof Vent
- Shop: Roof Vent Installation Kit - Sealant, Butyl Tape, Screws - White
- Search Results: v2119
- Search Results: ventline v2092
- Shop: Wall Remote Switch for Ventline Ventadome Roof Vent - White
- Shop: Ceiling Garnish for Ventline Roof Vent - 3-1/8" Leg - 14-1/4" x 14-1/4" - Polar White
- Shop: Ventline Ventadome Roof Vent w/ 12V Fan - Powered Lift - 14-1/4" x 14-1/4" - White
- Search Results: rv power inlets
- Search Results: e bike covers
- Search Results: covers
- Shop: Ventline Ventadome Trailer Roof Vent w/ 12V Fan - Manual Lift - 14-1/4" x 14-1/4" - White
- Shop: Ceiling Garnish for Ventline Roof Vent - 5-5/16" Leg - 14-1/4" x 14-1/4" - White
- Video: MaxxFan Deluxe Roof Vent Installation - Enclosed Trailer
- Video: Arched Loading Ramp Set Feature Review
- Shop: MaxxFan Deluxe Roof Vent w/ 12V Fan, Thermostat, and Remote - Powered Lift - 10 Speed - White
- Article: Trailer Wiring Diagrams
- Video: Review of Bauer Products RV Door Locks - Entry Door - BA93UR
- Shop: RV Roof Membrane
- Video: Checking Out the MaxxFan Plus Roof Vent w/ 12V Fan, Thermostat, and Remote
- Q&A: Availability of Birch White Ventline Ceiling Garnish
- Q&A: Availability of Keyless Entry Door Lock for 2023 Thor Freedom Traveler A30
- Video: Detailed Breakdown of the Roof Vent Installation Kit
- Q&A: How To Determine The Correct Replacement RV Entry Door Lock For Your RV
- Q&A: Power Roof Vent That Wires To Switch Plate
- Q&A: Replacement Recommendation For Older Ventline Roof Vent
- Shop: RV Interior Lighting
- Q&A: Best and Easiest RV AC Unit Replacement for Dometic Penguin II Unit
Dave G.
9/10/2024
I have this same exhaust fan in my 2017 Jayco Eagle fifth wheel, The lift and fan both don't work, I checked for blown fuse, not an issue, the rest of the bathroom 12 VDC lights on same circuit work fine. I have 12 VDC coming in according to your wiring diagram to the fan switch. I replaced the switch plate but still no fan or power lift, I suspect a bad (-) white connection to Chassie ground, it's hard to trace the wires back to the Chassie. Any ideas how I could troubleshoot this? Thanks, Dave G