


How Do I Replace The Valve Stem Gasket On A TST TPMS Cap Sensor?
Updated 10/02/2026 | Published 10/01/2026
Question:
How do I replace the small thick o-ring on the TST cap sensor. This is the one that seals the air pressure below the threads where it connects to the valve stem. Thanks.
asked by: Mark K
Expert Reply:
Hey Mark, thanks for reaching out. Yes, that small thick seal inside the threaded opening is the valve-stem gasket, which is different from the larger O-ring that seals the battery cap.
To replace it, remove the sensor from the valve stem and use a small pick or tiny flat screwdriver to carefully hook the old rubber gasket and pull it out of the bottom of the threaded opening. Be careful not to scratch the sealing surface. Press the new gasket straight down into that recessed seat until it lies flat, then thread the sensor back onto the valve stem until the air leak stops and give it about another 1/4 turn being careful not to over tighten.
What vehicle do you use the sensors on?


Product Page this Question was Asked From
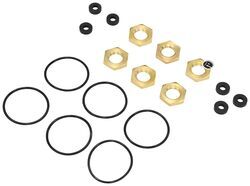
Replacement O-ring Kit for TST SE2 Cap Sensors

- Accessories and Parts
- TPMS Sensor
- Tire Pressure Monitor Parts
- O-Ring
- TST
more information >

Continue Researching
- Video: Review of TST Replacement O-ring Kit - TST69FR
- Shop: Replacement O-ring Kit for TST SE2 Cap Sensors
- Shop: Replacement O-ring Kit for TST E22 Flow Through Sensors
- Shop: Brass Tire Sensors for TST TPMS - Hybrid - Marine - Qty 1
- Shop: Replacement SE2 Cap Sensor for TST 507 Series
- Shop: Suspension Enhancement
- Shop: Tow-Rax L-Track - Tapered - Mill Finish - Aluminum - 24" Long
- Q&A: Recommended PSI for Firestone Ride-Rite Air Helper Springs When Towing
- Q&A: Recommended Air Pressure of Firestone Ride Rite Air Springs # F2071 on Dodge Ram 3500 Dually
- Q&A: Air Pressure Range for Firestone Ride-Rite Air Bags
- Q&A: How Much Air Pressure Should be Run in Firestone Ride Rite Kits
- Shop: Firestone Ride-Rite Air Helper Springs - Double Convoluted - Rear Axle
- Q&A: What is the Difference Between a Class II and a Class III Hitch?
- Article: Trailer Wiring Diagrams
- Shop: Trailer Hitch
- Search Results: trailer hitch
- Shop: Universal Installation Kit for Trailer Brake Controller - 7-Way RV and 4-Way Flat - 10 Gauge Wires
- Search Results: trailer tires and wheels
- Article: Brake Controller 7- and 4-Way Installation Kit (ETBC7)
- Q&A: Lug Nut Torque Chart for Trailer Wheels
- Shop: Trailer Wiring
- Article: How to Measure for Trailer Hitch Drop
- Q&A: What is the Difference Between a 4-Way and 7-Way Trailer Connector
- Search Results: trailer wiring
- Video: How to Choose a Trailer Brake Controller
- Shop: Brake Controller
- Search Results: trailer jack
- Article: Wiring Trailer Lights with a 7-Way Plug (It's Easier Than You Think)
- Article: How to Measure Your Trailer Wheel Bolt Pattern
- Video: An In-Depth Look at the Roadmaster Battery Charge Line Kit for Towed Vehicles

on Accessories and Parts















Ray
10/2/2026
As someone who recently replaced the gaskets, batteries and O-rings on my RV trailer and truck sensor caps, after several years of intermittent use, I agree with everything in Jesse's comments. Most ESPECIALLY his comment about being careful not to scratch the brass sealing surface UNDER the gasket. With that I can attest to the fact that removing a gasket from the sensor cap is a bit tricky. It sits within a very narrow recession in the cap, with the pressure sensor stem sticking up through it, limiting access to the gasket. I found that the gasket tended to rotate around the sensor stem making it challenging get purchase on the gasket to lift it out. This sliding in place foiled my attempts to use a straight needle to tease the gasket up from its normal position without sticking the needle directly down which would risk striking the sealing surface underneath. I found success using a precision hooked pick to penetrate the gasket at angle, making sure to pushing against the side of the gasket chamber, not the bottom. Pushing the pick into the rubber gasket I got enough purchase to get part of it above the sensor stem. I then used a fine pair of forceps to pull the gasket out of the cap. By the time I was on my third sensor, things went quickly. Please note that using this method renders the old gasket unusable because of the hole created by the pick so only use it when a replacement is on hand. Overall, I have been very happy with my TST TPMS finding it to be very reliable and accurate.