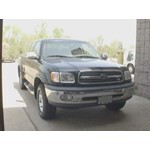
Installing a Brake Controller on a 2003 Toyota Tundra with a 7-Way but Not a Tow Package
Updated 04/12/2010 | Published 04/10/2010
Products Featured in This Question

Question:
I have a 2003 tundra sr5 v8 without trailer tow package. When i bought the truck the dealership added a 7 pin plug in and a reciever hitch. I also see an extra breaker under the hood. Can i hook up a wiring harness by the drivers kick plat? I only see 4 wires going in to the 7 wire plug. I dont need a charge circuit for an auxiallary battery. I assume I will need to run the blue brake controller wire. thanks
asked by: wade
Expert Reply:
As you probably know, in 2003 Toyota made the Tundra with or with out a factory trailer connector. So if they installed one when you bought it, they might not have run all the wiring for a brake controller. This might be why you only see 4 wires at the 7-Way. I believe this is the case, so you will need to hardwire the brake controller.
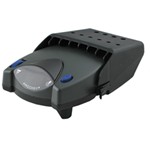
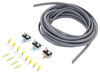
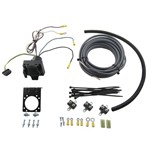
You will need a brake controller. I recommend the Prodigy, # 90885. It is one of our best selling and highest rated controllers. There are two possible hardwiring options. If you can access the wires on the 7-Way connector the dealer installed, you can run the brake and power wires from it to the battery and brake controller. You will need Universal Brake Control Wiring Kit, # 5506, and Pollak Single-Pole, Thermal Circuit Breaker, # PK54540.
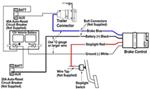
Start by mounting the 30 amp breaker and 40 amp breaker near the positive battery terminal. Using a length of 12 gauge wire, attach a 3/8 inch ring terminal to one side. On the other end attach a #10 ring terminal. This end will connect to the 30 amp breaker labeled BATT. Do not attach the other end to the battery yet.
Next, route a length of duplex wire from the cab where you would mount the brake controller, through the firewall, and to the battery. Attach a 3/8 inch ring terminal to the white wire and a #10 ring terminal to the black wire. Attach the black wire to the open pole on the 30 amp breaker. Attach the white wire to the negative battery terminal. In the cab, attach the black wire to the brake controllers black wire.
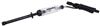
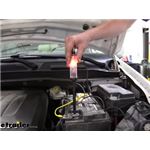
Next, find the stoplight switch above the brake pedal. Using a circuit tester like # PTW2993, find the wire that carries a signal only when the brake pedal is pressed. Attach this wire to the red wire on the brake controller. Then route a length of 12-gauge wire from the brake controller, under the vehicle, to the 7-Way connector, avoiding areas that might pinch or burn the wire. In the cab, attach the brake controller blue wire to this wire. At the connector, this wire goes into the bottom right spot on the connector.
On the top left spot on the back of the 7-Way, attach a length of 12 gauge wire and run it under the vehicle to the engine compartment. Attach this wire to the AUX post of the 40-amp breaker. Attach another length of wire to the BATT side and run it to the positive battery terminal.
Finally, connect the wire from the 30 amp breaker to the positive battery terminal. If you need the reverse lights, you will run wire from behind one of the taillights reverse lights and attach it to the center spot on the 7-Way.
If you do not have access to the connector the dealer installed, you will need to use a different method. You will need a # ETBC7 kit. You will have to cut the 4 wires that go into the 7-Way to get started. This kit has a 4 flat and you will need to cut the plug part off to splice the wires.
Using a circuit tester, find the wire on the vehicle that carries a signal with the left turn signal. Attach this wire to the yellow wire from the 4 flat you just cut. Next, do the same with the right turn signal. Attach this wire to the green wire. Finally, have someone turn on the lights and find the wire that carries a constant signal. Attach this wire to the brown wire. The last wire left on the vehicle will be the ground. Attach this wire to the white wire.
Next, attach the white wire from the duplex cable to the blue wire on the new 7-Way and the black wire to the black wire. Then route the duplex cable under the vehicle and up through the engine compartment. Separate the two wires and route the white wire through the firewall and connect it to the blue wire on the brake controller. The black wire under the hood will attach first to a 40 amp breaker, then to the positive battery post. You will need to attach some left over wire to the brake controller white wire and route it through the fire wall and attach it to the negative battery terminal. Last, the black wire on the brake controller will connect first to a 20 or 30 amp breaker (depending on the brake controller instructions) then to the positive battery post. You will find and attach the brake controller red wire the same as described above.
There you have it, two methods. Both valid. I have included the instructions to the first method below. For the second method, I have included two videos that show an ETBC7 being installed. I have also included an FAQ article on wiring a brake controller from scratch.


Featured Help Information
Miscellaneous Media


Continue Researching
- Shop: Brake Controller
- Shop: Trailer Hitch
- Shop: Trailer Wiring
- Search Results: tekonsha p3 wiring harness
- Search Results: tekonsha trailer brake controller
- Shop: Fifth Wheel Hitch
- Search Results: trailer suspension parts
- Search Results: brake controller
- Shop: Wiring Kit for 2, 4, 6, and 8 Brake Electric Trailer Brake Controllers
- Shop: Oil Cap, Plug and O-Ring for Dexter 7-9K Trailer Axles and DeeMaxx 8K Oil Bath Idler Hubs
- Shop: Redarc Tow-Pro Liberty Brake Controller - Dash Knob - Up to 2 Axles - Proportional
- Shop: Pollak Black Plastic, 7-Pole, RV-Style Trailer Connector - Trailer End
- Shop: 3" Round Trailer U-Bolts (Qty 2)
- Shop: Advent Air RV Air Conditioner - 13,500 Btu - Black
- Shop: Vehicle Tow Bar Brake System
- Search Results: tow bar brackets
- Search Results: rm676
- Search Results: rm 15267
- Q&A: Replacement Mounting Bracket for Prodigy P3 Brake Controller # 90195
- Article: Brake Controller Installation: Starting from Scratch
- Shop: Gas Shock - 150 lb Force - 20" Extended, 11.41" Compressed - Black Nitride
- Shop: Base Plate for Tow Bar
- Q&A: What Is An OEM Prep Package And How Do I Know If I Have It
- Article: Wiring Trailer Lights with a 7-Way Plug (It's Easier Than You Think)
- Video: DIY Install: Tekonsha Prodigy P2 Trailer Brake Controller on your 2002 Toyota Tundra
- Video: DIY Install: Mighty Cord Trailer Connector Adapter on your 2013 Thor ACE Motorhome
- Video: What to Know About the Mighty Cord Trailer Connector Adapter
- Video: A Closer Look at the Hook Probe Circuit Tester
- Video: Redarc Tow-Pro Elite Trailer Brake Controller Installation - 2022 Nissan Frontier
- Article: Brake Controller 7- and 4-Way Installation Kit (ETBC7)

on Accessories and Parts