
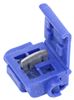
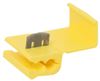
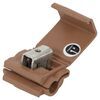
Closed port quick splices self-stripping connector is a 2 channel wire connector that is designed to splice into an existing wire without having to cut, crimp or strip the existing wire.
Features:
Specs:
Videos are provided as a guide only. Refer to manufacturer installation instructions and specs for complete information.
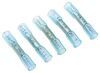
Speaker 1: Today we're going to take a look at the quick splices 14-, 16-, 18-gauge blue self stripping connector. It's for a quantity of one. Now this is a closed port quick splices self-stripping connector. It is designed to splice into an existing wire without having to cut, crimp, or strip the wire. Provides an open channel in the front for your existing wire. And then in the back is a closed channel for the tap wire.
The blade right up here on top, well, that's what will pierce the wires in each of the channels when you push down on it. And then you just put the cover over it and complete your connection.Now there are pliers required to squeeze down on that blade after your wires are placed in it. Now this part is comparable to the 3M blue quick splice connector. This is for a quantity of one. The connector color is blue.
And again, it's for a 14-, 16-, or 18-gauge wire and the maximum power rating is 600 volts.So what I'm going to show you here . I happen to have two 14-gauge wires, so what you'll want to do, like we mentioned, the front is all open, so you put your wire in there that you want to tap into. Then, you'll take your wire and on the back channel it'll only go . you push the wire in, it will only go so far 'cause it's a closed port on the back one. So you push that all the way.
Then once you get them all the way to where you want them, just take your pliers, put it on there, push down on it, just like that, and once you push down enough, you'll see that that has connected those. Then, just take your cover and that snaps right over there. As simple as that, you've tap into the wire without having to do any cutting, crimping, or stripping of the wire. That should do it for the review on the quick splices 14-, 16-, 18-gauge blue self stripping connector for a quantity of one.
Customer Satisfaction Score:
100% were satisfied with this product
0% of customers were not satisfied
Ratings & Reviews


Info for this part was:
At etrailer we provide the best information available about the products we sell. We take the quality of our information seriously so that you can get the right part the first time.


Thank you! Your comment has been submitted successfully. You should be able to view your question/comment here within a few days.
Error submitting comment. Please try again momentarily.