
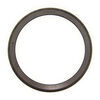
| Inner Diameter (ID) | Outer Diameter (OD) | Application: |
|---|---|---|
| 3.125" | 4.5" | AL-KO 12K, Dexter 10K, 12K, 15K & Hayes 10K - 12K |
| Seal Cross-Reference | ||||
|---|---|---|---|---|
| Dexter # | Transcom # | National # | NOK # | Chicago Rawhide # |
| 010-056-00 | - | 370014 | - | CR318281 |
California residents: click here
Videos are provided as a guide only. Refer to manufacturer installation instructions and specs for complete information.
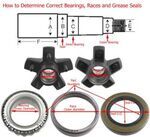
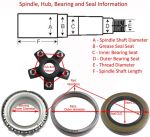
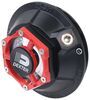
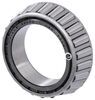
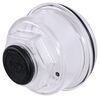
Hi there, trailer owners. today, we're gonna take a look at Redline's replacement wheel bearing oil seal. We're going to be using number 10-56, 10-56 today. And it's designed for axles that are 10, 12, and even some 15,000 pounds from manufacturers such as Dexter, AL-KO, or Haze. And with this the seal here main thing is double checking your size to make sure it's gonna fit properly over your spindle and inside of your hub, your drum. And with this, we're looking at an inner diameter of 3.125 inches and an outer diameter of 4.5 inches.
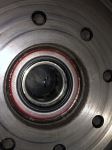
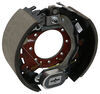
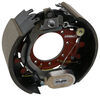
So now we've covered some of the specs on it. We've got a seal that's failed here and caused some issues with our brakes. So if you wanna follow along with us we're gonna show you how to get that seal removed and replaced and get this thing back up and running once again. So we've got our customer's trailer here. We just got the wheels off of it.
So let's get it disassembled. We're gonna remove the outer hub here. So we're gonna start with the cap here on the end. I'm just gonna use a pair of channel locks to remove it. And you might wanna use a screwdriver, or a pry bar, just to hold the hub as you're removing these.
And normally once you get about this far you start to get a drip or two coming out of it from the oil. But yeah, it's pretty dry in there. So it's definitely got a leakin' seal on it, 'cause we don't have any oil inside of it. But we didn't really see traces of oil out here, so it's unlikely that this seal here is what's causing the issue. Based on where we see the contamination, it's looking like it's probably that inner seal there on the back.
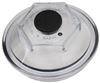
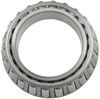
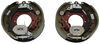
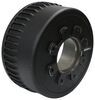
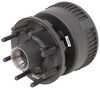
So now we've got that cap removed, we're going to remove the nuts here on the end of the spindle. You'll see, it's got these, it's like a star washer here but it's got some tabs on it. Need to bend those tabs straight or back. We need to get 'em out of the way so we can get the nut off of there. So we're just using our flat bladed screwdriver and a little hammer here just to knock those ears up. Check around, you may or may not have another one on there. A lot of times they put two of the tabs over make sure it's on a couple of faces, not always the case but just kinda look around and check. Looks like we're probably pretty good there. We'll then switch back to our channel locks here and we'll remove our nut. All right, just set that down. Behind that we have the locking star washer and you can see that one was bent over there, holding the other nut on the other side. Will then grab the nut behind it. And behind this nut, you'll have a washer as well. We'll grab that off of there. We can go ahead and now just slide the hub off. We've got all the nuts removed that's holdin' on. I'm not gonna slide the hub completely off. I'm just gonna slide it out some and I got my screwdriver here on the end of the shaft, and this way we can use that to kinda catch our bearing. Boy, it's a heavy assembly. Oh, there we go. We got our napkins down there. They just fell in there, that's all right. If you have a seal puller, and we do have seal pullers here at etrailer that you can use to pull seals, you can use that method to remove the seal. I'm gonna show you just kind of a little bit of a backyard tech way to get that inner seal removed. If you don't have any of those tools available, what we're gonna do, we're gonna take our washer and our nut, just cleaning it off real quick. We're gonna slide our washer on there, and then we're gonna thread a nut on here. And when we go to pull this hub off, that washer is gonna hit the face here of our bearing. And then when we pull it, it can hit that bearing, and then the seal will press out with the bearing here. Just like that, one quick motion. I wasn't even pulling that hard. If you pull this thing and it doesn't come out. 'Cause I just kind of a easy pull motion, I really wasn't pulling that hard. If you pull it, boom and it slams and it stops, that method's probably not gonna work for you. It works in most cases, but there are some instances where just something gets pressed in there just right. it gets kinda cocked a certain way. That may not work out so well for you, and you have to actually use a seal puller on it. And we're gonna take our bearing and put it into place. This is the larger of the two if you remember, and you can always just double check while dropping it down in there, it should fit right back into the race. Now we're not gonna reassemble it dry. We're gonna put a little bit of lubricant on there. So we've got some oil here, this is 80, 90 weight, and we're just gonna get it kinda worked around all the way on this and kinda work it inside here a little bit, just so that way we're not a assembling it completely dry. Kinda working it around to get it across all the rollers and on that inner race as it works around. And then we can drop it in there. And I'll sit in place right inside our assembly there. Next we'll install our seal. Now to install the seal you are gonna need a seal driver. We have seal drivers available here at etrailer. I'm gonna take a little bit of oil and put it on the outside. This can just help it slide in a little bit easier. We'll drop that down in there. And these are labeled too, if you we're curious, you know so it shows air side there, which will make this the oil side. So there is a label on that there, if you're confused. And now we'll drive this in. And we're just double checkin' looks like we're just a hair crooked so we're gonna try to straighten it out a little. All right then, then just keep working at it until you get it all the way down in there. It should be flush with the lip all the way across here at the top. And your gap should be about the same all the way around. So once it feels like it's all the way even around you may or may not get a couple of pieces of the rubber outside, that kinda just rip off, you can just pull those little pieces out of there. 'Cause if you look at the seal, it kinda had like stripes around it help it seal better. Every now and then those outer pieces, you know, the old chunk that kinda comes off. It'll still seal properly inside there. All right, and now this is one of the most important parts of your reassembly is actually sliding the drum back on. So here we go. Get your whole body in there, get it to the right height where you can see and then just, without touching anything on that seal, slide it right on. All right, now that we've got it slid up there, we're just putting in the rest of our parts. All right, now we just need to fill it up. If you look at your cap here, it says oil level on it. So we're just gonna fill it until we're at the oil level. This is something that you're gonna wanna double check multiple times, just because this is a thick oil, and it takes it a while to fully gravitate and fill all the cavities. So you might end up filling this thing. You spin this thing around a few times, come back and check it like 10, 15 minutes later. It's probably gonna be low. Fill it back up, do it again. And then I would even let this thing sit overnight and recheck it again in the morning, just 'cause this oil gets so thick. And it's pretty cold out right now, you know, we're in February here in the middle of the country. So it's cold. That makes the oil just a little bit more viscous, or a little bit thicker because of the temperature. All right, so now we've got it filled up here, just reinstall our cap. And that completes our look at Redline's replacement wheel bearing oil seal..
Customer Satisfaction Score:
97% were satisfied with this product
3% of customers were not satisfied
Ratings & Reviews


Good seal at a reasonable price.
worked well thank you.
delivery on time,the correct parts,and i will be using your help again!!!----thanks ron
A great seal
Justin finally got it right talked to three people and got three different seal numbers but thanks Justin
The right seal
PERFECT FIT AND GREAT PRICE
All parts ordered were of excellent quality, Thanks!
Everything fit good. Thanks Calvin
Great product and fast shipping
Do you have a question about this Trailer Bearings Races Seals Cap?
Info for this part was:
At etrailer we provide the best information available about the products we sell. We take the quality of our information seriously so that you can get the right part the first time. Let us know if anything is missing or if you have any questions.


Thank you! Your comment has been submitted successfully. You should be able to view your question/comment here within a few days.
Error submitting comment. Please try again momentarily.