


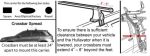
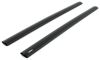
This Thule roof rack lets you carry cargo and gear on your vehicle. Aerodynamic crossbars with split rubber strips in top channels work with channel-mount and clamp-on accessories. Installs to flush rails on your vehicle's roof.
Features:
Specs:
 Alternate Instructions
California residents: click here
Videos are provided as a guide only. Refer to manufacturer installation instructions and specs for complete information.
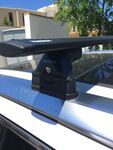
Hey, Trailblazer owners! Today, we're gonna take a look at the Thule Wingbar Evo for flush rails on our 2025 Chevy Trailblazer. Now, what we're gonna do is, see how well it fits and how easily we can install it. Now, being a Trailblazer owner, you're fully aware that it's pretty limited as far as your cargo space. So this is gonna help you as you go down the road. So, being a Trailblazer owner, it's a pretty high probability you purchased this vehicle because it's flat towable. And what that means for you is, this is gonna add to the amount of stuff you can bring along with you to make those memories.
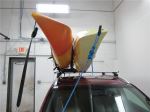
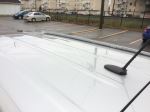
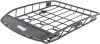
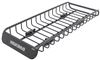
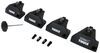
This gives you this entire roof to add a basket, kayak, carrier, bike carrier, whatever you can think of to get the most outta your time. Now, taking a closer look at what you're gonna do, this guy right here is based off of a wing design. The wingbar is shaped like a wing, and it's gonna give you access to your top strip right here. So you have a T-channel slot, so you can slide down T-channel accessories and it also has a rubber strip that's gonna help reduce your wind noise. Now, as far as the towers themselves, these guys are made of the same types of plastics that manufacturers use on a vehicle.
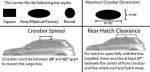
So it's designed to deal with the harsh heat and cold no matter where you are. So if you're in the Southwest or the Northeast during the wintertime, you're gonna be good to go with this guy. And then you have your custom pads right here to design, to contour around your rooftop. Because the trailblazer has fixed mountain points, you get what you get. This is gonna be the spreads you have and you're just gonna like it.
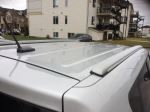
So it looks like you're right about 24 inches as far as your space in between. And as far as your overall height from the roof, you're right at 4 3/4 inches. So that's more than enough space for most rooftop accessories such as cargo boxes or cargo baskets. You could also put a bike up here. You could put just about anything that works with rooftop accessories.
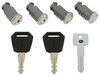
Now, I would honestly love to see how you're going to use your wingbar. So why don't you go ahead and leave a comment below if there's something that I didn't mention that you would use this rooftop rack for. Now, as far as what you need to set it up, everything is in the box. So we're gonna go ahead and show you how to get this thing installed. To kind of get an idea as far as how the assembly goes, I installed the back crossbar as well as my platform so I can see where everything connects. And it's pretty straightforward. So from here, we're gonna actually assemble our foot pad and clamp system. So I'm just gonna start with removing my wingbar end cap. You can just press and pull and it'll just slide out the end. This part of it is steel tool-free, and you're gonna wanna make sure that this exterior part where you have this threaded bolt is sticking out. I'm just gonna slide it along the track. So you see this guy right here, we're just gonna slide it right along our track. And each one of these pieces are alphabetized. You have A, B, C, and we're gonna put 'em on in that order. So we're gonna make sure that these hooks are going towards the inside, and that's A. We have our pad that's going to match up to the shape of the bottom of our foot. And this guy will just press right in and we're gonna hook this guy down in here. So just so I can show you a little clearer, you can see how this matches up to that dip there, and you're just gonna hook that right on. And what holds it all together is this threaded bolt also. So you're just gonna twist this guy on here, hand-tight just enough to keep it together. All right, now, we're gonna put our end cap back on and install it on our roof. So at this point I'm just gonna reach across and just place it on top of my platform. And I'm gonna actually try to make my clamp around right here. And I'm just gonna hand-tighten. I'm not gonna use my torque wrench yet because I'm gonna need to make some more adjustments. So I'm gonna do the other side to make sure it's connected and then I'm just gonna adjust my bar so it's symmetrical with the vehicle. Alright, and now that I got it hand-tight, I'm gonna actually use my tool and I'm gonna go from side to side. So I'm not gonna tighten this all the way. I'm gonna go to the other side 'cause it tends to pull a little bit. And I'm gonna go each side to each side till I get it to right before it wants to torque. Once your wrench starts torquing you know it's tightened. From here, you're gonna be able to put the cover on your tower, and this is where you would actually lock it down if you added the Thule single key lockable option. Now, alternatively, you could go with something like the Thule wingbar edge right here that's going give you that cutoff here that gives you more of that OEM stock look. So again, this is Ed with etrailer.com, taking a look at the Thule Wingbar Evo on our 2025 Chevy Trailblazer. Have a great day.


Do you have a question about this Roof Rack?
Info for this part was:
At etrailer we provide the best information available about the products we sell. We take the quality of our information seriously so that you can get the right part the first time. Let us know if anything is missing or if you have any questions.


Thank you! Your comment has been submitted successfully. You should be able to view your question/comment here within a few days.
Error submitting comment. Please try again momentarily.