
To see if this custom-fit item will work for you please tell us what vehicle you'll use it with.


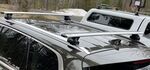
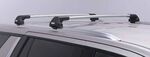
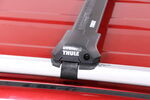
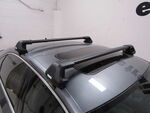
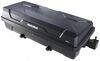
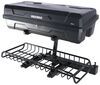
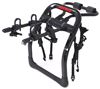
This aerodynamic Thule roof rack mounts flush on your roof for a sleek, factory look. Crossbars with split rubber strips in top channels work with channel-mount and clamp-on accessories. Installs on your vehicle's naked roof.
Features:
Specs:
 Alternate Instructions
California residents: click here
Videos are provided as a guide only. Refer to manufacturer installation instructions and specs for complete information.
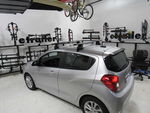
Hello neighbor, this is Curt with etrailer and today we're gonna take a look at the Thule Wing Bar Edge roof rack on our 2025 Nissan Rogue. Now if you've had any experience with this roof rack or if you have questions about it after watching this video, just go ahead and leave those in the comments below. We'd love to take those and use them to help our other neighbors make the best decisions for themselves. Now, the Thule Wing Bar Edge is a flush crossbar, meaning it doesn't have any kind of overhang bar. People like these because they're cleaner looking, they don't have to worry about head space when they're getting in and out of the car and hitting their head on anything and it just generally has a cleaner more factory look. It is an aero style bar, which means it's got an ovular or a blade shape.
It's wider in the front, narrow in the back. That's really gonna help with wind noise, reducing that while you're traveling. It also is gonna help a little bit with your gas mileage as well. The bars are gonna have a 165 pound weight capacity. However, you always want to double check your owner's manual and check the factory roof capacity, whichever those numbers is smaller, that's how much you can carry up there.
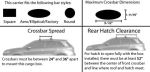
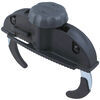
Now the way that these bars can work with accessories is you are free to use your clamp mount accessories. There's also a rubber stripping at the top that's split, so you can use your T accessories as well. Those will be added in through your towers with the cap removed. But since we're up here and we're talking about different accessories and things, it is important to know what our crossbar spread is. So from the center of one bar to the center of the next, we are at a 28 and a half inch bar spread, and that's a really good place to be.
Most rooftop accessories require between a 26 and a 32 inch spread, so these should work out perfectly for us. The other thing we're gonna check is just how much more it's adding to the roof, three and a quarter inches higher. That's not a whole lot that you're probably not getting into areas that are, you know, have a low enough clearance that you gotta worry about that. But it is good to know just what you got up here otherwise. Under the bar between the roof, we're gonna have about two and a half inches.
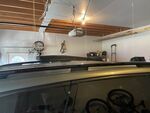
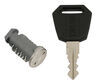
So just keep that in mind when you're choosing accessories and how they're gonna work on here. I like the placement of these bars. It is specific as you'll see in a moment when we show you how to install them. But if you're standing in the second row door threshold, that puts you right in between 'em, which means any of your accessories up here are just gonna be that much easier to reach. So now that we've talked about few of the features and exactly how this fits onto our Nissan Rogue, why don't we go ahead and show you exactly how we got these installed. So as we begin our assembly, we're gonna kind of lay everything out here. We already have our first bar installed and the reason we went ahead and did that is because with a naked roof you don't have fixed mounting points. So the instructions are gonna tell us just how far back from the windshield to mount this bar, and then it'll give us a measurement from this bar to setting on our back bar. So we went ahead and installed the front bar first, but in order to put our tower together, there are some things you have to pay attention to in the instructions. Your foot pads are going to be specific as far as to where, you know, front, back, driver, passenger, where they're going to go. And that's because they're shaped very specifically to the contour of your roof in order to get a really snug good seat for your crossbars. So the first thing we want to do is go ahead and make sure we are matching up. So I'm taking my tower that is for the driver's side rear and the appropriate foot pad to put on it. I'm just gonna kind of press this down into place until it's seated comfortably. Once we have our foot pad seated in a nice secure position, we're gonna go ahead and insert our clamp to the tower. Now you are gonna get two different lengths of clamp in your kit. You have a shorter set and a longer set. The longer set is going to go on the rear crossbar while the shorter set is going to end up on the front crossbar. And that's only because you have more car body to reach back here to get into that door threshold. So just remember the longer set is going to go in the back. We're going to install this. You notice there's two little hooks right here. We're simply going to insert it in this area and press down until we hear it lock in. And then once it's locked in, it's nice and secure and we can move on with the rest of our install. Now your tower is essentially assembled at this point. We did remove the cover here. There's a little metal tab that you see right here, and when you insert this into the crossbar here at the end, you'll depress this tab and slide it over until it pops up right in through this hole right here. But before we do that, we should put in our weather stripping. So the weather stripping is really simple. You're going to go ahead and separate your pieces first. Then on the plain side, which is going to go on the narrow end of the crossbar, it is an aero crossbar, so it's wider in the front, narrow in the back. The plain end is going to go back here facing away. And all we're gonna do is just depress this down into these tabs as we move along and make it flush on the end there and depress this all the way down until it's in. Next, we're gonna go ahead and install the front piece of weather stripping. And this is easy to identify because of these arrows. These arrows should be pointing forward on the vehicle and we're gonna install that the exact same way. And finally, what we'll do is go ahead and insert our towers here. We'll just depress that tab down and push it in until we hear it click and lock in. There we go. We're just gonna repeat that process over here on the passenger side. Now that we have our towers attached to the crossbar, it's time to set our crossbar length and we're gonna do that using the provided Thule tool right through this area here. And in your instructions, it'll give you a bar length that is indicated by these lettered hash marks here. On the back bar, which is what we're assembling right now, it asks us to tighten it down to the B length, which is gonna be this hash mark right here. So I'm just going to go ahead and tighten this down until the edge of my crossbar meets the hash mark for the letter B on both sides. Now as far as bar placement goes, I mentioned that you have to place the first bar on so you know where to place the second bar. The first bar, they asked for a measurement from the front of the tower to the top of the windshield of 14 and 1/8 inches. So we've got those set right at that. The measurement for our second bar is going to be from the front of our first crossbar to the front of our second crossbar, should be 28 and 3/8 inches. So I'm gonna go ahead and get kind of a rough measurement right now so I know about where to place my bar. So I'm gonna set it right here and we're gonna go ahead and tweak it from there after we get it up here and get some accurate measurements. I'm going ahead and I'm making sure that this seats properly along the contours of the roof line with these rubber pads that I've got here. And once I get it to 28 and 3/8 from front of the bar to front of the bar, I am gonna double check both sides to make sure that they're perfectly perpendicular with the vehicle. And then once I have that measurement accurate on both sides, and I know I'm even, I can go ahead and get things tightened down. Now, once you get it on the roof in the correct position, you may sometimes run across that, you know, the claws aren't quite reaching all the way down. You're able to tighten and loosen those clamps here I mean, right through this hole right here using your provided Thule tool. So I'm just going to loosen this up a bit because I do have the crossbars exactly where I want them. And as I'm loosening it up, you can see the claw is lengthening some or the clamp rather. And once I get it around there, I'm just gonna go ahead and make it snug. I'm not gonna tighten it all the way down. What we want to do is kind of go back and forth tightening incrementally. If I tighten this side down too much off the bat, the other side is likely going to pop out of position and I'll have to start all over. So a little bit at the time on each side. Now after I've got each side tighten down almost completely, I've ensured that everything is seated properly and stayed in its position, we're gonna go ahead and tighten down completely. Now that provided Thule tool that they give you is a torquing tool. So we are gonna hear a loud, audible pop just like that when we know that it's tight enough. We're gonna do the same on the other side. And then we're gonna replace our covers. Now that we've gone back and forth and got both of our towers snug down and ensure that everything remains seated properly and the crossbar stayed in position, we're gonna go ahead and make sure this is torqued down to spec. Now the provided tool with the kit is a torquing tool. So once you have it tightened to the correct specs, we're gonna hear a nice loud pop just like that. Now we know that this is tightened down as it should be. We can go ahead and replace our tower cover and we'll repeat the same process on the other side. Now, you may or may not have noticed as we we inchesre assembling these, that there are no locking cores here in the tower covers, they do provide you with a set of plastic ones that you can install. They can be opened with a flathead screwdriver or a similar tool. However, for the security of your cargo and items and the crossbars themselves, I really recommend that you pick up a set of Thule one key lock cores. You can get all of your towers keyed alike and get them keyed alike to any Thule accessories you may have. So there's a look at the Thule Wing Bar Edge roof rack on our 2025 Nissan Rogue. I'm Curt with etrailer, thanks for stopping by.
Ratings & Reviews


Info for this part was:
At etrailer we provide the best information available about the products we sell. We take the quality of our information seriously so that you can get the right part the first time.


Thank you! Your comment has been submitted successfully. You should be able to view your question/comment here within a few days.
Error submitting comment. Please try again momentarily.