
To see if this custom-fit item will work for you please tell us what vehicle you'll use it with.


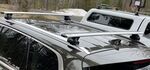
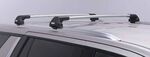
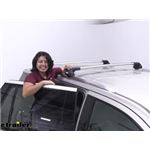
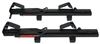
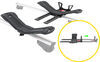
This aerodynamic Thule roof rack mounts flush on your roof for a sleek, factory look. Crossbars with split rubber strips in top channels work with channel-mount and clamp-on accessories. Installs to flush rails on your vehicle's roof.
Features:
Specs:
 Alternate Instructions
California residents: click here
Videos are provided as a guide only. Refer to manufacturer installation instructions and specs for complete information.
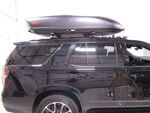
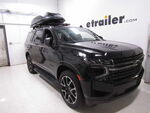
Hi everyone, I'm Evangeline here at etrailer and today we have roof racks for your 2025 Hyundai Palisade. The one we have on specifically right now is the Thule flush roof rack where you have a very streamlined look and it's pretty much a factory style roof rack, but it comes with a lot of function. So if you wanna carry around a roof box, you wanna carry kayaks or even a rooftop tent. This might be something that you are interested in. Now we're going to go through some of the different options you may have for your Palisade but I'll also show you how to get this all installed. But first up, double check what type of roof you have on your Hyundai Palisade.
There's two styles. One is called a naked roof or a bare roof where it's completely flat up top. The other has a flush rail, which is what we have here. And this is important because we have different kits that fit different types of roofs for your Palisade. And within those kits we have very specific parts that are designed to accommodate the roof dimensions as well as the flush rail dimensions so that everything works together and looks good like what we have here.
That's not to be confused with a flush roof rack though, and when we talk about that, we talk about this sleek look at the end where no crossbar is going further out. So the owner of this vehicle wanted a flush roof rack because they wanted a more streamlined look. I personally like the through roof racks just because then I get more crossbar space that I can use, but that's totally up to personal preference and what you're planning on bringing. With our flush roof rack here, we have our aerodynamic bars. We have slightly less crossbar space, but we have a tower that connects the crossbar to the flush rail using a fit kit.
So those are three different components. You don't have to worry about what those components are too much because we have it kitted here for you here etrailer, you can always give us a call or send us a message if you want to work through which of the different kits might be the best fit for you and your adventure. But depending on what you do plan on carrying, you may want to know what the dimensions are with this roof rack installed on your Palisade. So your usable crossbar space is measured inside the towers and you're gonna have about a little over 35 inches of that space. You'll also want to know the height that you can work with.
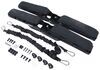
So our smallest distance is gonna be about 2-1/4 inches, and that's measured from the roof to the bottom of the crossbar and then from the roof to the top of the crossbar that's around, it's closer to four inches and that will be helpful for knowing if you have large clamps and things like that, if that will fit underneath the crossbars. This is on the smaller or less clearance side, so double check that for sure. And this will also tell you how high your cargo is going to sit and will help you figure out if you will clear the roof or not. As for your crossbar spread, that measurements is actually up to you because of your flush rail system when you install this, and you'll see that later in the video, you can adjust where you put your roof rack to match the required crossbar spread of what you're carrying. That's something that a lot of people double check when they bring skis, snowboards, and certain roof boxes require specific crossbar spread. That will be measured most of the time center to center for one crossbar to the other. Plus, depending on how you want to do it, if you want things closer to your sunroof or further away, or if you want more hatch clearance because you're carrying around the kayak, you can adjust your system to work for you. But once you have this roof rack on there, you're gonna have a very strong and sturdy base. You have this very low profile look to the point where I recommend that if you can get channel mounted accessories, all you do is take off the end cap and you can slide that accessory through the channel. Plus the end cap then also works as a security function for both the crossbar and the accessory if that's the route you wanna go. So hopefully this video show just how it works, how it looks, and what you might do with it. If you do wanna check out how to get it installed, well, stick around. Getting your roof rack set up the first time might feel a little intimidating since there's a lot of little parts that you may have to keep track of. But once you know the process, it's actually very simple. So we're gonna go through that process together. The very first thing you need to do is unpack all the boxes, lay out all the parts on your table so it looks like this. And we are going to start with the crossbars. Usually stored inside the crossbars are going to be these rubber strips. So they come as one piece. You do have to just pull them apart at the middle and then line it up on the crossbar. Underneath the weather strips will be these grooves that fit into the grooves of the crossbar. So the blank strip will go along where the Thule logo is, and then the strip with the arrows will go facing the front of the vehicle. So the arrows will face the front, but to make things easier, that will be the tallest part of the crossbar. Just push these weather strips in. Now to set up your towers. So these are gonna have their end caps on them already. There's gonna be a left and a right tower, and you'll be able to see it printed over at the bottom of that end cap. So to help myself, whenever I set up roof racks, I always orient the crossbars facing front so that I know which side is left and which side is right. So we're gonna pull this end cap off. There we go. And then fit the tower to the bar. Notice how the opening on the crossbar is designed perfectly for the tower. You'll also see how the tower has this opening to the side to accommodate for your crossbar. And then you're gonna have this little tab up top. You are gonna need to push down on the tab. What I do so I don't accidentally catch my fingers, is I just use the Thule tool to push down on that as I secure the crossbar and the tower. There we go, that fit right through. And now we can continue sliding everything in. We're gonna keep going until the tab comes up in that end. So confirm that the tab is front and now we'll do that for all four towers. Now you're gonna be attaching the clamps, so they are labeled A, B, and C. Fortunately for your Palisade, they're all the same, so you don't have to differentiate between different numbers and things like that. And then you're gonna secure them with this bolt. So the A clamp looks like it has little arms on it and that goes onto your tower and the arms go up and over. And then your B pad, it'll have these tabs, these tabs clip in underneath the tower and they help hold that A clamp up. Finally, you have your C clamp, which goes on to the A clamp, goes into the bolt and then is secured with this nut. So this nut will just hold them all together. We're just gonna hand thread it for now just enough where nothing falls off. And now it's hoisting time. So grab your finished crossbar and very carefully put this onto your roof. You're gonna have the clamps on them, which will secure onto the flush rails. Now this is a much easier to do when you have two people 'cause then you can adjust the distance of the towers. You can also pull on the crossbar to adjust the distance yourself and then secure on both sides. I'm just gonna gently set both crossbars in place. We're gonna go mark our distances in a bit. Talking about placement of your crossbars. Since your Palisade has a pretty large roof and a long flush rail, you have plenty of space to put your crossbars. What I try to avoid is the sunroof so that we don't block any of that. And I've noticed that the crossbars are on the shorter side. So you have go about this far or further back. So right here seems like a good spot for the front crossbar. What I then do is I measure from the front crossbar center to center to the rear crossbar, and that's how I decide my crossbar spread. I'm gonna be carrying around a roof box today, so I want around 30 inches of crossbar spread since that seems very versatile to carry most types of things. So we're gonna make sure it's 30 inches on both sides and then that the crossbars are in the same spot on the roof on both sides. Once you're happy with where your crossbars are, then it's time to tighten them down onto your flush rail, you're going to be using your Thule tool. I always try to tighten down roof racks evenly, so I'll tighten one side maybe half way, then I'll tighten the other side three quarters of the way and then I'll go back to the other one. That way I am evenly tightening down and not pulling one side to the other. As I'm tightening down, I just see how nicely contoured everything is. The pads are designed to go perfectly around the flush rail. We also have our hooks that are clamping around the front and the back of the rail. It all looks very low profile. You can barely tell that you are using clamps and as you tighten it down, it just secures and compresses to your roof rails. We're gonna tighten that until the torque tool clicks, which is how you know you have enough tension. Before you put the end caps on you have two options here for your locks. So this comes with your plastic lock, which works really well, and that just pops right in once you get it into the groove. If you want to though, you can purchase the fully one key system lock core packs. This is gonna be helpful if you have other accessories that are all locked and then you can get them all keyed alike and then that's when you would pop those in as well. Cap it off by putting your end cap onto your tower. This should just slide right in as long as you haven't confused the left and the right end cap. And then to actually secure it, I just grab a flat flathead screwdriver, turn that to locked, and now we are good to go. That's really gonna be all there is to the installation process. Put your Thule keys somewhere safe in case you need to take this off. It's gonna be a really quick process. Takes about two minutes to undo everything you can then store it away, keep all the clamps and the hooks on, and then toss it right back on whenever you wanna carry anything on your roof. But hopefully this install video helped you out.


Do you have a question about this Roof Rack?
Info for this part was:
At etrailer.com we provide the best information available about the products we sell. We take the quality of our information seriously so that you can get the right part the first time. Let us know if anything is missing or if you have any questions.


Thank you! Your comment has been submitted successfully. You should be able to view your question/comment here within a few days.
Error submitting comment. Please try again momentarily.