
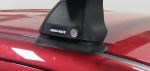
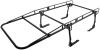
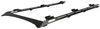
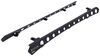
Rhino-Rack Sportz Roof Rack for Naked Roofs - Aluminum - Black - Qty 2


To see if this custom-fit item will work for you please tell us what vehicle you'll use it with.
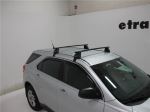
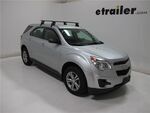
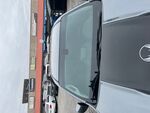
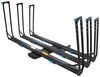
This aerodynamic roof rack gives you the freedom to haul gear and cargo on your vehicle. Full-length aluminum crossbars offer plenty of space for channel mount and clamp-on accessories. Installs on your vehicle's naked roof.
Features:
Specs:
 Alternate Instructions
California residents: click here
Videos are provided as a guide only. Refer to manufacturer installation instructions and specs for complete information.
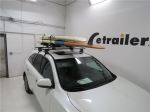
Hello neighbor, this is Curt with etrailer and today we're gonna be taking a look at the Rhino-Rack Sportz Roof Rack and we're gonna see how it fits and how it installs on our 2024 Chevy Colorado. Now a roof rack is a great way to transport items, as I'm sure you're aware. However, you may be wondering why you might need it on something like a pickup truck. You got this whole bed that you can carry cargo in. Well, if you're someone that has a ladder rack and you're carrying longer items like a canoe, lumber, whatever it might be, you might want that extra load support coming out across the roof. Of course, you may also have something back here like a camper shell or a tonneau cover or, you know, any number of accessories that, you know, or a full bed for that matter where you can't really use it for something that you could use the roof rack for.
One of those things might also be something like a kayak carrier or canoe carrier. A lot of kayaks are just gonna be sticking right out over your tailgate. If you have a kayak carrier up here on your roof rack, you'll be able to carry it safely wherever you need to go without it fumbling around and messing anything up back here in our truck bed. It would frankly make me a little bit nervous just to have one loose with a single bow tied down in your truck bed just rumbling around. I would much rather carry it up here on a roof rack.
Now this Sportz Bar Roof Rack from Rhino-Rack is a bit different than others out there. It's got this really robust and really aggressive look to it, which I think looks awesome on a lot of SUVs and trucks just like this, especially this Colorado seeing that it is a Trail Boss model. Now as I mentioned before, this is a little bit unique in some other ways to other crossbars, it's still gonna give us a 165 pound weight capacity. However, you do wanna double check the owner's manual of your Colorado and make sure that the vehicle roof capacity matches that. If it's a lower number, that will have to be your weight capacity.
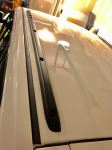
But there's a lot of neat things to show you about this roof rack. So let's get in the truck bed and up over the roof and we'll show you some of those new details. So the Rhino-Rack Sportz Crossbar is a little bit unique compared to other crossbars. One of the first things you may notice is that it's got this big open channel at the top and normally you would think with an open channel like that, they vibrate a lot, they'd be very noisy as you're going down the road. But this was specifically designed in a way that that won't happen.
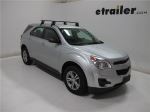
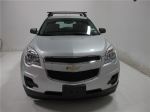
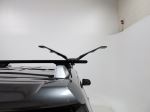
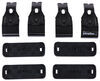
There is a dual weather strip on each side of that open cavity there, which is designed to direct air up and over the gap in the bar rather than across it like it would be normally on a standard crossbar, it is gonna be a little bit more robust of a bar as well and it gives it an overall really aggressive look. But the purpose of this open channel is that Rhino-Rack is providing us, they're coming out with new things all the time with a system called Zwifloc. Zwifloc is gonna allow you to mount T-channel accessories without sliding 'em through the end cap. You'll be able to drop them right into place and that's really big for people that use their roof rack for a variety of different accessories. Now you won't have to take something off just to slide something on in the middle, like a tie down or something like that, only to replace the original item later. So if for instance, you have a kayak carrier up here, you got two kayaks up here and you want to have a tie down in the middle, if you've got your kayak carriers already on here with a standard bar, you'd have to take 'em off to slide your tie down in the middle. This you won't have to do anything, you can just drop your tie down right into the channel and lock it in place, get everything ready for a safe ride on the road. Now while we're up here, let's take a few measurements and see exactly how it fits our Colorado. We're gonna take first a crossbar spread measurement and this is a really important measurement. We're gonna end up at about 28 and 1/4 inches worth of crossbar spread. As you'll see in the installation in a moment, you really don't have too much of an opportunity to move these bars. Rhino-Rack had us set them in very specific places on the roof of our Colorado, but your crossbar spread is gonna tell you just what kind of accessories you can put up here. Any rooftop accessory is gonna give a minimum and maximum crossbar spread and right at about 28 inches, I'm perfectly happy with. Most rooftop accessories, their minimum/maximum fall somewhere in between 25 and 35 inches. So I'm really not too displeased with this spread. This should accommodate most crossbar accessories that are out there. The other thing we're gonna double check on is how much height does it add to the vehicle It's gonna add about four and 3/4 quarter inches. So if you're worried about height clearance with the vehicle, you'll need to add that number to whatever the height of your rooftop accessory is so you know how much you can clear over your roof. The other thing we'll take a look at is our clearance under the bar, which is gonna come to about three and 1/4 inches, and that should be more than enough space under here to be able to get all those clamp mounted accessories you might have around it and secure. But I had mentioned installation a moment ago, stick around. I'm gonna show you exactly how we got these on the roof of our Colorado. So to begin our installation, we've just kind of got everything laid out here for our crossbar. We've got our towers, our feet and pads for it, our clips to go around our frame there and we've got the tower covers. So we're gonna start by assembling the tower. And to do that we're gonna take one of our foot pads here and with the arrow pointing outward to the outside of the tower, we're gonna go ahead and clip that on right there just like this. Next thing we'll do is take one of our foot pads here just like this and we're gonna go ahead and put that on with this kind of groove shape here is gonna be facing the inside of the tower like that. Now this is just gonna compress on, we wanna make sure that it goes all the way on, all the way around the lip of it as well. So real easy, just like that. And the next thing we're gonna do is add our clip. So to do that we're gonna go ahead and remove this bolt, slide this up and over just like so. And we are gonna very, very loosely just so it just barely catches that bolt back in. We wanna leave as much maneuverability to this clip as we can to make sure that it goes around the lip of our doorframe. Our second tower is gonna assemble exactly the same. Now it is important to note with these rubber pads on the bottom, on the second bar or the rear bar, both of our pads are numbered the same as M368. However, the front bar is going to be side specific. You need the M505 to go on your driver's side and M506 to go on your passenger side. So the next thing we're gonna go ahead and do is attach our tower to our crossbar and to do that, the first thing we'll do is remove our end cap here and this'll just kind of pull right off. We're gonna remove this kind of measuring strip right here as well. And what we're gonna do is take this metal block at the top of our tower and it's gonna feed through here through like a T slot. So let me get that lined up. Make sure that the outside of your tower is facing the outside of the bar before you put it on, but we're just gonna guide that on into place and slide it over. Now if you pay close attention to your instructions, it is going to give you the distance that your towers need to be apart before putting it up on the roof. The distance it gives us for our second bar is gonna be a 118 millimeters and you're gonna use this strip right here in order to measure it. So what we'll do is we'll reinsert our strip here and we're gonna put it so that the very end of it cuts off at 118 millimeters, which is going to be right there. We're gonna keep that in place, move our tower until it butts up against it, double check, make sure we keep it on that 118 millimeters. And then we're gonna use this tab here on the inside of the bar to just kind of come on over and just make a bit of a bookend here for our tower. Once that's done and it's in place, we're gonna go ahead and take our included tool and through this bolt here in the top, we're gonna go ahead and tighten it down onto our bar. This is gonna keep our tower in place so it doesn't shift in and out. We're gonna get this tightened down real good. Make sure it's flush just like that. Now this measuring strip at the end here, it's still at 118 millimeters. What we're gonna do at this point normally is we would just take a scissor or a blade and we would just cut that flush with the end of our bar. This is gonna actually help cover up what would be a gap under here and probably create a bit of noise. But since this is not a permanent install today, we're just doing a demo for it, we're just gonna leave this strip out without cutting it. So we're gonna go ahead and remove that and at this point we can replace our end cap. Now when replacing the end cap, remember we're looking at the bottom of the bar, the lip to the end cap should be toward the top of the bar. So we're gonna just put it on just like this and we're gonna repeat this process on the other side. Now as I'm over here setting the other side, remember we're on our second bar, it's 118 millimeters. The front bar actually has a different measurement. It's gonna be 123 millimeters. So pay close attention to that as you're getting these set, might be a good idea even to just take it up on the roof and double check it before you cut your strip. Could be a millimeter, give or take, that you need to make up for, but just keep note that there are gonna be different widths between your towers when it comes to the front bar and the second bar. Now if you have a measuring tape that does metric, it does end up being a lot easier to figure out where on your roof you're going to end up placing your bars. So what Rhino-Rack has in the instructions is that from the door seam right here to the center of our front bar should be 320 millimeters. So we had that measured out and we've got that right in place. The second bar is going to be based on where the front bar is. So the second bar is going to be 700 millimeters from the center of this tower to the center of the back tower. So we're gonna go ahead and grab our second bar and we're gonna get it just about in place where it should be. Get a final measurement before we lock it down. So the bar is aluminum and this is all really lightweight. This is definitely something you could do on your own. If you wanna be extra careful, grab a friend. But what I'm gonna do is just standing here in the door seam, I'm just gonna make sure that that clamp kind of goes around a little bit, the door frame and that our pad there is gonna kind of slip right into place with the lip of the rubber pad kind of going into the groove back here behind our doorframe. So we're gonna get this kind of right, about in the right spot and then we're gonna get back down on the ground and take our measurement to make sure we've got our distance right before tightening everything in place. So, you know, with my tape here, again, center to center, we're trying to get it lined up to 700 millimeters, just making sure, good there. There is a rubber padding on the inside of these clamps here, so I know you probably see it shifting around a little bit. It is rubber lined, so it's not gonna be doing anything to scratch up or paint our anything like that, but there we are right at 700 millimeters. I'm gonna go ahead and go over to the driver's side and double check that that measurement is exactly the same. That's gonna guarantee that our bars are parallel to each other. All right, now that we've got everything in line, we double checked both sides to make sure that they're even, we're gonna go ahead and take the provided tool here and we're go gonna through this bolt right here. We're gonna start tightening it down. Now what I'm gonna do or suggest that you do too, is just kind of grab onto it and press with your thumb up, get this snug up against the vehicle. That way you can kind of guarantee that it doesn't tighten up crookedly or anything like that. And the other important thing to remember too is you shouldn't over tighten one side compared to the other. I'm tightening this up here until it's snug, which it is right now, making sure my foot pad and everything is still right where I need it. And I'm gonna go over to the other side and do the same thing and I'm gonna slowly, incrementally tighten down both sides a bit at a time until it's all the way there. If you find yourself tightening one side completely while the other side's loose, I could guarantee you it's gonna shift a bit because this bolt is bringing this claw up and closer. So if you just tighten one side down completely without doing the other, the other's gonna be very difficult to get lined up and your foot pad may even come out of place too. So a little bit on each side, maybe, you know, three, four turns over here. I'm gonna go three, four turns over there, back and forth until it's completely tight. When we've got it tightened down completely, I'm gonna go ahead and kind of give it the old shake test, make sure nothing's moving. The truck is moving, but nothing on the bar is. So we've got it good and tight and in place. I'm gonna go ahead and take our tower cover right here and our key, I'm gonna make sure it's in the unlocked position. I'm gonna insert these two tabs right over here and get this into place. I'm gonna lock it down. And now we've got our roof rack installed. We're ready to load it up and head out on our next adventure. So there it is. Installation was very, very simple. This ends up being a great look here on the Colorado, as I mentioned before. We've got 53 inches of bar space with an overhang to be able to mount some of those extra accessories and whatnot. And overall, I think this would be an excellent choice for you and for the Colorado. But if you decide that this is the roof rack for you and you get it, you install it, you get to use it a few times, please share with us what you think about it in the comments below. We would love to share your experience with our other neighbors so they can make the best decision for themselves. Once again, this is Curt with etrailer. Thanks for stopping by.

Do you have a question about this Roof Rack?
Info for this part was:
At etrailer we provide the best information available about the products we sell. We take the quality of our information seriously so that you can get the right part the first time. Let us know if anything is missing or if you have any questions.


Thank you! Your comment has been submitted successfully. You should be able to view your question/comment here within a few days.
Error submitting comment. Please try again momentarily.