Kelly you're spot on, thanks for reaching out! Since you mentioned you have “the bar that the Falcon 2 hooks to” that tells me your current setup on the Geo Metro is using a Roadmaster crossbar-style base plate. I checked fitment for both…
Hey David, so EcoHitch does not like to post the install instructions for their hitches like the front hitch part #EH54QR that fits your 2023 Ford F-450 but it does come with a set of detailed instructions. Would you like me to track down a set that…
Hey Chris, Our Fitguide can be a bit confusing sometimes. Essentially the whole category is broken down into whether they fit diesel or non-diesel models. Since the EcoHitch Hidden Front Mount Trailer Hitch Receiver #EH37FR fits both gas and diesel…
Hi Robert! The EcoHitch Hidden Front Mount Trailer Hitch Receiver - Custom Fit - 2" #EH37FR will indeed fit your 2026 Ram 3500 diesel Mega Cab Laramie edition. I confirmed this with EcoHitch and we actually have a review from another person that…
Hey, Michael! Thanks for reaching out. Yes, we do carry a front mount hitch for your 2025 Ram 2500 diesel. The EcoHitch Hidden Front Mount #EH37FR will fit both diesel and non-diesel models, but it will not fit the Power Wagon models. There’s no…
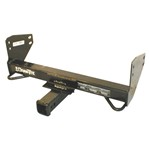
Hi Stan! The SnowBear Snowplow for 2" Hitches - 82" Wide x 19" Tall #K2AVAL8219 and Curt Front Mount Trailer Hitch Receiver - Custom Fit - 2" #C31018 will definitely work on your 2013 Ford F-250 4x4. We actually have both of these…
Hey Sean, yes you can use the TowSmart Adjustable Ball Mount #TS89VR in the Gen-Y Voyager Ball Mount #GY52JJ. This will provide cushioning to the adjustable ball mount plus some additional drop. What are you planning on towing with this setup?
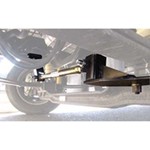
Yes, it will Mike! The EcoHitch Hidden Front Mount Trailer Hitch item #EH54QR is exactly what you need for your 2024 Ford F-350 dually. This hitch is specifically designed to fit the dually models. It has a 2" receiver with a 1,000 lbs vertical…
Hello David, Thanks so much for reaching out! For your 2026 Ford F-350 diesel dually, you will want the EcoHitch Hidden Front Mount Trailer Hitch Receiver - Custom Fit - 2" #EH54QR. This is the only front mount option we offer that is confirmed…
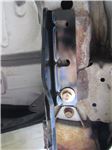
The front air dam on your 2023 Ford F-150 Platinum will actually need to be removed to be able to install any of the front hitches. So yes, the front air dam will no longer be operational once you have the EcoHitch Hidden Front Mount Trailer Hitch…
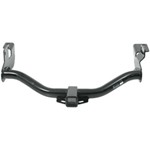
So long as your 2020 Chevy Silverado 1500 is a gas version and not a diesel, then the EcoHitch front hitch you asked about does indeed fit, with the correct part number being the following: - EcoHitch Hidden Front Mount Trailer Hitch Receiver #EH58RR…