


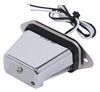
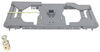
This light-duty toggle switch combines space-saving size and economy. May be used in automotive, light-truck, off-road, and RV applications. Includes mounting hardware and 6" wire leads.
Features:
Specs:
Videos are provided as a guide only. Refer to manufacturer installation instructions and specs for complete information.
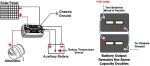
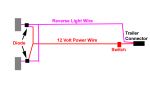
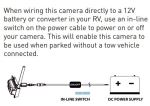
Hey guys, Kevin here with etrailer, and today, I'm gonna be showing you how to install the Pollak Light Duty Toggle Switch. So this Pollak Light Duty light switch is just a simple on off, and it comes with two six-inch wire leads. So it's honestly a super easy install. The hardest part of your installation is really just gonna be running your wires over to your switch. So, because I'm installing a relay, I yanked out the original switch that we had right here, and I cut into our power, cause I'm gonna make a little jumper over to our new switch. And then I ran our other power wire coming from our relay right over through our ceiling, down into our railing here.
And then we're going to make our connections. Doesn't matter which wire that you've used when you're doing this. So I'm just gonna hook up my left side here to my wire, ran it over to our relay. That In. We can crimp it down.
And then on my other side, I've already stripped a wire back on each side and I'm gonna make a little jumper from our power wire to our other switch. And then place that onto my other wire right over here. So I'll twist these together. We'll put on our butt connector. Crimp it down.
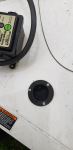
Now we can crimp on our other side of our power wire so that we have a connection back to our first switch. And then we'll use another bud connector between our new switch and our jumper wire. Now we can go ahead and place our wiring back up into our wall here and then put on our plates so that we have a nice cover. You don't see these ugly holes in the way. Pull off our on-off.
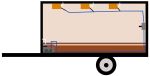
Take a cover, slide that right through. I'm actually gonna have to take this one off as well, just for this switch. Drop that on, drop on our on-off. And this is only gonna go one way, cause there's a little tooth right there, that's gonna go right into this gap. So you don't have to worry about putting it on the wrong way. And then we can twist on. If we can. Back in place. And now I'm just gonna take some self tappers and shoot 'em right through to hold our cover in place. Now that we have our cover back in place, we can go ahead flip on our switch. And then test that it's working with our lights. As you can see, our switch is activated at our lights. Well, guys I think that about does it for our installation today of the Pollak Light Duty Toggle Switch here on our enclosed Feather Light Trailer. My name's Kevin. Thanks for watching..


Good switch .. heavy enough to complete most applications .. wires long enough to complete wiring easily .. switch body small to fit in close spaces, has excellent wire connection protection .. useful when installing in areas with little rear access
Fits on my old-school 1989 toyota dolphin just fine! Got to add some silicone caulking around it so it doesn't fly off this time!
quick shipping ,quality parts
Reliable
Do you have a question about this Accessories and Part?
Info for this part was:
At etrailer we provide the best information available about the products we sell. We take the quality of our information seriously so that you can get the right part the first time. Let us know if anything is missing or if you have any questions.


Thank you! Your comment has been submitted successfully. You should be able to view your question/comment here within a few days.
Error submitting comment. Please try again momentarily.