
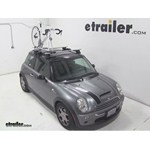
# 1
Yakima HangOut 2 Bike Rack - Trunk Mount - Adjustable Arms
When I started the search for a bike rack, I was so disappointed and upset to hear that I would need to install a hitch and spend even more money to buy another bike rack for my 2016 jeep renegade. I ordered this bike rack with a little hope but got a huge surprise! Not only is it super convenient and easy to install but I can fully use my trunk and not spend a ton of money!
Very nice, works well. The only thing that was an issue was with the "Anchor" part of assembly. The straps it came with were 2-3 ft. too short. So I had to replace/substitute my cargo straps for the Yakima top straps. Other than that, I'm pretty satisfied with this item.
# 2
Swagman XC2 Bike Rack for 2 bikes - 1-1/4" and 2" Hitches - Frame Mount

This is a well designed rack. Adding and removing bikes is quick & easy. Just set the bike on & slide the padded hook down onto the bike frame to secure it; no straps required. If only one bike is transported, it does not interfere with opening the trunk on our Tesla Model 3. With 2 bicycles the trunk cannot be opened. For 2 bikes the Swagman model that can tilt might be worth the extra 22 bucks. This rack uses a bolt in the receiver hitch instead of a pin. This locks it securely preventing it from moving in the hitch & rattling. It also requires a wrench to remove it, good for theft prevention but one more thing to keep track of. For storage on the vehicle the top bar folds down. For storage in the garage, the left & right bars fold up & you can hang it using one of the hooks.
So far so good. The rack wiggles a bit, but that is expected. I have it on my 2007 Corolla and I have hit 65+ on the highway with it and have not had a problem. I would recommend getting a locking pin. The one included is threaded, which aside from security, makes it harder to take the rack on and off. I would also look into a DIY way to secure the wheels better. I am using some bungee straps which do the job no problem. The two bikes I carry are at the racks capacity.
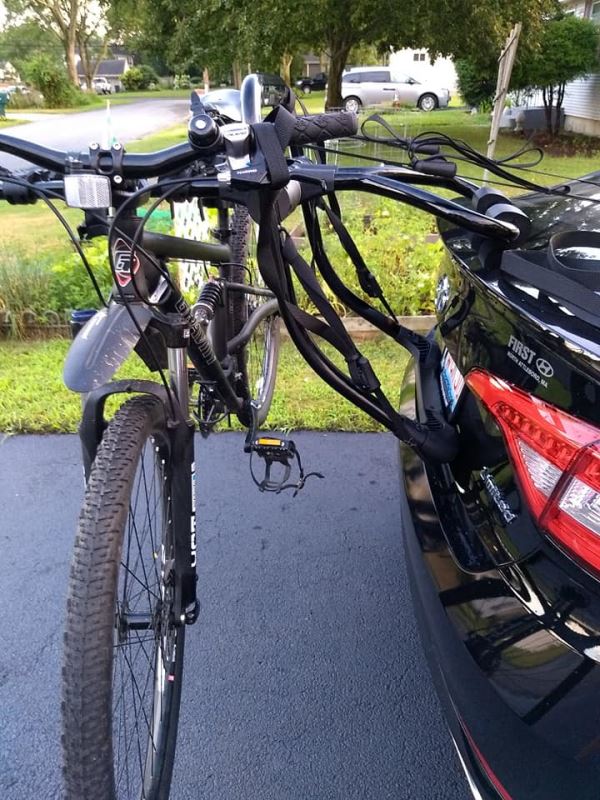
# 3
Thule Passage Trunk Bike Rack for 2 Bikes - Hanging Style
Pontiac Trans Sport VanThe Thule Passage Trunk Bike Rake for 2 bikes is a good product. I used it to transport my mountain e-bike. I choose this particular unit because it can handle the weight 2 of bikes (non-e-bikes) and the weight of my e-bike is equivalent to weight of 2 bikes. Note: Must readjust the straps after mounting the bike to the rake.
great! works really well, and a lot easier to attach than I anticipated. We drove with bikes across the country from south west all the way to North east. solid rack!
# 4
Kuat Beta Bike Rack for 2 Bikes - 1-1/4" Hitches - Tilting
The quality of the bike rack was excellent, but I was unable to use it because I couldn't open and close my trunk (Honda Accord 2012) when the bike rack was closed. It may have worked if I had a different trailer hitch, but I didn't want to spend the extra money on a new trailer hitch. Unfortunately, I will need to return the bike rack.
I was looking for a light weight bike rack for my 2015 Honda Accord. Your videos stated that the Kuat Beta was light and easy to install. You were right. I opened the box, read the instructions, and had it installed in about 10 minutes. I don't use a rack lock. It is so easy to pop on and off the hitch that I keep the rack in my car trunk.
# 5
Yakima FullBack 2 Bike Rack - Trunk Mount - Adjustable Arms
Perfect for my Toyota Highlander, thanks guys, great job
First rack I've ever purchased I misplaced the end bar used to lock the bikes onto the rack. Can I buy another one?
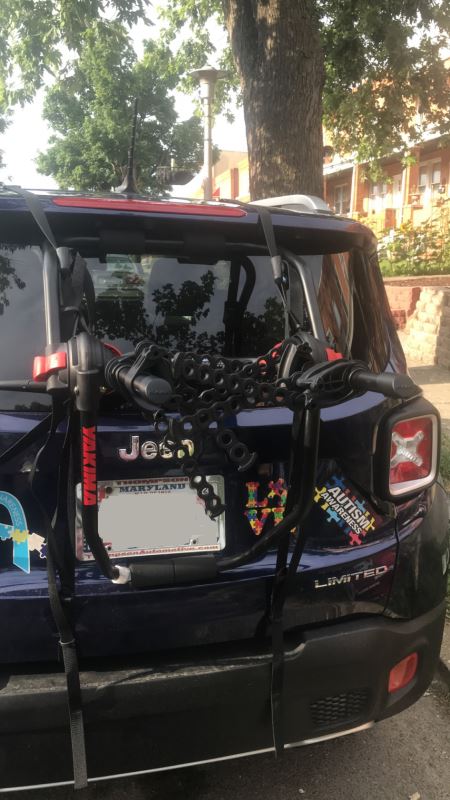
# 6
Swagman XTC2 Bike Rack for 2 Bikes - 1-1/4" and 2" Hitches - Frame Mount
I was sent additional mounting materials that don't correspond with my hitch or my bike rack. See the photo below. Are these materials for my Swagman STC2 Bike Rack Item #S64670?
Very stable and simple to use bike rack that works great with my road bike AND with my 29" Big Rippers. It makes loading and unloading the bikes a snap and they are safe and secure for traveling once loaded and secured. I have already logged over a thousand miles hauling bicycles with this rack and highly recommend it. I am a big fan of Yakima roof racks but, honestly, wish I would have went with this setup for my bikes from the beginning.
# 7
Saris Bones 2 Bike Rack - Trunk Mount - Adjustable Arms
So far really great! I love the stability my bike has on the rack, fit for my 2021 Honda Civic, and the quality of the material engineered into the design to prevent damage to the cars paint/parts.
Works great even using an electric bike like my Aventon Soltera.
# 8
Yakima FrontLoader Wheel Mount Bike Carrier - Roof Mount
It's a fantastic roof rack, which I use above my truck bed. I recently bought a second one so I can take my road bike and gravel bike with me on my camping trips.
Mounted nicely on my Rhino racks and holds our nikes well. Easy to load and unload.
# 9
Swagman Upright Bike Rack for 1 Bike - Roof Rack Crossbars - Frame Mount
Great product for the price. Pretty easy to set up. Only issue I have is my mountain bike, which is an XL frame with 27 inch wheels, is pushing the limits of the base. Wish this rack was just 4-5 inches longer that way you have the perfect overlap amount in the middle without pushing the current frame to the limits. With that said it does hold my bike just have to find the sweet spot. But this fits my son’s youth bike perfectly!
As always with products I buy from e-Trailer, this item is exactly as advertised and works perfectly. Easy assembly, I bought 2 but only installed one until I check the fit with my rooftop carrier.
# 10
Yakima FullBack 3 Bike Rack - Trunk Mount - Adjustable Arms
Performed perfectly on a 140 mile round-trip in my 2017 Acura MDX. It took me a few tries to position the anchors inside the top of the hatch, but I got the hang of it and the rack did not shift at all while driving 50-60 mph on the highway.
After searching for a bike rack for my 2015 Hyundai Sonata, I settled on the Yakima Fullback 3. I initially wanted a roof rack so I could carry my bikes and kayaks, but my options with the panoramic sunroof were limited and expensive. Part of the Sonata trunk lid is plastic so I was very hesitant to use a trunk mounted rack. It seemed that most Sonata owners were using a trunk mount rack, so I placed my order on a Sunday evening. etrailer shipped it the next day and I received the rack on Thursday. It took about 10 minutes to unpack, read the instructions and install it. I put both my mtb and road bike on and went for a test ride. The rack was more stable than the hitch mounted rack I had on my old vehicle, and the best part was it didn't scratch my paint. It keeps the bike pedals far away from my bumper, and it was one of only a few racks that would clear my factory spoiler. It folds up and I can stick it in my trunk while I ride. The only reason for the 4 stars is that the rack is fairly heavy. It would be nice if Yakima could find a way to lighten it up while keeping the rigidity and price where it is now. Otherwise, I'm completely satisfied with the rack and the service from etrailer.
# 11
Saris Bones EX 3 Bike Rack - Trunk Mount - Adjustable Arms
Truly a great product! The bike rack is a huge improvement over the one it replaces. I had lost confidence in it, as it was always loose and sloppy when in use for long distances. The materials are high-quality, with very dense plastic arms, a metal main tube, and strapping that can be pulled quite tight. Overall a very solid piece of equipment. Each bike has three points of attachment, which keeps them very stable. The ratchet mechanism is much easier to manipulate when compared to web straps, which always seem to work loose, but are difficult to work with when removing a bike. The feet, which get placed on the glass and in the license plate well on my Subaru, are flexible and substantial. When placed according to the online fitment guide, I can still use my backup camera, at least when no bikes are on. I can also drop the arms easily when not carry bikes, and storage off of the car will be very easy. For my wife's step-through frame, I acquired the Saris Bike Beam, which makes placement on the arms very easy, and seems to be very stable. These products are clearly well engineered and manufactured. Great customer service and fast shipping from Etrailer combine for a great purchasing experience. I highly recommend this item!
Great product so far! Easy to install and adjust. A little tricky to load 2 large handlebar mountain bikes and a third smaller bike, but we just turned them sideways with the front wheels taken off. We had racks on bikes which were probably the impediment. We got them on though! Love how it folds up easy for quick storage. Works great on 2014 Subaru Outback.
# 12
Thule Passage 3 Bike Carrier - Trunk Mount
Way too light duty for what is advertised. It seemed to be made out of 1/2 inch electrical conduit. I would never put three bikes on that rack. I only had two bikes on the rack. While on trip through Idaho the wind was so strong that one of the bikes partially blew off the rack. We traveled 1,800 miles and upon arriving home I actually sawed the bike rack up and threw it away so that no one else would use it and cause an accident. I've already found a different brand that is HEAVY DUTY and I will stick with that brand.
This is definitely more of a 2 bike carrier vs 3 bikes. I had to take the front wheels off two bikes to get three bikes on this carrier. Also, it rubbed the paint off on the trunk of my Subaru legacy.
Fit Test: Kuat Transfer V2 Bike Rack for 2 Bikes with 2021 Mini Cooper

Hey, everybody, welcome to etrailer.com. I'm Bobby and today we're taking a look at the Kuat Transfer V2 two-bike platform rack here on our 2021 Mini Cooper. Now right out of the gate, the biggest limitation with our Cooper is gonna be our hitch. So, we're thinking bike racks, we're gonna have to keep it lightweight and still pretty adaptable to our system. I think that's where the Transfer really starts to shine. Now it is a little bit heavier than some of your more extremely lightweight carriers, weighing about 40 pounds because of our two-bike system here.
How Does the Hollywood Racks Destination Bike Rack for 2 Bikes Fit on a 2021 Mini Cooper?

Hey everybody. Welcome to etrailer.com. I'm Bobby. And today, we're taking a look at the Hollywood Racks Destination 2 Bike Platform Rack here on our 2021 Mini Cooper. Now, right out of the gate, the Mini Cooper definitely gonna start limiting you on the kind of bike racks you are gonna be able to carry. Because we're gonna have a smaller hitch, our tongue weight is probably gonna be a lot lower than you might see on some of those class 2 and class 3 hitches.
How the Saris Bones EX 3 Bike Rack Fits on a 2017 Mini Cooper

Hi everyone, it's Evangeline here at etrailer. And today, we taking a look at the Saris Bones EX trunk-mounted bike rack, right here on our 2017 Mini Cooper. Your Mini Cooper is a lot of fun in a tiny package. If you wanna be able to carry around your bikes with this vehicle, you're gonna have to get a little creative. So one of the options that I highly recommend is to get a hitch on your car, but I know that can be tricky to do, tricky to find the right bike rack for that hitch, or if you cannot get a hitch, what are your other options That's gonna be a trunk-mounted bike rack like this. So this is the Saris Bones EX.
How to Set Up Your Swagman Fork Down Roof Mounted Bike Carrier on a 2006 Mini Cooper

Today on our 2006 Mini Cooper well be test fitting the Swagman Fork Down roof mounted bike rack, part number s64710. Now our vehicle is already equipped with a Thule Rapid Traverse roof rack system so well begin our test fit by placing the bike rack onto the vehicles load bars. Well pull out our hardware and starting at the front, well run the silver brackets around the underside of the front crossbar and thread on our black wing nuts. Before fully tightening them down well move to the rear where this time well slide the silver bracket down over top of the bike rack and bring the black plate up on the underside of the rear load bar and thread on our wing nuts. Well then move back up to the front and continue to tighten them down. Now with everything all tightened down and secured were ready to load up our bike.
RockyMounts TieRod Stretch Roof Bike Rack Review - 2006 Mini Cooper

Today on our 2006 Mini Cooper we'll be test fitting the RockyMounts TieRod Stretch Roof Mounted Bike Rack, part number RKY1011. Our vehicle is already equipped with a Thule Rapid Reverse Roof Rack system so we'll begin our test fit by placing the bike rack onto the vehicle's load bars. We'll bring the rubber coated steel straps around the underside of the front load bar and hook them back at the connection points after removing the black plastic cover. We'll then use the included Allen key to turn the silver bolt to tighten down the straps. We will move to the rear to remove one of the Allen bolts to bring the rear bracket around the underside of the rear cross bar. We'll then tighten it down with the included Allen key. With everything all tightened down and secured we're now ready to load up our bike.
RockyMounts TieRod Roof Bike Rack Review - 2006 Mini Cooper
Today on our 2006 Mini Cooper well be test fitting the RockyMounts Tierod roof mounted bike rack, part number rky1014. With a Thule Rapid Traverse roof rack system already assembled onto our vehicle, well begin our test fit by placing the bike rack onto the vehicles load bars. Well bring the rubber-coated steel straps around the underside of the front load bar, remove the black plastic cover at the front and hook the straps into the connection points. Well then use the included Allen key to turn the silver bolt to tighten down the straps. Well now move to the rear of the bike rack where we will again use the included Allen key to loosen up the Allen bolt to bring the rear bracket around the underside of the rear load bar. Well then tighten down the bolts.
Thule Sprint Roof Bike Racks Review - 2005 Mini Cooper

Today on our 2005 Mini Cooper, we're going to be test fitting the Thule Sprint, a fork mount roof bike rack, part number TH528. With our Thule Rapid Traverse Roof Rack system already installed on our Cooper, we'll begin our test fit by placing the bike rack directly onto our load bars. As we do this we want to bring our black rubber coated metal straps around the underside of our load bars and this will position our foot packs directly on top of our load bars. Here at the front, we're going to fit the strap into the head of the carrier and then tighten down the black lever to secure it. We'll move to the rear and repeat that same process. With both of our clamps secure, we're now ready to load up our bike. We'll begin by undoing our rear wheel strap and making sure that our front skewer is open. We'll now grab our bike, place it onto the bike rack, we'll guide our front forks down onto our front skewer, we'll secure it here first by tightening that black and grey knob back down.
DIY 2005 Mini Cooper Installation for the Swagman Upright Bike Rack for 1 Bike

Today on our 2005 Mini Cooper we're going to be test fitting the Swagman Upright roof bike rack, part number S64720. With our Thule Rapid Traverse roof rack system already installed on our Cooper we'll begin our test fit by placing the bike rack directly onto our load bars. Here at the front we're going to bring two of the silver u-bolts around the underside of our load bar, fit them through the head of our carrier, and thread two wing nuts onto each one to hold them in place. We'll then tighten down all four of our wing nuts to secure the front of our rack to our vehicle. With the front secured we'll now move to the rear. Here we'll place one of the silver u-bolts down through the rack. We want to make sure that the threaded portion comes out on both sides of our load bar.
Thule Big Mouth Roof Bike Rack Review - 2005 Mini Cooper

Today on our 2005 Mini Cooper, we're going to be testing the Thule Big Mouth, a frame clamp roof bike rack with part number TH599XTR. With our Thule Traverse Roof Rack System already installed on the Cooper, we'll begin our test fit by placing our bike rack directly onto our load bars. Here at the front, we'll remove the two black T bolts from the lower portions of the clamp, bring our clamps around the underside of our load bar, reinsert the T bolts, then tighten down both black wing nuts to secure these clamps around our bars. With the front secure, we can now move to the rear here. We'll loosen both wing nuts and remove one completely. Then we'll position our clamp over our load bar so that we have one threaded bolt coming down on both sides. We'll then replace the lower portion of our clamp, thread on our wing nut, and tighten both of them down to secure it. With our rack secure, we're now ready to load up our bike.
RockyMounts TieRod Stretch Roof Bike Rack Review - 2005 Mini Cooper

Today on our 2005 Mini Cooper, were going to be test fitting the RockyMounts TieRod Stretch. A fork mount roof bike rack with part number RKY1011. With our Thule rapid traverse roof rack system already installed on the Cooper, well begin our test fit by placing our bike rack directly onto our load bar. Here at the front, as we do this, we want to bring the two black rubber coated metal straps around the underside of our load bar. Well then remove the black plastic cover and fit these straps into the head of the carrier. Well now take an Allen tool and tighten the Allen bolt to secure both of these straps firmly around our front load bar. With our front secured, we can replace our cover, then well move to the rear.
DIY Install: Swagman Fork Down Roof Mounted Bike Carrier on your 2005 Mini Cooper

Rate your transcript OrderClientKevin BrossRef #20668Order #TC0760601794 Today on our 2005 Mini Cooper were going to be test fitting the Swagman Fork Down, a fork mount roof bike rack with Part Number S64710. With our Thule Rack and Diverse Roof Rack system already on the vehicle we'll begin our test fit by placing our bike rack directly onto our load bars. Here at the front we'll bring two of the silver u-bolts around the underside of our load bar, fit them through the head of the carrier, and thread two wing nuts onto each one to hold them in place. We'll then tighten down all four of our wing nuts to secure the front of the rack to our front load bar.We can now move to the rear. This time we're going to place the u-bolt down through the rack being sure that one of the threaded portions comes out on both sides of our load bar. We'll then take the flat black metal portion, place it up unto to the u-bolt and hold it in place by threading on two the wing nuts. At this point we'll tighten down both of our wing nuts.
Install: Kuat Trio Roof Bike Rack on a 2005 Mini Cooper

Rate your transcript OrderClientKevin BrossRef #20666Order #TC0751270775 Today on our 2005 Mini Cooper, we are going to be test fitting the Kuat Trio, a fork mount roof bike rack with part number RU01. With our Thule rapid traverse roof rack system already installed on our Mini, we'll begin our test fit by placing our bike rack directly onto our load bars. Here at the front we are going to bring the two black rubber coated metal U bolts around the underside of our load bar, fit them up to the head of the carrier and thread two cylinder knots onto each one. We'll then use the provided Allen tool and tighten of four of these down. That will secure our front. We'll now move to the rear, here we are going to loosen both wing nuts and remove one completely. We'll position our clamps we have one bolt in front of our load bar and one bolt behind it. We'll then place the lower portion of our clamp back on to the bolt that we separated it form and thread on our wing nut.
Setting up the Yakima ForkLift Roof Mounted Bike Carrier on your 2004 Mini Cooper

Today on our 2004 Mini Cooper, well be test fitting the Yakima Forklift Roof Mounted Bike Carrier, part number Y02098.With a roof rack system already assembled onto our vehicle, well start off by placing the carrier onto the vehicles crossbars. Well remove the skewer, slide back the black plastic cap, and loosen up the wing nut to bring the bracket around the underside of the front crossbar.Well fit the bolt into the bottom of the brackets and tighten down the wing nut to secure the carrier to the vehicle. Then to the front of the carrier, well slide in the black plastic cap and then insert our skewer. Note, that you will not have access to the wing nut without first removing the skewer.And now with our carrier secured to the vehicle, were ready to load our bike. We'll first undo the tray strap at the rear of the carrier, set the bike onto the carrier, slide the forks of the bike onto the skewer, tighten down the skewer to secure the front forks of the bike to the carrier. We will then move to the rear of the carrier where we will put the tray strap through the rim and tighten it down.That completes todays test fit for the Yakima Forklift Roof Mounted Bike Carrier part number Y02098 on our 2004 Mini Cooper..


What our customers are saying:
"Sent out an e-mail to you earlier this week asking which hitch woudld be the best choice for installing on a 2000 Venture van for hauling a bike rack with two bikes. You suggested the one that would be easiest to install..received in a matter of days..installation went great ..very well thought out instructions. Everything went smooothly and the hitch is up nice and snug..doesn't stick out..looks great."