
# 1
Yakima FrontLoader Wheel Mount Bike Carrier - Roof Mount

It's a fantastic roof rack, which I use above my truck bed. I recently bought a second one so I can take my road bike and gravel bike with me on my camping trips.
Mounted nicely on my Rhino racks and holds our nikes well. Easy to load and unload.
# 2
Swagman Upright Bike Rack for 1 Bike - Roof Rack Crossbars - Frame Mount
Great product for the price. Pretty easy to set up. Only issue I have is my mountain bike, which is an XL frame with 27 inch wheels, is pushing the limits of the base. Wish this rack was just 4-5 inches longer that way you have the perfect overlap amount in the middle without pushing the current frame to the limits. With that said it does hold my bike just have to find the sweet spot. But this fits my son’s youth bike perfectly!
As always with products I buy from e-Trailer, this item is exactly as advertised and works perfectly. Easy assembly, I bought 2 but only installed one until I check the fit with my rooftop carrier.
How to Set Up Your Swagman Fork Down Roof Mounted Bike Carrier on a 2006 Mini Cooper

Today on our 2006 Mini Cooper well be test fitting the Swagman Fork Down roof mounted bike rack, part number s64710. Now our vehicle is already equipped with a Thule Rapid Traverse roof rack system so well begin our test fit by placing the bike rack onto the vehicles load bars. Well pull out our hardware and starting at the front, well run the silver brackets around the underside of the front crossbar and thread on our black wing nuts. Before fully tightening them down well move to the rear where this time well slide the silver bracket down over top of the bike rack and bring the black plate up on the underside of the rear load bar and thread on our wing nuts. Well then move back up to the front and continue to tighten them down. Now with everything all tightened down and secured were ready to load up our bike.
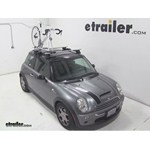
RockyMounts TieRod Stretch Roof Bike Rack Review - 2006 Mini Cooper

Today on our 2006 Mini Cooper we'll be test fitting the RockyMounts TieRod Stretch Roof Mounted Bike Rack, part number RKY1011. Our vehicle is already equipped with a Thule Rapid Reverse Roof Rack system so we'll begin our test fit by placing the bike rack onto the vehicle's load bars. We'll bring the rubber coated steel straps around the underside of the front load bar and hook them back at the connection points after removing the black plastic cover. We'll then use the included Allen key to turn the silver bolt to tighten down the straps. We will move to the rear to remove one of the Allen bolts to bring the rear bracket around the underside of the rear cross bar. We'll then tighten it down with the included Allen key. With everything all tightened down and secured we're now ready to load up our bike.
RockyMounts TieRod Roof Bike Rack Review - 2006 Mini Cooper
Today on our 2006 Mini Cooper well be test fitting the RockyMounts Tierod roof mounted bike rack, part number rky1014. With a Thule Rapid Traverse roof rack system already assembled onto our vehicle, well begin our test fit by placing the bike rack onto the vehicles load bars. Well bring the rubber-coated steel straps around the underside of the front load bar, remove the black plastic cover at the front and hook the straps into the connection points. Well then use the included Allen key to turn the silver bolt to tighten down the straps. Well now move to the rear of the bike rack where we will again use the included Allen key to loosen up the Allen bolt to bring the rear bracket around the underside of the rear load bar. Well then tighten down the bolts.
Thule Sprint Roof Bike Racks Review - 2005 Mini Cooper

Today on our 2005 Mini Cooper, we're going to be test fitting the Thule Sprint, a fork mount roof bike rack, part number TH528. With our Thule Rapid Traverse Roof Rack system already installed on our Cooper, we'll begin our test fit by placing the bike rack directly onto our load bars. As we do this we want to bring our black rubber coated metal straps around the underside of our load bars and this will position our foot packs directly on top of our load bars. Here at the front, we're going to fit the strap into the head of the carrier and then tighten down the black lever to secure it. We'll move to the rear and repeat that same process. With both of our clamps secure, we're now ready to load up our bike. We'll begin by undoing our rear wheel strap and making sure that our front skewer is open. We'll now grab our bike, place it onto the bike rack, we'll guide our front forks down onto our front skewer, we'll secure it here first by tightening that black and grey knob back down.
DIY 2005 Mini Cooper Installation for the Swagman Upright Bike Rack for 1 Bike

Today on our 2005 Mini Cooper we're going to be test fitting the Swagman Upright roof bike rack, part number S64720. With our Thule Rapid Traverse roof rack system already installed on our Cooper we'll begin our test fit by placing the bike rack directly onto our load bars. Here at the front we're going to bring two of the silver u-bolts around the underside of our load bar, fit them through the head of our carrier, and thread two wing nuts onto each one to hold them in place. We'll then tighten down all four of our wing nuts to secure the front of our rack to our vehicle. With the front secured we'll now move to the rear. Here we'll place one of the silver u-bolts down through the rack. We want to make sure that the threaded portion comes out on both sides of our load bar.
Thule Big Mouth Roof Bike Rack Review - 2005 Mini Cooper

Today on our 2005 Mini Cooper, we're going to be testing the Thule Big Mouth, a frame clamp roof bike rack with part number TH599XTR. With our Thule Traverse Roof Rack System already installed on the Cooper, we'll begin our test fit by placing our bike rack directly onto our load bars. Here at the front, we'll remove the two black T bolts from the lower portions of the clamp, bring our clamps around the underside of our load bar, reinsert the T bolts, then tighten down both black wing nuts to secure these clamps around our bars. With the front secure, we can now move to the rear here. We'll loosen both wing nuts and remove one completely. Then we'll position our clamp over our load bar so that we have one threaded bolt coming down on both sides. We'll then replace the lower portion of our clamp, thread on our wing nut, and tighten both of them down to secure it. With our rack secure, we're now ready to load up our bike.
RockyMounts TieRod Stretch Roof Bike Rack Review - 2005 Mini Cooper

Today on our 2005 Mini Cooper, were going to be test fitting the RockyMounts TieRod Stretch. A fork mount roof bike rack with part number RKY1011. With our Thule rapid traverse roof rack system already installed on the Cooper, well begin our test fit by placing our bike rack directly onto our load bar. Here at the front, as we do this, we want to bring the two black rubber coated metal straps around the underside of our load bar. Well then remove the black plastic cover and fit these straps into the head of the carrier. Well now take an Allen tool and tighten the Allen bolt to secure both of these straps firmly around our front load bar. With our front secured, we can replace our cover, then well move to the rear.
DIY Install: Swagman Fork Down Roof Mounted Bike Carrier on your 2005 Mini Cooper

Rate your transcript OrderClientKevin BrossRef #20668Order #TC0760601794 Today on our 2005 Mini Cooper were going to be test fitting the Swagman Fork Down, a fork mount roof bike rack with Part Number S64710. With our Thule Rack and Diverse Roof Rack system already on the vehicle we'll begin our test fit by placing our bike rack directly onto our load bars. Here at the front we'll bring two of the silver u-bolts around the underside of our load bar, fit them through the head of the carrier, and thread two wing nuts onto each one to hold them in place. We'll then tighten down all four of our wing nuts to secure the front of the rack to our front load bar.We can now move to the rear. This time we're going to place the u-bolt down through the rack being sure that one of the threaded portions comes out on both sides of our load bar. We'll then take the flat black metal portion, place it up unto to the u-bolt and hold it in place by threading on two the wing nuts. At this point we'll tighten down both of our wing nuts.
Install: Kuat Trio Roof Bike Rack on a 2005 Mini Cooper

Rate your transcript OrderClientKevin BrossRef #20666Order #TC0751270775 Today on our 2005 Mini Cooper, we are going to be test fitting the Kuat Trio, a fork mount roof bike rack with part number RU01. With our Thule rapid traverse roof rack system already installed on our Mini, we'll begin our test fit by placing our bike rack directly onto our load bars. Here at the front we are going to bring the two black rubber coated metal U bolts around the underside of our load bar, fit them up to the head of the carrier and thread two cylinder knots onto each one. We'll then use the provided Allen tool and tighten of four of these down. That will secure our front. We'll now move to the rear, here we are going to loosen both wing nuts and remove one completely. We'll position our clamps we have one bolt in front of our load bar and one bolt behind it. We'll then place the lower portion of our clamp back on to the bolt that we separated it form and thread on our wing nut.
Setting up the Yakima ForkLift Roof Mounted Bike Carrier on your 2004 Mini Cooper

Today on our 2004 Mini Cooper, well be test fitting the Yakima Forklift Roof Mounted Bike Carrier, part number Y02098.With a roof rack system already assembled onto our vehicle, well start off by placing the carrier onto the vehicles crossbars. Well remove the skewer, slide back the black plastic cap, and loosen up the wing nut to bring the bracket around the underside of the front crossbar.Well fit the bolt into the bottom of the brackets and tighten down the wing nut to secure the carrier to the vehicle. Then to the front of the carrier, well slide in the black plastic cap and then insert our skewer. Note, that you will not have access to the wing nut without first removing the skewer.And now with our carrier secured to the vehicle, were ready to load our bike. We'll first undo the tray strap at the rear of the carrier, set the bike onto the carrier, slide the forks of the bike onto the skewer, tighten down the skewer to secure the front forks of the bike to the carrier. We will then move to the rear of the carrier where we will put the tray strap through the rim and tighten it down.That completes todays test fit for the Yakima Forklift Roof Mounted Bike Carrier part number Y02098 on our 2004 Mini Cooper..


What our customers are saying:
"I ordered a trailer hitch and a bike rack carrier the order was shipped with in three days. To put the hitch on only took about 30 mins. only had to drill two 1/2 holes. fit like a glove."