Customers compare 38656 to these similar products
Products Featured in this Video
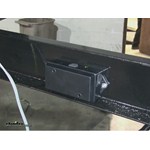
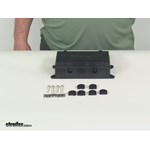
Previously on This Old Trailer we installed the backing plates in the hubs and on this episode we are going to install the wiring. Basically what we are going to do is hook up the wires for the backing plates and run them up to the front of the trailer. We are going to install junction box part number 38656. It is a good idea to have a junction box in case you ever have to change out the lead going up to your truck. It is easily changed out especially if you have a wiring harness that is all molded into one piece. We are going to upgrade this trailer with our junction box so we can do that. Install it in this location in the channel on the tongue. Hold the box up to it, mark some holes out, and drill it out to 1/ 4 inch bit and use 1/ 4 inch hardware to hold it in place. When we get the hardware installed we can tighten it down into place. 01:29
Next we need to start running our wires from the junction box and we will follow the existing holes that are in the frame down to our brake axle. The next thing we will do is make the connections to yhe junction box. We are going to peel back the gray cable a little bit and then we are going to run our white cable to ground that is labeled in the junction box. We are going to treat the junction box just like the inside of a 7-pole connector. White is going to be ground and blue is going to be for electric brake lead, however on the cable we have got a black and white wire. White is going to stay white to ground while the black wire will go to blue in the junction box. The junction box also comes with different grommets. You can see here this one is opened up for the cable and we will just replace the one that is existing in the box right now. We will just pull out the original grommet and slide in a new one. 02:39
We will also clamp our wire in position with the hardware provided with the junction box. We will add some ring terminals to our wires and attach them in to proper position. Next I am going to make a connection to the first brake hub and make sure you have plenty of slack so you wrap the wires where they will not get mashed up against the frame. We will make our connections and just leave plenty of slack and then later we will come back with some loom clamps. Lets cut back some of the insulation and we will make the wiring connections to the cable. The actual connections to the wire we are just going to use what is typically called a quick splice and we are just going to use that to connect our wires together. The brake magnet itself has two green wires. It does not matter which one goes to power as long as you have a secure connection one is going to power and one is going to ground. It does not matter on the green. Again on our second brake hub we will cut our wire to length. Make sure we have plenty of length left over so we have room for suspension movement and make sure it does not get smashed again. The same thing as before, it does not matter which wire goes where on the magnet. Just make sure one goes to ground and one goes to power. In this case we will be using the butt connectors to make our attachment. When using a butt connector with a smaller gauge wire like we are doing here, it might be a good idea to take the wire and fold it over itself and then install it in the butt connector and then crimp it down. 04:56
We will run our 7-pole cable up to the front of the trailer by the coupler. We are going to run it through the factory guide and then run it into our junction box. We will start making our connections for our brake leads inside there. Slip on the grommet for the wire cable and just like the other side put it into place. Next we will make our wire connections up from our 7-pole cable. White is still going to be ground so we will run it to our original white wire and that is labeled for ground. We will run the blue wire to where the black wire was ran to and that pin is labeled blue. We will make our blue and black wire connection permanent and with our extra bits of wire we have we can use that to make our jumper for ground. We will use the grommet on the top and poke a hole through it and the white wire through there. On the white wire we need to make a jumper off that post on to the frame of the trailer so the trailer can get ground from that point and then we can make that connection permanent. We have the left over wires and our 7-pole harness. What those are used for is the lighting on the trailer itself and for the purpose of this video we are just going to these both alone for now because we are only dealing with the electric brake part. Our next thing to do is apply the 12 volt power to our circuit and make sure the brakes work. Spin the hub with the power off and then when you apply power the hub should stop. That will finish our installation of the brakes on a standard trailer using a junction box and a molded 7 way connector. That finishes this episode of This Old Trailer adding electric brakes.
Info for this part was:
At etrailer.com we provide the best information available about the products we sell. We take the quality of our information seriously so that you can get the right part the first time. Let us know if anything is missing or if you have any questions.