
Thank you! Your comment has been submitted successfully. You should be able to view your question/comment here within a few days.
Error submitting comment. Please try again momentarily.
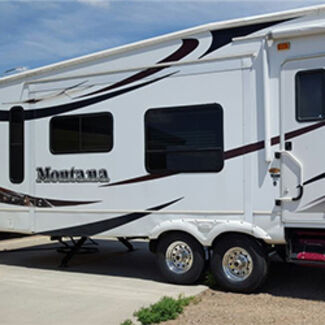
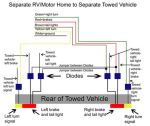
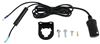
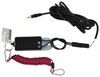
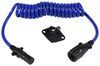
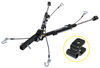
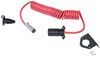
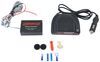
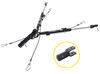
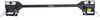
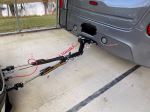
Kit allows up to 15 amps from your RV's battery to be used to maintain the charge of your towed car's battery while the car is being towed. Charge line connects to the 6-way or 7-way plug on your vehicle. Requires separate charge line in RV.
Features:

California residents: click here
Videos are provided as a guide only. Refer to manufacturer installation instructions and specs for complete information.
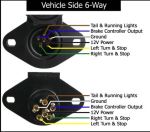
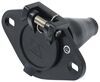
Hello Ram owners standard 2012 Ram 1500, we're going to be taking a look at and showing you how to install Roadmasters Charge Line Kit, and your Charge Line Kit. You really don't even see it installed on your vehicle. It integrates into your existing diode wiring. So, you'll have to already have a connector here at the front to attach your Charge Line too our connector here at the front is a six pole connector. This is the most common connector type for a flat tow setup. It's putting a six pole here at the front.
You'll need four poles just for all of your lighting circuits. So, a six pole we'll give you two additional circuits for adding accessories. A Charged Line Kits, one of the most common and your motorhomes are typically wired for them already. And usually when you plug in an umbilical, like a seven to six connector into your motorhome, that seven way end on your motorhome, we'll send a charge circuit down to the center pin here on your six pole. So, we're going to wire our fueled wire, to your Charge Line Kit into that center pole to be able to get your voltage trickle charging your battery from your motorhome.
And so whenever you're driving your motorhome, the motorhome's charging system, y'all made around there. It's going to put out a higher voltage than what our battery is, pushing some in there and keeping it topped off. So, when we reach our destination, no matter how long we're driving, cause there's some of you guys out there like to put in the hours and maybe do a six to eight hour trip. Some vehicles could discharge over the course of six to eight hours, depending on how much the braking systems drawing and any loads that may be present when the vehicles in flat tow. So, a Charge Line circuit, like this is going to ensure that battery stays topped up and you never have to worry about hearing that clicking noise.
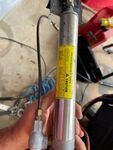
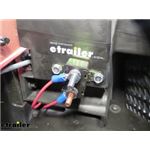
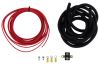
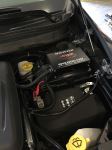
When you get to your spot and realizing you can't take this vehicle. So, has our charge line circuit looks like under the hood here, we've got circuit protection included with the kit to ensure that we're going to keep our vehicle in a safe state, no chances of shorts and any electrical damage there you'll receive a wire included with your kit. That's a heavy enough gauge to allow your battery to trickle charge and enough length of wire, to be able to make the connections here at your battery, to your circuit breaker. And as well as to the front, to your connector there. You also receive some wire loom in the kit to protect your circuit as you're making all of your routing and connections.
So, if you want to follow along with us, we'll show you how to get this installed. This is something that honestly you could probably do in your driveway or in your garage, even in less than a half an hour, it's a really easy thing to get done. And it does really just put you at peace of mind when you're going down the road, knowing that when you get to your spot, you're not going to have to take that motorhome somewhere. You can unhook and enjoy your easier to drive vehicle. We'll begin our installation by mounting our circuit breaker. You'll want to determine a location that's close to your battery. We're actually going to put ours right next to this ground, Start right here. There's a pretty good spot right here to Mount it up. So, for now we know what location we're going to Mount it up. We can go ahead and run it in with our self-tapping screws. What I like to do is to hold all this stuff together though, I'll take the top and the self-tapping screw. I'll put it through the hole. And I'm just kind of scratching a little mark where I want the self-tapping screw to go. This way We can use this right. It's a lot easier than trying to hold all your pieces together when you're turning to get these self-tapping screws in place. So, we're just going to run this in now. And once you get it started, we can then go ahead and back it out of there. So, now that we have our circuit breaker and we'll get it installed, your bronze post is labeled battery. And would normally under most accessory applications, you would hook best this side here to the battery in your vehicle. But since this is a Charge Line Kit, we're going to be using our motorhomes battery. And alternator and charging system to charge this battery. So, the power supply is actually going to be the motorhomes. So, the stud here is actually going to go to the front of our motorhome to send power to this, to then output it to our battery. So the ox is actually gonna hook to the battery and this particular application that we're using it for. So, we're sliding our self-tapper now through one of those, eyelid ends on our circuit breaker, and then we round it down just a little bit easier this way, trying to hold all those pieces together. Now that we've got that one snug, it kind of holds this high over here, snug for us, making it easy to run this one right in. So, here we've got our wiring. This needs to route from our circuit breaker to the front of the vehicle. We're going to route that first and we'll hook it up to our battery. Actually last to prevent us from accidentally causing any shorts. So, we're going to take our red wire here. We're going to strip it back and after we strip it back, we're going to take one of these smaller ring terminals that comes in our kit here and attach it to it. We'll then loosen up the Brown stud one labeled battery. After you remove the nut, slide your wire in place that small ring terminal there, and then just reinstall the nut. We can come back and snug these down here at a later step. We're going to go ahead and get this wire routed out towards the front of the vehicle when routing your wiring, you want to avoid anything excessively hot and any moving components. So, we're going to take ours down here. We'll probably run it underneath and then bring it forward to where our electrical connectors located at the front of our vehicle. And we're going to go ahead and zip tie it along the way to make sure our wire stays secure and in place where we want it. So, it doesn't fall down and wrap up into anything, so we've got our connections made to our connector at the front. We can come back here and go to make our connection at the battery. So, we're going to take the remaining excess wire that we've got here from trimming off the excess up there at the front. We'll strip this back. We'll then take our small ring terminal, fly that in place connected to one end. We then remove the nut from the silver post on our circuit breaker. Slide our new wire on there, and then we can tighten this down. And at this point, it's a pretty good idea to go ahead and snug these up. Just snug them up using a 3/8 socket. We can go ahead and snug these down with that 3/8 socket. You don't want to over tighten them, just make sure they're snug to where they don't slide around or anything. You can't rotate on the, on the stud there. We going to take the rest of this wire. We're going to kind of just wanna shorten it, but we also want to leave length there for the future to be able to make any repairs or, you know, anything we might want done. So, we're going to be trimming down some while leaving a little bit of excess. We'll strip this back and then this one's going to get the larger ring terminal that's in your kit. This guy right here. This will attach to the battery positive post on our vehicle here. So, we get that put together. We can go ahead and put back our battery cover. So, now we'll just take up, strip up the cover for your battery positive. We did turn it to the side and push on both of those tabs there, to let this open up and now we can kind of slide our wire in here to make it look a little bit neater, and then we can close those back up. Will now remove the nut located here with a 10 millimeter socket. Take your ring terminal, slide it right on top. And then just re-install that nut And you will get some wire loom in your kit so we can go and cover our wiring with the loom, especially at any point where we suspect it could have a spot where it could rub through. So, any place where it's kind of turning the corner, where it might be tucking, some metal or anything, that's a good location to make sure you got some wire loom on there. And that completes our installation of Roadmasters Charge Line Kit on our 2012 Ram 1500..


I never knew I needed this for flat towing. Sales rep helped me pick the right item. Shipping was in a timely manner and the price was fair.

Ron

12/20/2025
The Roadmaster accessories work great - the brake switch in the car is ideal for turning it on and off as required.
Works great, I was having trouble keeping my car battery charged while flat towing. I have to keep my car key in the acc position and its electronics and the power brake has to get plugged in the car lighter eating away at my battery so when I stop usually around the second stop and restart the car the battery is dead. With this charge line kit my battery stays charged! It’s a win. I hope I explained it properly
Easy install. Especially when installing in conjunction with the towed vehicle wiring kit. This will keep your battery charged due to battery drain from the turn signal/brake/tail lights on your towed vehicle.
I had this professionally installed and it didn’t work the way I thought it should. When my tow vehicle was hooked up to my RV and the RV wasn’t running the Tow vehicles battery would feed back into the RV and the radio, back up camera, and GPS would remain on in the RV. This would ultimately drain the tow vehicle’s battery. I ended up replacing this with an RVi unit.
OVERPRICED AND UNDER DELIVERED!
You get about 15 feet of wire worth 50 cents per foot and it is BARELY enough to get from the front of the vehicle to the battery. It works, but just go to Homer Depot and buy a spool of wire and two circuit breakers and you'll have enough to wire both the RV and the tow vehicle for 50% less. Do Not Recommend
I highly recommend this if you’re towing your vehicle behind a motorhome. We’ve gone across the country several times in the past year and I’ve never had a dead (or weak) battery on my Toad.

Nick S.
10/13/2025
This is definitely a part that is often forgotten, but makes the biggest difference! I am glad it is working well for you. Cross country?! Have you had any favorite spots you have hit?
First off the chat rep sent me a complete list of everything that I would need to flat tow a 2015 Equinox so I made the $[XX]+ purchase from their list. After two full days installing all the items needed in the towed vehicle I try and attach it to RV and the connection can not be made. The tow bar will not fit into the base plate attaching points. I immediately (7/21) open a chat to let them know that they recommended the wrong parts and the rep agrees that a mistake was made and says that they will upgrade the shipping of the correct tow bar without charge so that I can have the tow bar a full day before my trip to test the complete install. I follow through with them after getting my order confirmation and it states that expected delivery is 7/22 so even though I needed to purchase a second two bar and wait for a refund on the first tow bar I am satisfied with the handling of the situation and comfortable with the full day to test the parts. On 7/22 I track the package only to see an expected delivery date of 7/23 so I immediately open up a chat and they proceed to tell me that there is nothing that they can do because it is already shipped. Then they go on to tell me that I agreed to 2-day shipping, which I did not. The previous rep told me that they would upgrade the shipping because it was their mistake. The normal Free Shipping is only a two day delivery to my area so an upgrade would mean next day shipping. I requested a full copy of the chat transcript to see where I specifically agreed to 2-Day shipping and they did not send me the transcript. I definitely regret giving this company my money. Their staff needs a lot more training to say the least. First they recommend the wrong parts so they are no expert in their field. Then they force me to purchase the replacement part fully knowing that the mistake was theirs. Then they can not follow through on their agreement to expedite the replacement part. Finally when confronted they proceed to put the blame on the customer as well as shrug their shoulders and say that there is nothing that they can do. Save yourself time, money and aggravation. Shop somewhere else where your business is actually appreciated.
The kit is fine. The install was for a 1997 jeep wrangler with a new roadmaster base plate. The red wire was approximately 12 inches short for wiring to battery. Had to buy red wire so I would have one piece without extra splice.
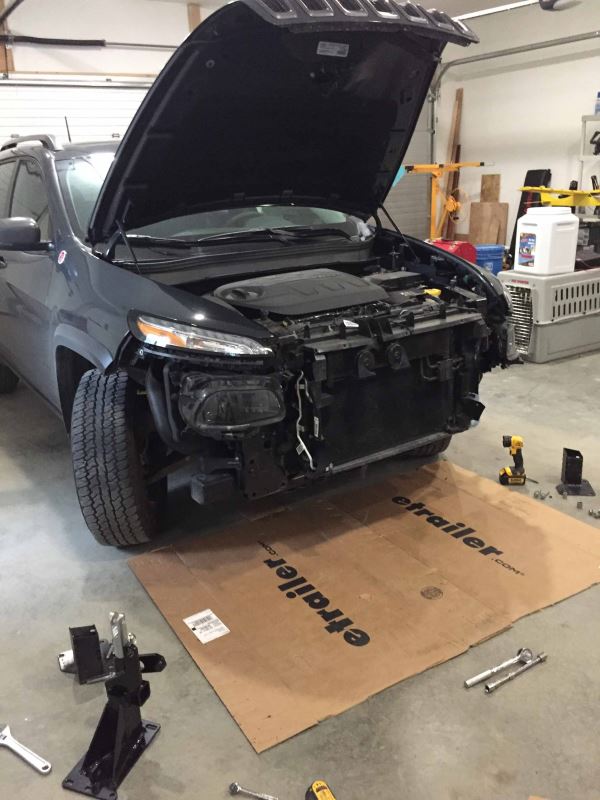
I ordered all the parts required to safely flat tow out 2017 Jeep Cherokee Trailhawk from etrailer.com. The only part they didn't have was the Mopar Flat Tow Enhancement kit Jeep requires to flat tow this model.
Ordering from them was great, the website is easy to use and I was able to locate all the pieces compatible with my specific vehicle. The expert recommendations help my decision choosing the right parts. I ordered from etrailer even though I found some of the parts on other websites a little cheaper. I chose to pay a little more because of all the effort etrailer has put into installation videos and guides. I was very pleasantly surprised to learn from etrailer that they have a price match guarantee!
So my equipment consisted of the following
Mopar Flat Tow Enhancement Kit (from Jeep)
Roadmaster Battery Charge Line Kit for Towed Vehicles
Mighty Cord 7-Way RV Style Trailer Connector - Trailer End
WesBarg 7-Way, RV-Style Connector w/ 6' Long Coiled Cable Trailer End
Pollak Black Plastic, 7-Pole, RV Blade-Style Trailer Socket - Vehicle End
Hopkins Custom Tail Light Wiring Kit for Towed Vehicles
SMI Stay-IN-Play DUO Supplemental Braking System
Roadmaster Brake-Lite Relay Kit for Towed Vehicles
Blue Ox Alpha Tow Bar - Motor Home Mount - 6,500 lbs
Blue Ox Base Plate Kit - Removable Arms
Blue Ox Tow Bar Cover - Aladdin, Aventa LX, Aventa II
The installation videos are great but not all inclusive. Take the time to read the instructions that come with the parts. This is a major project, I took about 30 hrs over a full week but as you'll see in the pictures I took s few extra steps to make a cleaner look.
Some of those extra steps:
The base plate install requires the bumper be modified cutting off a flange on each side, I spray painted this to prevent corrosion.
In the install video of the baseplate on the drivers side they use an extra quick link (not included) to run the safety cable around the wiper fluid reservoir. I took the time to remove it and run the safety cable behind it.
I didn't want our nice new vehicle to look like it can be towed so I played the brake away switch and 7 way trailer plug behind the license plate, so when not being towed our vehicle looks great!
Some things to be aware of. The Brake air cylinder that mounts to the brake pedal with four bolts may need longer bolts, it did on our Jeep. Spend the money for weather tight heat shrink crimp fittings. The Hopkins wire harness was about 1.5 feet short to get to my plug location. Buy extra zip ties, electrical tape and split loom.
I recommend reading all the various installation manuals and watching all the videos because the various components integrate together and if you install one at a time you'll be doing a bunch of extra work.
The brake light relay is a real pain in the butt, not because of the hardware but because of the location of the brake light switch which is very hard to get to.
Overall I am very happy with the products and how the installation looks. We haven't towed it yet but do not expect any problems.
Roy
7/30/2018
Still very happy with our purchase. We’ve towed over 10k miles and have had zero issues with our tow setup. I’ve shared my experience with several other RVrs and recommended your company for their needs. Thank you,
have successfully completed the installation of the following items that I purchased from etrailer:
> Nighthawk RM-676 tow bar
> RM-524458-5 base plate
> DEMCO Stay in play DM86VR
> RM-152 diode wiring kit
> RM-156-25 charge wire kit
> RM-88400 brake switch relay kit
I work slow but methodically. I had no issues other than the high degree of difficulty for a 68 y/o man working alone. This project exceeds the abilities of someone NOT mechanically inclined. There is also the need for some specialty tools. I found that feeding the wiring through the dash, firewall, and underbody was more difficult than installing the front baseplate. Overall, I am satisfied with the function of this installation. I am glad I did it myself rather than having it done.
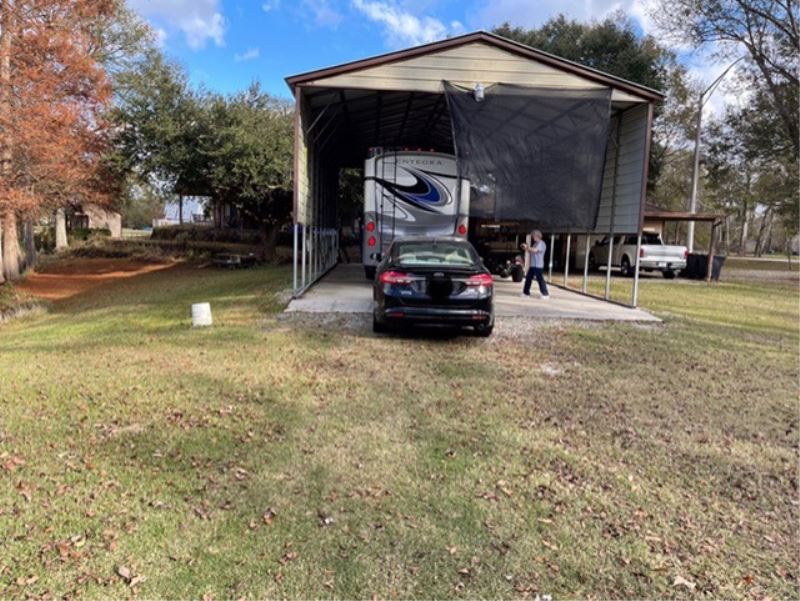
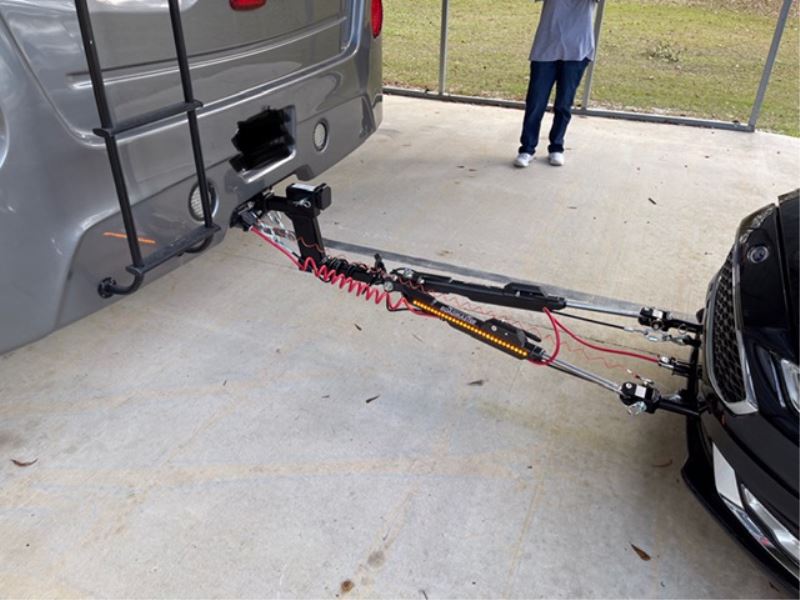
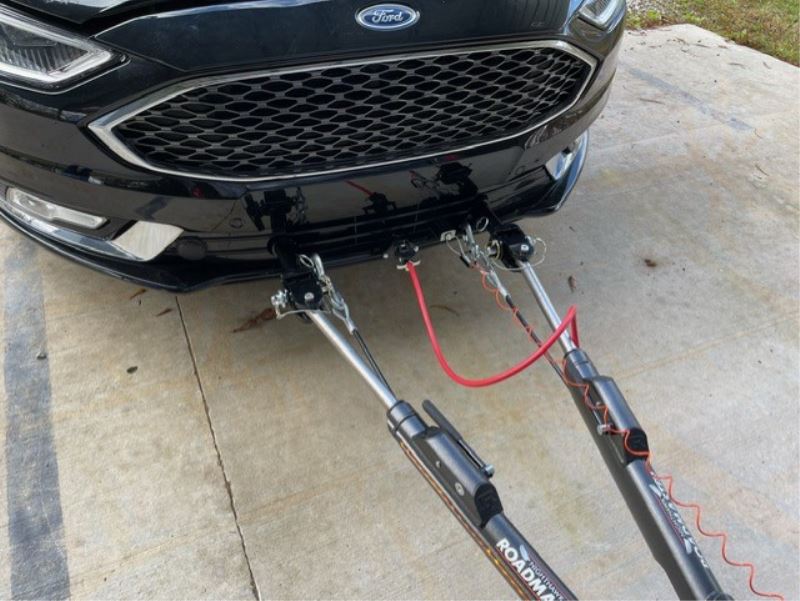
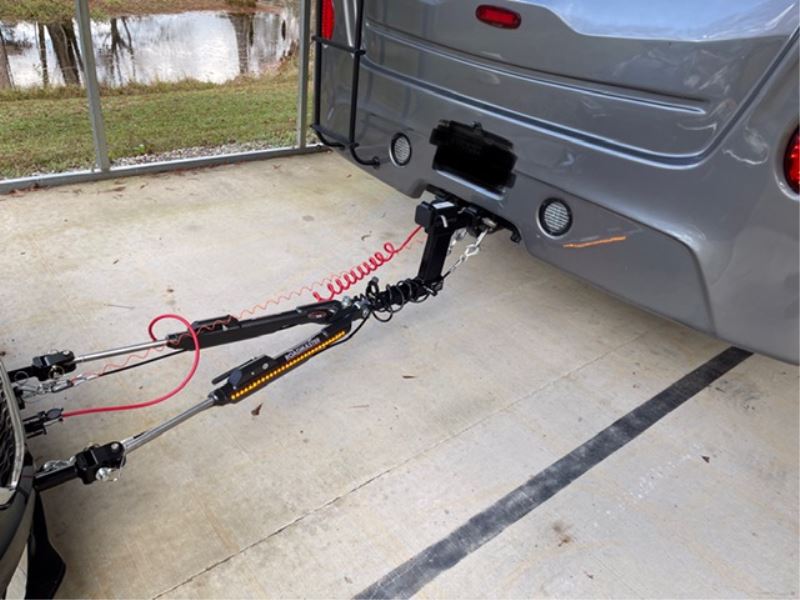
Tow vehicle: 2021 Entegra Emblem 36U
Towed vehicle: 2018 Ford Fusion Platinum Energi

Jeffrey
11/19/2022
I have no regrets with this purchase. Items preform as advertised with no issues. I am very satisfied with Roadmaster and Demco products.
I’d highly recommend the charge line kit for anyone looking to tow for prolonged distances. No battery issues for me! Having the trickle charge gives me peace of mind as I tow. And one less thing to worry about is truly amazing. I used this for about 6 month on the road last year and am about to hit the road again. Love using products I feel confident with.
Victoria H.
3/21/2025
Thanks for your feedback Jenn! I'm happy to hear this adds more peace of mind to your adventures! Where to next?
Easy to install, keeps my F150 battery charged up while flat towing behind my Motorhome
Trailer people are the best! They assembled my replacement tow bar with this kit and it has worked perfectly ever since!

Brooke M.
5/9/2025
Right on! Where all have you been in the last year?
I purchased this as part of a package which included; Hitch and wiring for my 2022 Equinox, Base plate, Tow Bar, brake System and connecting air hose, break away cables, LED tow lights with wiring harness, and a trickle charger to keep the Equinox battery from going dead while I was towing it behind my class A RV.
I had etrailer do the install of all the components on my car and RV. All the workmanship was excellent and done in the amount of time they said it would take. Also because they did not have a video of this equipment being put on this year and model vehicle, I gave them permission to make a video(which added a extra day and a half to the install)and the installation was free. Everything has worked perfectly and I couldn't be happier. Etrailer is my go to for anything towing and also RV parts.
Jay
1/7/2025
I have had not trouble with battery on the Equinox which makes this all worth it. Etrailer lead me right
This product did exactly as described and was just what we needed to keep the battery charged in our towed vehicle.
Great service!

William
4/28/2025
This product has been working perfectly now for a year. No problems, thanks
I was told this would allow me to charge the battery on my 2025 Chevy Trax. You can only disconnect the negative battery terminal, not the positive battery terminal, so it will not work. Since the positive battery terminal is always connected and your motorhome provides the ground, you cannot isolate the battery - unless someone has come up with some sort of diode system.
It's working as far as I know. It was recommended by etrailer to add to my complete towing package. The installers put it in.I was glad for the quick helpful service fro etrailer when I asked questions about what I should get.
Good direction for installation easy to install.
Installation was straight forward no problems have not had a chance to tow our 2025 Maverick as I'm not done installing everything yet.
The Roadmaster brake connection kit has worked flawlessly on our toad. Thanks!
Richard
2/11/2025
Brake connection kit has worked fine with my Blue Ox system
The kit arrived without the fuse line. etrailer's excellent customer service took care of me quickly.
Brooke M.
4/4/2025
Glad we made it right!
I found out the hard way why I needed this. Dead tow
Vehicle battery when I was trying to go without this on the first trip.
Good instructions, easy to hook up.
Easy fast installation. Works as advert ised
Simple an easy installation.

Do you have a question about this Accessories and Part?
Info for this part was:
At etrailer we provide the best information available about the products we sell. We take the quality of our information seriously so that you can get the right part the first time. Let us know if anything is missing or if you have any questions.


Victoria H.
1/9/2025
That's awesome Ron! I will let them know you reached out.