Replacement Support Arm Assembly for Solera Flat RV Awnings - 69" Long - Black - Qty 1
Thank you! Your comment has been submitted successfully. You should be able to view your question/comment here within a few days.
Error submitting comment. Please try again momentarily.
- All Info
- Reviews (157)
- Q & A (0)
- Videos (4)
- Photos
Lippert Accessories and Parts - LC281154
- RV Awnings
- Arms
- Support Arms
- Lippert
- Flat Awnings
- Solera Replacement
- Black
- 69 Inch Long
- Standard Head
Replaces (1) 69" long arm assembly used to support your flat Solera RV awning.
Features:
- Replaces 1 arm assembly used to support your flat Solera RV awning
- Includes wall-mounted bracket, outer arm, inner arm, and pitch arm
- Overall length: 69"
- Black color
- Quantity: 1 support arm
Fits:
- Solera flat RV awnings with a 69" long arm assembly

281154 Replacement Lippert Solera Support Arm Assembly for Flat RV Awnings - 69" Long - Black
California residents: click here


Videos are provided as a guide only. Refer to manufacturer installation instructions and specs for complete information.
Video Transcript for Lippert Solera Standard Flat Awning Support Arm Installation - 2017 Forest River FR3 Motorhome
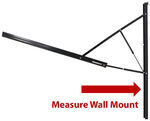
Rob: Hey everybody. It's Rob here at etrailer.com. And today we'll be taking a look at the Solera flat arm replacement support arm on our 2017 Forest River FR3 motorhome. Now you want to make sure you get the correct replacement part for your awning. So the way you're going to measure to make sure you have the correct arm is you're going to measure from the very top of the extrusion where the fabric goes into the motorhome. You're going to measure from that point all the way down to the bottom mounting point, where they are mounts into the wall.
Now that measurement comes out to be 69 inches. Then this is the arm that you need to use to replace it. Now, the other thing to pay attention to is that our arms do come into different colors. We'll have the black, like we have here, but if you have white arms in a white awning, you might want to go ahead and pick up a matching one in white.And the support arm is going to be a direct replacement for the factory arm that came on your awning. And this is going to be a replacement for a flat awning and it is going to work for powered and manual awnings as well.
And here we have the original one that we took off. You can see up top here close to where it mounts, it's actually bent and it starting to crack. Well, that's obviously not good because if this breaks, then our entire mount will come off, not to mention where it was mounted, definitely took some abuse there to where it was actually starting to pull away from the motorhome. Now, the really nice thing about the replacement arm is that it does come as an entire unit. You can see if we open up our old one here, we can see that it has a shock inside.That's a nice thing.
We don't have to take apart the entire arm to try to replace just this piece. It's going to be all one assembly which makes it really easy to get installed rather than having to replace a small component or the entire system. And slur makes really nice awnings. One thing I really like is the joint they have right here on the arm. It's actually a friction joint so we can change the pitch of our awning.
In case we have a lot of water up there, we can pull down on the arm and you can see it'll change the pitch just enough that we can get all that water to come off and drain off the edge. But the other nice thing is, is we're not going to have to adjust that arm to match the other side. We can roll our awning in and it'll automatically go back to the way it needs to.Now, as far as the installation, it's a pretty straightforward process. It's a replacement part. So we're simply just removing this one and replacing it with the new one. One thing I do definitely recommend is having a few extra people with you so they can help you hold things up and kind of hold things while you're getting things in place. Another thing you will need is either some butyl tape or some kind of silicone so we can seal up all the holes either from the mounting locations, or if you have a powered one where all the wires are coming through. Now, we're going to go and show you how to get everything on, so you can have the confidence to do it at home. The starter installation, we need to remove the arm that's damaged or that you're going to be replacing. On ours, this front one at the very top, that brackets bent pretty bad, but we need to get access to the bolts that are holding it to the motorhome.So we're going to extend it out far enough that we can access these lower bolts. So if you have a power arm like we do, you're going to extend them out. If we have this cover that's covering up the wires, typically you just grab behind it, pop it out of that channel at least far enough that we can see the bolts that are holding everything in. So you want to grab a 3/8 snap driver or a 3/8 socket. And we're going to pull all these out, two at the bottom and then the two in the center. Are the arms still being held on by the top bolts So we don't have to worry about it coming down, but you do want to be careful case it starts moving on it.Now, If you have a power awning as well, we're going to need to disconnect the wiring before we can pull the entire arm off. So any of these covers that are covering up the wiring, you want to go ahead and pull them out so we can get access to them. Now, the first ones we're going to have on ours is we're going to have these wires going to the lights. they're right above our awning. So we want to go ahead and disconnect those.Now those already have butt connectors on them, so I'm just going to cut them right before the butt connector. That'll also give me a good indication of which wire goes where. just leave a little bit out of the connector and have an easier time hooking them up later. So cut those wires and pull all the Slack down through and then if we follow the arm where our black cable is, it's going to come down this channel and actually come back up till it goes to the head. Now on the very back of the arm here, we pull down on that connector, we can get it disconnected and again, start filling that wire through so we can get all the Slack out of the arm.At this point, we want to make sure that we have something to rest the awning on. Because we're going to be disconnecting the head from the arm right here. Now the arm still attached to the motorhome, so we want to worry about it dropping, but again, you want something or someone to support the roller in this side of the awning. We'll grab a Phillips screwdriver or a Phillips bit and we're going to remove that large screw right there at the end of the arm.So now that we have our arm extended, the awning is supported. You want to double check your wires and make sure that you can actually pull the awning away and it's not stuck to the wires. Because we're going to move up top, remove the bolts and then remove the entire arm assembly. Just want to make sure that you have someone below supporting it because it is a little difficult to hold on to all of this while you're on a ladder. But there should be four bolts, we'll go ahead and pull all four of those out.And then gently lower down the ladder, lower down the arm and make sure the wires come through and they don't get stuck. So we're going to grab our new arm. Now at this point, you'll notice there's a big zip tie holding the arm together, leave that attached until we're ready to because the arm is going to open up just like the other one did. But for right now, we just want to attach it to the motorhome just the way we took it off. So we're going to attach the top first.But before we do that, I always suggest using some butyl tape. Now this is not going to come with the arm, but it's definitely a good idea to put some in. So seal up the holes that we have and we don't have to worry about any kind of water intrusion. The butyl tape in place and make sure you put any wires through that opening, line up our brackets, make sure the holes line up in the other locations. I'm going to take the new screws that come in our kit and we're going to drive them right into the side of the motorhome.At this point, very carefully we want to cut that zip tie and allow the arm to come out so that we can get access behind it, route our wires and connect the head. But again, remember there's that spring in there or that at least that shock, so it is going to come up pretty quick. So you want to make sure you have a firm grip on it. So we want to go ahead and make sure we start routing our wires through the opening at the bottom, just kind of pull the arm away, very gently until all that Slack to come through for all the wires.You put a little bit of butyl tape behind the mounting holes, then we can take a couple more of the included screws and secure them down in those same locations, the two at the bottom and then the two in the middle. So now we want to start routing our wires the same way that we took them off. The black wire will go up and eventually go to the head. And then for our power wires or red wires here, those are going to go up top to the light. So we're going to go ahead and route those and get everything connected up.So this point we want to bring the head over to the end of the arm. Now we did end up getting the head screwed in and back on the arm, but I will let you know it was a little bit of a battle trying to get everything lined up. Partially because we had the arm on the other side fully extended. So there is a lot of tension on that arm. So what you can do is, is if you come to the pivot point and actually grab the arm and pull it down, that will change the angle of the awning, and it'll give you a little bit of Slack, you kind of have to play with it. So you get one side a little bit loose, move to the other side, pull down and kind of go back and forth until you can have enough Slack to get the head connected back electrically and to put that screw back in place.And then the final step is going to be rolling the awning in and out a couple times, make sure that the fabric is nice and centered and that the arms are working properly. And if everything is in adjustment, the fabric should be straight on the roller and the arms should go into place all the way locking in on both sides. Now that we know that our awning moves in and out perfectly fine, that'll finish up your installation and you look at the Lippert replacement arms for Onyx. But again, I'm Rob here at etrailer.com and that'll finish up your look at the Solera standard flat awning support arm on our 2017 Forest River FR3 motorhome..
Customer Satisfaction Score:
94% were satisfied with this product
6% of customers were not satisfied
- Arrived Damaged
- Product did not meet expectations
- Wrong item was ordered
Ratings & Reviews
4.6
157 reviews
etrailers was the best company I ever dealt with.Was talking on line with Ryan and Ryan was very thorough and informative. I ask Ryan to call me because it would be easier for me to.order. So we did business on the phone. Shipping was also very thorough every step of the was where my order was and by who handled it until I received my parts. Will do more business with etrailers thank you.. my Rv awning bracket

Bought to replace a damaged and bent arm from weather. Followed YouTube video instructions and took about an hour to replace myself. etrailer was helpful in determining the correct size to order. Package arrived timely but was somewhat damaged in shipment, but contents were fine.
Awesome! I needed a few more parts for my repair but that was my fault! Great customer service and FAST shipping.
Watch the installation video, it’s exactly that easy. It took an hour and ten minutes from the moment I started removing the first screw.
My damage was such that it was necessary to fill two holes with bonds and drill two new holes. Fortunately I already had some. The only additional purchase was butyl tape.
Race G was exceptionally helpful. The Support Arm assembly went on as explained in the video. The slight amount of custom fitting to to the exact dimension of the OEM installation was handled expertly and professionally by the Lippert representatives.
Awesome everything
Fast shipping exact replacement
Customer service was incredible and follow up was amazing
The replacement support arm was exactly what I was looking for. It went on perfectly. 100 % satisfied. Thanks
All products were as advertised and shipped when they said. I replaced the non-drive side that I tore off accidentally while backing the trailer.
I dismantled the new part so I didn’t have to cut wiring and possibly strip out mounting brackets holes unmounting and remounting the entire arm from the trailer. This part should be sold and it should only cost $50, not the $350 I had to pay. On the bright side, If I bend another one then at least I have a template for my favorite machine shop I guess.
Havent tried to install it yet so I’m not sure about fitment. Etrailer staff was very helpful on the phone helping me get the correct part.
Tim

2/13/2025
Still working great


Tim

2/13/2025
Easy install and perfect fit. Still working great.
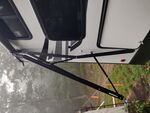
Tail swing on 30' trlr thru a 11' gate with a turn required to get thru sorta messed up one support arm of the Solera power awning. I did some looking and found that etrailer had exactly what I needed, a speaker head cover for the arm and a 69" support arm assy. I ordered the parts I needed and when they arrived I was relieved to know that they were genuine Lippert parts. I had to grind the heads off of the old pop rivets to get the old assy. off of the trailer. Then I pushed the flaired rivet end into the wall. The new arm lined up perfectly with the old holes, so with some black silicone as sealer and new flairing pop rivits, we were up and running in about 3 hours. Thanks all at etrailer for your help.
.

Yall did great all the parts were first class


Gwendolyn Y.
4/3/2025
Those are some great photos, Mike! Looks like a nice little spot with the flowers :)
The replacement support arm for our 2015 Thor Château is an exact replacement. After watching the supplied video for the repair, I ordered the arm. After receiving the arm the removal and the install was done in 2 1/2 hours. I did have help and it was completed with no surprises. Can’t say enough about the trailer and their products. E trailer definitely deserve the five stars I gave them on this product.
Wrong parts terrible follow up - still have RMA go return or any clue my parts are.
Came as promised a direct replacement for my damaged parts.
The parts I ordered were shipped and received within two days. Parts arrived in perfect condition and were exactly as advertised. Great Customer Service….
Thanks for fast delivery

Excellent replacement. Works as it should.
Quick shipping
Perfect replacement for support arm! I had read reviews and most said that it didn’t come with the mounting screws but mine did. Took about 30 minutes to replace. I would order some butyl sealant tape to go along with it. It just makes a better deal over the mounting screws.
Shipping was exceptionally fast. Ordered it Monday and it got here Thursday! Will definitely buy from them again!

William

7/2/2024
We no longer have that camper but I’m sure it’s still going strong!
Easy install, perfect fit. The install video alone is worth the price of admission! Etrailer to the rescue again!
Fast delivery and everything was as promised. Easy to DIY install.
See what our Experts say about this Lippert Accessories and Parts
- Replacement Parts for Damaged Arm on 69 Inch Solera Power AwningBased on the pictures you definitely need the awning support arm # LC281154. I can't tell in that other photo if the pin is bent or damaged, or just barely hanging in there. I'm also not sure if your idler head and roller endcap are ok or not so you will need to inspect them for damage. In addition to the replacement arm we have the following parts available: -Solera Power Awning Idler Head # LC672052 -Replacement Front Cover # LC643923 -Replacement Rear Cover # LC643921 -Replacement...
view full answer... - LCI Lippert Solera RV Power Awning 69 Drive Inner Arm Replacement SolutionWe have replacement pitch arms for the Solera 69 inch awning setups like what you have with the part # LC375994 which would be all that you'd need.
view full answer... - Awning Arm Replacement for Rockwood with Dometic AwningAre you trying to replace the awning arms? Or just a portion of the arms?
view full answer... - Replacement 69" Solera Replacement Awning Arm for a 2019 Heartland North TrailHey Barbara, We have the Replacement Support Arm for Flat Awnings in Black # LC281154 and White # LC281152, as well as the Hybrid Arms in Black # LC434727 and White # LC434728. I'm not sure which style came on your North Trailer, but both of these have the 69" arms. If you have something different please let me know and I'll be happy to look into this further for you!
view full answer... - Solution for Replacement Awning Bracket With 69" ArmsHey Rob! I'm assuming you have a Solera awning, is that correct? Unfortunately, the bracket is not something that is available separately. I know it isn't ideal but, the only way to replace the bracket is with the Replacement Support Arm Assembly for Solera Flat RV Awnings - 69" Long # LC281154 (black) or # LC281152 (white).
view full answer... - Replacement Outer Arm for a Solera Edge Awning Hey Dan. I have a solution for you but it sounds like you're describing a piece of your awning that is not available for individual purpose. We don't have anything in brown btw. I attached a picture below and circled what I think you're talking about. If that's what you need to replace and just that piece measures approximately 63" you'll need the Replacement Support Arm Assembly for Solera Flat RV Awnings - 69" Long - Black - item # LC281154. You can confirm this by measuring your awning...
view full answer... - Replacement Powered Awning For A 2022 Grand Design Transcend 247BH XplorHey Johnny, There unfortunately isn't a guide to tell us the correct awning needed for your trailer so we'll need to get a measurement first to determine the best fit. I'm assuming you're replacing a different awning and not adding one in where there isn't already one. If this is the case then you'll wan to measure from the center of one awning arm to the center of the other awning arm to determine the length. Once we know the length I can start looking for the right kit to fit your trailer.
view full answer... - Part For Replacing Inner Arm 383152 on Lippert AwningPer Lippert, the inner arm 383152 is not available on its own, you must purchase the entire pitch arm which is the Solera 69" Standard Flat Awning Support Arm part # LC281154.
view full answer... - Are Replacement Pitch Arms Available for Solera RV AwningWe have replacement support arms from Solera that measure 69 inches such as the Solera 69" Standard Flat Awning Support Arm # LC281154 (Black) and Solera 69" Standard Flat Awning Support Arm # LC281152 (White) but no replacement arms that are just 14.25". I'm not sure which part you were referencing as looking like the photo but the closest thing we have to an arm with that measurement are replacement gas struts (it should be noted the aforementioned arms do come with a gas strut). If...
view full answer... - Which is Correct Gas Strut for Solera AwningThe correct gas strut for your powered or manual Solera awning will simply depend on which Solera awning arm assembly you have. If you have a Solera Short or Flat awning arm assembly (which will use something like the Solera Short Awning Support Arm # LC351829 for a pair or Flat Awning Support Arm # LC281154) you will need the Solera Gas Strut 26", 124 lbs for Short and Flat Awning Arms # LC280343. For pitched awning arms such as Solera 66-1/8" Pitched Awning Support Arm # LC260294...
view full answer... - Replacement Bent Arm of 69" Solera AwningHey Chris sorry to hear about your awning! I've got more bad news for you though. Lippert has decided not to individually sell that bent portion of your awning arm. To replace it you'll have to purchase the Replacement Support Arm Assembly for Solera Flat RV Awnings item # LC281154, you were looking at. We also have it available in white item # LC281152. I have linked an installation video below so you can see how to get this awning arm set up. Please feel free to email me directly or...
view full answer... - Looking For Awning And Slide Out Parts For 2022 Forest River Rockwood Ultra Lite 2893BSHello Tony, thanks for reaching out. Sorry to hear about the issues with your camper. We do offer replacement arms for the Solera awnings. We have the Arm Assembly # LC404523 which is the 63" long or the LC281154 which is 69" long so please confirm which one you have. This is the only replacement arm available. There is nothing more heavy duty I'm afraid. As far as the slide out parts, I am not seeing we carry anything that matches what you are describing. It might help if you can send...
view full answer... - Replacement Dometic Awning PartsHey, Ken! What kind of replacement part are you looking for? We don't carry Dometic awning parts but depending on what you are needing, a Solera part may still work for you. Let me know in a comment or you can reply to the email with some pictures so I can get a good look at what you are needing.
view full answer... - Replacement Solera Awning Component V000436366 Needed Hey Robert & Carol, That part number comes back to a custom order piece. Is this the channel on the side of your RV that the fabric from your awning slots into, like part # LC715216? If you'd like to email me some pictures I'd be happy to take a look and get you what you need?
view full answer... - Looking for Replacement RV Awning Support Arm that is 69 inches TallHey Daniel, is it a Solera brand awning? If so, and yours measures 69 inches we do have replacement support arms with the part # LC281154 for black or part # LC281152 for white. When you get a email me the pictures if you are still not sure and I'll see if I can ID what you have/need.
view full answer... - Looking To Replace Arms On Solera Awning Item V000315307Hello Jason, thanks for reaching out. Our best option for replacing that is the Replacement Support Arm Assembly for Solera Flat RV Awnings # LC281154. This replaces the one 69" long support arm assembly.
view full answer... - Replacement 58 inch Awning Arm Solution for 2022 Forest River Wof Pup 14ccSince you said you have the 58 inch arms that would indicate that you have the Lippert Edge awning which we have just the replacement arms for. For the idler arm you'd want the part # LC62ED and for the driver arm part # LC22ED.
view full answer... - What Parts Do I Need to Install a Solera 12 Power RV Conversion Kit to My Solera Awning? You will be able to mount the Solera 12V Power RV Awning Conversion Kit - Universal - 69" Arms # LC434723 on your 2019 Keystone Cougar 26RBS trailer. As far as the specific measurements of the Solera 21' Replacement Awning Fabric - Solid Black # LCV000334448, I would not be able to determine the exact length of fabric you need without measuring the distance between of the center of the left arm to the center of the right arm. For the correct size, I recommend making that measurement. I...
view full answer... - Can I Replace the Inner Arm for My 69' Lippert Solera Awning?I'm so sorry to hear about your bent support arm. We have had a few neighbors who have reached out to us with a damaged inner arm assembly. Unfortunately, the inner arm of Lippert Solera awnings are specially manufactured by a certain amount of force during the production process by a special machine. With that being said, even if the inner arm were available to purchase, there would be no physical way to install the arm into the wall mount and the outer arm. Since this is the case, you...
view full answer... - Is The Inner Arm Available Separately For The Solera Standard Flat Awning Support Arm?The inner arm on the Solera 69" Standard Flat Awning Support Arm # LC281154 is not available as a separate replacement, unfortunately. You'd have to buy the entire # LC281154 if you needed to replace the inner arm.
view full answer... - Solution for Needing Replacement Solera Inner Arm # 383152I checked with Lippert and asked if we could get just the part number you mentioned and they told me it's not available by itself. You'd need the entire assembly part # LC281154.
view full answer... - What to Measure For Replacement Solera Awning Support ArmIn order to get the correct replacement support arm for your Solera awning, what you want to do is measure the wall mount of your awning. All you need to do is measure the length of that mount, and that measurement will let you know which support arm from the following options you need to get. - 63 Inches - White: Solera Short Awning Support Arm # LC97UD - 69 Inches - Black: Solera Standard Flat Awning Support Arm # LC281154 - 69 Inches - White: Solera Standard Flat Awning Support Arm...
view full answer... - Replacement Pitch Arm Assembly for Solera 69 Flat Awning Support ArmThanks for the photos, and from that it looks to me like you are asking if just the pitch arm assembly is available, and if so, the answer is yes, it is the Replacement Pitch Arm Assembly for Solera 69" Standard Flat Awning Support Arm # LC375994. This is just the pitch arm part of the entire arm assembly, the Solera 69" Standard Flat Awning Support Arm # LC281154 so you do need to be sure this is the arm assembly you do have, and if so the pitch arm I referenced is the correct replacement....
view full answer... - Can Inner Solera Awning Arm 383152 Be ReplacedWe have checked with Lippert before and they do not offer just the inner arm 383152, you must purchase the entire pitch arm which is the Solera 69" Standard Flat Awning Support Arm part # LC281154.
view full answer...
Do you have a question about this Accessories and Part?
Info for this part was:


At etrailer we provide the best information available about the products we sell. We take the quality of our information seriously so that you can get the right part the first time. Let us know if anything is missing or if you have any questions.







Victoria H.
3/26/2025
That's awesome Lamar, I'll let Race know you gave him a shout out!