
Thank you! Your comment has been submitted successfully. You should be able to view your question/comment here within a few days.
Error submitting comment. Please try again momentarily.
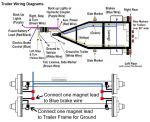
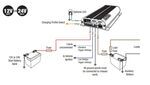
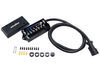
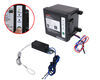
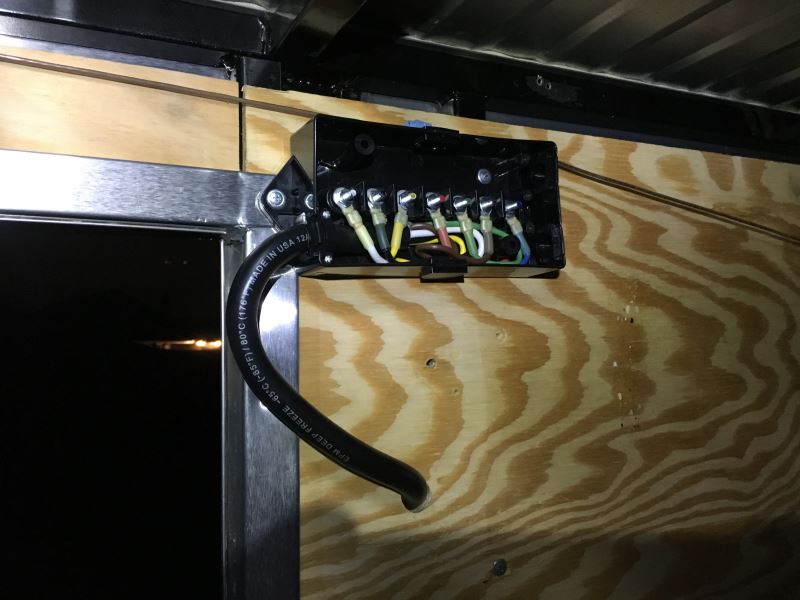
Color coded terminals in the ABS box provides a fast, easy way to connect the wires from the trailer connector to the wiring for either a 6-way or 7-way connector. Makes replacing your trailer's connector simple.
California residents: click here
Videos are provided as a guide only. Refer to manufacturer installation instructions and specs for complete information.
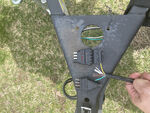
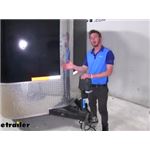
Hi everyone. Adam with etrailer.com. Today we're going to be taking a look at the Buyers Products seven pole trailer junction box. So this is going to be a really organized way to get all of your wiring from your seven pole of your vehicle tied up to the right function of the wiring of your trailer. This is going to do a couple of things, keep everything organized, keep it all dry because it does have a cap, but also a lot of the times we don't get trailers that configure with the standard seven pole color wiring. Luckily we lucked out and we can do basically color to color, but it's not always the case.
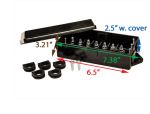
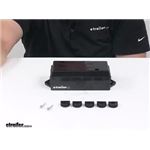
What's nice about this junction box is it is pre colored. Each stud is going to have the color and it does have stated green in text and also what that function will be on the other side.So it gives you a color cue and also a word cue to let you know how to wire this thing up. So when comparing this to some of the other junction boxes we carry at etrailer.com if you're starting from scratch, etrailer does make a kit that comes with a seven pole and a junction box and much more. Also we do have a Pollack brand that comes with a 10 function. So if you have a little bit more use for a couple more terminals here, definitely go ahead and grab one of those.It does look pretty difficult, but honestly it really isn't.
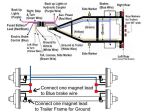
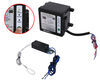
You just got to test your wires. So let's just go ahead and do all that together. So we're going to go ahead and check out our trailer's functions and you can either use a test box or just hook up your vehicle. So what we've got to do is I'm going to grab ground from my white wire here. You can also just ground it to the chassis of your trailer.
With my test box I'm going to be testing the right blinker. Ours is color to color, so brown should be the right one.So you can repeat that same exact process for all the wires. Just remember match it to function, not color. Now that we have all this wiring sorted out and we know every single wire and what it does, now we can go ahead and take our junction box. You kind of want to get an idea of where you want to mount it.
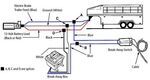
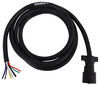
I think I'm going to mount it right here. You want to make sure you can get that cap on and you'll be able to tap in from the sides. Before we do all that, what we're going to do is I'm actually planning on using these two sides here to run our wires in and as you can see there's no holes.So in our kit that comes with the junction box we are going to get replacements that will have holes in them. So since I'm using these, I'm just going to take this out put it back in the box and these are going to eventually seat into the slot there. What I'm going to do to make it a little bit easier on myself. I'm actually going to fish these wires through first. So I'm going to to do the same exact thing for our wiring going to our trailer. Once that's done, I'm actually going to start with the wiring that comes from our vehicle and basically all we got to do is just put it into the slot like so. We're going to have to undo these screws right here. Take that off, put it in there.We might have to avoid these little brown plastic pieces here. That's going to be what's going to secure our lid into place. Then fasten it down. Once you think you're done, give it a good wiggle and make sure it's nice and tight. These ring terminals does not come with the kit. We do sell them here, so if you don't have any in your garage or anything, definitely go and pick those up whenever you grab one of these. Always make sure you've got a good connection and obviously have enough length to meet it to the right function.So I'm just going to put this nut on there pretty loosely just so it's not flopping around. I'm going to go ahead and put some ring terminals on all of our wires. For now I'm just going to match them up color for color on our junction box. So as you can see here, we just finished our vehicle wiring here and we're going to basically do the same exact thing for our trailer wiring. We're going to put this into place, but I got to undo these two screws first. Then we're going to go ahead, put those back, and screw them down evenly.So now we can just go ahead and put some ring terminals on all these wires and we're probably going to have to cut them and strip them back a little bit so they can fit into our junction box. So we've got all of our ring terminals on here and this side over here is going to be all of our trailer wiring. Over here is going to be from our vehicle. What we're going to do is as we put from our vehicle, all these wires have a specific function. So you don't necessarily need to go by the color because a lot of the times these trailer wirings aren't going to be color to color. So you could do it one at a time and test each and make sure that you're matching them up function by function. Let's take this nut off, place it on there.Tuck those wires away a little bit and put that nut back on. We are going to come through here with the tool to tighten these up. So now that everything is hooked up, now's a great time to test everything out and make sure everything's hooked up correctly. We're going to use the test box, but you can also just use your car. All right, so first we're going to start with our taillights.Our left turn signal, our brake lights, and our right turn signals. So now is going to be the time to mount it in its home. I want to angle it like so and we're going to run some cell tappers through this plate. One thing to note these cell tappers are not included with our kit. So once that's secured into place, give it a good wiggle, and make sure it doesn't go nowhere, and then we can go ahead and put our cap on. It doesn't really matter which way because these are going to line up regardless. Then we can take our screws and these we're included with our kit, slide on in there. Use the Phillips head tighten them down. Well everyone that's going to do it for our look at the Buyers Products seven pole trailer junction box.
Customer Satisfaction Score:
100% were satisfied with this product
0% of customers were not satisfied
Ratings & Reviews


This replaced an interior metal junction box on exterior front of almost every pull behind camper made. All connections were wire nuts with massive corrosion.
Easy waterpproof fix for a minimal cost.
I had bought a used trailer that needed TLC, a brake controller added, and some rewiring done. The junction box made it clean and easy!
This review is more about the customer service than the product. E trailer has always been really helpful when I need Parts in the past. The customer service is excellent
I received this junction box today. I can tell by looking at it that it's a good quality item.
This would make it easy to do mods or replace a 7 pin connector, even though I wound up not using it. My trailer uses an electrical junction box for connections. To swap it out would have been more trouble than it was worth for me. I just used lever nuts and high current screw connectors. But this would have been great in the right situation. Advice: look at what kind of box you have there already.
i used these junction boxes on two of my trailers. good to add to your trailer tongue so you can replace your cord/plug. this box is well made,weather resistant, and the studs that you connect the wires to are color coded.

Brant

6/15/2025
i have had these junction boxes for a year now. im still happy with them.
The color coding for using this item is Canadian. Trailer wiring in the US is different apparently from this Canadian version. I had to move the wires around on the lugs and decipher the colors for US use. The 7pin trailer pig tails are the same. At least I’m using a Jbox and can move wires around instead of butt splices. It would be great if it could come with what color wire who to which pin as well. Just frustrating when you’re all done and the lights don’t work completely correct after a total rewire on 2 trailers. Cost me 3 hours tracing wires and figuring out it’s Canadian color coded.
Excellent product, well made and sturdy.
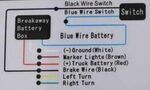
Color coded anchor bolts to secure your 7pin connections with the wiring of your trailer to match up appropriately with assigned functions from your vehicle’s harness. Which is all standard!
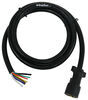
Gasket sealed to help protect connections if attached outside exposed to the elements.
Extra sleeves provided in case your wire harness is slimmer in diameter or wished to seal proof the junction box.
Can’t express enough how easy, convenient, and the quality of this product has been from install and to this point in time.
Over a year in my trailer, and looks just as good as the day I put it in.
It is made of thicker plastic, built to last, and has held up with no deformation of any kind within my enclosed trailer in the Texas heat.
Im sure my trailer, being black, and enclosed, bakes over 160 degrees in there.......if not over or near 200 degrees.
Yet plastic is still good and not brittle, and like I said......is no different than the day I put it in.
I bought it to rewire my whole trailer and to include reverse lights and electric brakes. Original wiring was complete BS and had splicers, which caused intermittent working lights and shorts.
I gutted and rewired the whole thing with thicker gauge wiring, heat shrink connections with heat shrink tubing over that, and any possible friction points I wrapped with tape and put heat shrink tubing over that.
Needless to say, the color coded connections within the junction box made my life so much easier.
Not to mention the thought process that went into the design of this junction box for a clean install no matter where you decide to mount it was a God Sent!
You wont regret this purchase!
I’ll quote Chef Paul Prudhomme on this one,......
“ I Guarantee!”
This was fantastic for my utility trailer. Made wiring everything super easy! For my small trailer I have led brake lights, side blinkers and I also had a 3rd brake light. There was still room so I put a female trailer plug just long enough to hang out of the box. That way I can connect a 'trailer light tester' and have an idea where potential shorts might be. ;-)
Makes wiring very easy and a clean job of it.

J M.
3/11/2026
Grate no more wiring problems and it makes a clean wiring job and easy to replace cords without cutting in to the wiring
I have a 2019 Forest River travel trailer. I started having brake problems and the dealer was no help so since i have some experience I started looking at the issue myself. What i found was a series of loose and poor 12v connections throughout the braking system and some in the lights as well. The main culprit was connections in the main junction box, see pictures. The factory used a household style jbox and not a quality sealed jbox. I looked on line to fInd a suitable solution that allowed easy access and easy installation. This product fit the bill Perfectly. After a couple hours work to remove the old box and install the new one (in new location) cut and install proper ends on all the wires and make clean secure connections my trailer now has brakes that work properly. The new box came with all necessary screws, nuts and has plenty of wiring install point options. It is all plastic so i was careful not to over tighten any of the screws used to retain the harnesses on each end of the box.
Thank you for a great product.
Tim
Gunter, TX
Happy Camper
Your connector box is a great product, easy to install each wire by color and number. I had a shorter than I expectd new harness and plug but the box made it eazy to place where I needed it instead of going into the trailer understructure. I placed the box between the traile tung under the battery box for easy future acccess. I hand made a sheet metal shield for extra water proofing.
I reccomend this product, easy peasey.
Parts arrived in a reasonable amount of time and were well packaged.
This junction worked perfectly! So handy to have under your vehicle to wire up a wide variety of accessories! I used it to wire up flush mount pod lights that I installed in the rear bumper. They serve as reverse lights and they’re also wired to come on with a switch. Very handy!
E trailer is great. They always take care of my orders immediately and send me exactly what I want. I appreciate them guys very much.
Junction box is compact which makes it nice to have a small profile but it is challenging to wire up with the space you have. Overall happy with the outcome.
Fast shipping
it looks to be a great product was easy to put on
I trouble shot bad 7-pin plug as lites blinking and one brake lite questionable. All bulky connectors, wire nuts, for new plug not an option. Saw this. Clean. Looks good. Yeah, little experience needed, however, you do not have to be an technician to use.start to finish: 30 mins. Color coded terminals not really needed, but good idea if you've never done something like this.
Overall I liked the way it organizes and protects the wiring connections. However, the screws and design for securing the cover did not seal tightly and basically stripped out (the screws could not lag down well like they didn’t get enough bite). I ended up chalking the entire lid and screws/ screw holes to get it to stay in and get a waterproof seal. If they improved this I would give 4-5 stars.
Two thumbs up again! The site is so informational that it makes the job a breeze and the products are exactly as they are shown on the site.
Well made, and did just what I needed to protect my wires from my truck to my boat trailer.
I have done wiring repairs on trailers for years. I like to use J-boxes like these because it really cleans up an installation or rewire job. These are quality boxes!
It worked as intended
you get what you pay for. ever thing looked good. fast shipping.


Info for this part was:
At etrailer we provide the best information available about the products we sell. We take the quality of our information seriously so that you can get the right part the first time.


Raymond
4/29/2025
The box is still water tite, and shows no interior corrosion. Many campers have intermittent power due to loose and corroded wire nuts on low voltage systems. Especially the front jack!