
To see if this custom-fit item will work for you please tell us what vehicle you'll use it with.
Thank you! Your comment has been submitted successfully. You should be able to view your question/comment here within a few days.
Error submitting comment. Please try again momentarily.
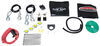
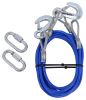
Plug-and-play: this permanent system gets you automatic braking with a one-and-done installation. Actuator box installs out of your way under the front seat. Adjustable pressure setting for comfortable braking. Charges car battery while towing.
Features:
Specs:
A braking system is a must when towing a Chevrolet Silverado 3500 behind your motorhome. Without it, the weight of the towed car can create a safety hazard, strain your RV's brakes, and affect its the warranty of both your car and motorhome. Most states legally require a supplemental braking system, so if you don't use one and you end up in an accident (which is more likely since your RV takes longer to come to a full stop), your insurance and liability headache just doubled. You also won't have any breakaway system; if there's an accidental disconnect, there's nothing to bring your car to a stop.
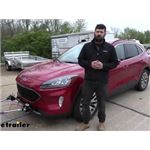
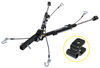
The InvisiBrake is a permanent braking system, which means that it's a one-and-done. Once it's installed, there's no more setup that you have to do. When you plug in the power cord at the front of your Chevrolet Silverado 3500, the system automatically turns on. Just like that, you're ready to flat tow.
While the components are installed permanently in your RV and toad, they remain concealed and inconspicuous. None of them will interfere with normal driving, and most of the time they are invisible.
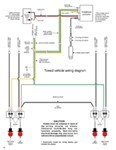
This system will apply the brakes in your toad (towed Chevrolet Silverado 3500) every time you hit the brakes in your RV. It will detect the brake light signal from your motorhome and trigger the system to the settings you pre-programmed.
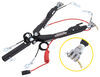
The braking pressure of the InvisiBrake can be adjusted from 5 psi to 80 psi depending on the weight/size of your toad and your preferences. A higher pressure will brake your car with more force - a good fit for a heavy Chevrolet Silverado 3500 - and a lower setting is good for a small Chevrolet Silverado 3500. 60 psi is the recommended default setting, but you can tweak it to suit your individual setup.
The adjustable pressure setting is also an important safety feature for a car with active or continuous-power-assist brakes, such as hybrids. A car with active/continuous-power-assist brakes has pressure in the brake lines even when the ignition is off, so a braking system could apply excessive pressure and potentially cause damage. By lowering the setting (20 psi is recommended), you can use the InvisiBrake with active brakes.
The pressure setting needs to be adjusted only once, during the initial installation, at which point you can test the system at different settings to determine which feels best. Once you have it set, it does not have to be readjusted, so your system is always ready to go.
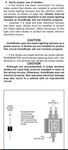
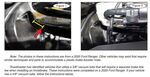
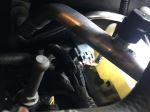
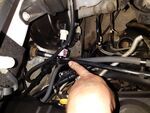
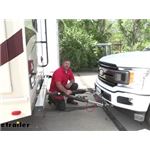
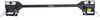
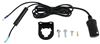
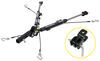
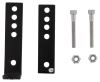
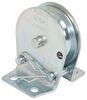
Most often, the InvisiBrake actuator box installs beneath the driver seat of your toad, neatly tucked out of your way. You can, however, install it anywhere in your car that's convenient for you, such as in the trunk, as long as you can still access the adjustment knob.
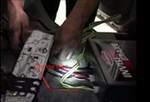
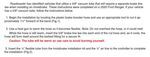
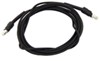
A bracket and cable pulley will install on the arm of your Chevrolet Silverado 3500's brake pedal. This will not interfere with normal braking function and does not have to be adjusted or removed. There will be lots of wiring to do as well, with connections made to the battery, breakaway switch, and tail lights. But once it's done, your braking system is always ready to go.
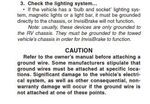
This is a tough installation, with several points that need careful precision to get right. Depending on the Chevrolet Silverado 3500, it can be challenging to find a place to fit the actuator box, and you have to be sure the cable pulley will meet the brake pedal at the right angle to function properly. There's a good chance you'll be pulling up carpeting and removing panels to get the wiring and cable run. Check out one of our installation videos to see if this install is in your comfort zone! Otherwise you can take it to a professional to get it installed.

Average Customer Rating: 4.8 out of 5 stars (231 Customer Reviews)
Plug-and-play: this permanent system gets you automatic braking with a one-and-done installation. Actuator box installs out of your way under the front seat. Adjustable pressure setting for comfortable braking. Charges car battery while towing.
The braking system and the lights are working, one year after I bought them. However, I am towing a 2016 Keep Patriot, and about 2_500 miles after install, the system started making an annoying clicking noise when I enter the Patriot, which stops after about 10 seconds and then starts up again, usually a minute or so later, for another 10 or 15 seconds. etrailer first said that they had never heard of.such a thing, then said that there are otherwise comments for Keep Patriot owners on forums. Still have no.fix.
Also, at first I did not know that to store the tow bar, it must be pulled up so that the post fitting can moe to the position where it fits into the hole.in the smaii yellow bracket, which works well when used correctly. And store the coiled.wide in your tower vehicle.to prevent corrosion which will interfere with its function.
Invisibrake on a 2014 Honda CRV
I’ve been a carpenter all my life and recently finished building a custom car. After Watching the etrailer video (multiple times) it appeared to be a fairly simple installation, not so much, as getting up under the dash is very tight, mounting locations and access points are different and not much working room under dash.
1. It appears the length of the cable and air cylinder are shorter than when the video was made, so an alternate location for the cable clamp is needed. The cable direction needed to be at a 90’ angle to the pedal. . Removing all the carpet and insulation was a PIA to get a direct connection to metal. The cylinder mounted a few inches closer than the video showed and I used two clamps to attach it. The mounting point on the cable clamp ending up being behind the wheel well, so I used a couple of stainless steel bolts for attachment.
2. The hole location into the firewall was very difficult to get to. I was only able to drill a 5/8” hole. I couldn’t get my step bit in there and the brake lines are on the outside and didn’t want to risk damaging them. I just ran the power wires and vacuum line through this hole. I drilled another 3/4” hole in the floor at the back of the cylinder. I ran the plug for brake away and the lighting wires under the body and followed the lighting wires from the back to front. Covering all wires in a plastic loom
3. The plastic molding pieces required some trimming to fit the new wires and cylinder.
4. The video shows the box mounting directly though the removable carpet mat. (Not a good thing) I removed the mat prior to install and will have to modify it to reinstall.
5. All the wiring in the engine compartment and the plug was fairly straight forward and simple.
It all appear to work as it should. Testing seemed to work good.
I recommend making a new installation video.
When I ordered it, the Amazon price was lower and etrailer couldn’t match the pricing. Two weeks later the pricing dropped to match the amazon price ( lower by $150). Sad face..
2014 CRV Baseplate -Roadmaster 521567-5
The installation was fairly simple and the video explained it well. The bumper and grille were fairly difficult to remove and expect to break some of the clips. ( new yellow ones can be purchased on Amazon) . I would wait to replace the grille until all the plug wiring is complete. Just hind site.
2014 Honda CRV Brake switch relay. -Roadmaster 88400
Relay switch are really simple to install, but the location of the brake switch and the small wires made it really difficult.
But it works as it should
This product was supposed to fit under the seat of my 2022 Chevrolet Colorado. It doesn't even come close. The power seat motors do not allow any room between the seat and the floorboard of the cab. I am returning it "Unused, Uninstalled and in the original packaging. I am being charged return shipping fees. I could understand if I just changed my mind but the product DOES NOT FIT!!! I ordered a replacement air brake unit that will fit. Why am I being charged return shipping for etrailer's mistake in compatability??
Good quality materials.
Fast delivery
Good price.
Complicated install. 16 hours labor for me to install toad portion, including bulb kit. 8 hours to install indicator light/warning beeper in RV. Worth the one time effort for me to not have to set and remove floor mounted brake system each time I want to drive the toad.
2002 Jeep Grand Cherokee with electric drivers seat. Controller would not fit under drivers seat, installed in cargo area behind rear seat. Good instructions for install.
Kit included everything I needed. Due to controller placement, the controller power leads were not long enough. Air line to air cylinder connection was difficult to get right. Was not as "sure" as air line to controller. Took 3 attempts to get it to not leak.
Overall a good product, I expect it will last a long time and be very reliable.
A little more difficult than others to install but definitely worth the money. The only thing I noticed is every couple of hookup’s you need to pump the brakes once to activate the system

Russell

6/3/2023
Works great however if there’s a short anywhere in the primary vehicles light wiring. It will randomly apply the brakes.
I love the InvisiBrake system! It's permanent installation and flawless operation really simplifies the process of connecting and disconnecting the towed vehicle. I would definitely buy it again and recommend it without hesitation.
I've always have a Invisibrake system installed on my tow vehicle as they work excellently and are not in the way.
My Invisibrake system works excellent. I t was easy to install for anyone with a little mecanical ability. Love it
Not using it anymore because the Ford Maverick we got it for, was upgraded to a Ford Ranger. It did not supply enough power to charge the battery. The charging option was one of the main reasons we bought this one. I think it is different for other cars. It was a little challenging to adjust the brake power. We switched to a portable solution for the Ranger.
Intermittent brake application sticking on. 3 different times in 4000 miles but always seems to fix itself.

Dennis
10/13/2023
Still occasional compressor sticking on. Times out eventually after annoying buzzer alarm.

The installation went as planned. All parts fit and worked the first time.
Etrailer was Awesome from start to finish. Vert efficient and made sure that i had everything I needed.
Realitively easy to install except for the brake indicator in the RV. The problem was in the 2018 Wrangler, getting the wire I needed ti splice int for the in-use indicator.
The product arrived within a reasonable amount of time. Instruction for installation was pretty good between both what came with the kit and the video etrailer web site. For the most part the installation went well but there are a few things I would like to comment on, and they are:
1) The self tapping screws to install the control unit to the floor of my towed vehicle were too short to get through the carpeting and into the sheet metal with enough bite to hold. Instead I used longer 1/4 - 20 bolts.
2) The vacuum check valve came apart while I was pushing it into the brake vacuum line. I was able to not lose the rubber membrane inside and used super glue to put it back together. I tested it and is working fine but I did order another check valve to the tune of [a few extra] more dollars.
3) It would have been nice to have the etrailer video show something on where to hook up the "Monitor System" from the towed vehicle. It took some doing but I was able to locate the brake switch and tap into the cold side for the signal.
Although I haven't put any miles on this system yet my test of it went well.

Rachael H.
9/1/2017
Thanks for the feedback and review Ken. I wanted to let you know that I have included a link to one of our installation videos and at about the 15 minute mark there are some details about installing the monitoring system in the RV.
Helpful Links

Ken K.
9/1/2018
A year later and Im still in love with the Roadmaster tow bar & base plate and InvisiBrake braking system. We just got back from a road trip that started around Seattle down to Bryce canyon and back. The tow bar and brake system worked flawlessly, I could not be more pleased. Also, recently I traded in the first Jeep that I installed this system on for a newer Jeep. Knowing that I would be towing the new Jeep as well, I wanted to uninstall the base plate and brake system from my old Jeep and reinstall them on the new. The process went very well, actually faster than the first time I installed it. So, bottom line is that Im very pleased with this set up and would recommend it highly.
Installed in a 2014 CRV. Worst part was getting all the wiring and under the door sill trim panel and routed up through the firewall into the engine compartment, and getting the cable and pulley installed up to the brake pedal. Pretty crowded under the dash in a CRV (my ribs are still sore)! had to use a different clamp on the vacuum cylinder because I had to move it forward of where the video showed in order for the cable to reach the mounting location under the dash. Had to clamp it around the larger end of the cylinder and the supplied clamp would not fit around the larger diameter end. Maybe Roadmaster has shortened the cable? Haven't tested yet but have high hopes! I used the videos extensively, and couldn't have done it myself without them! Not bad for a 72 year old!

G.d.
8/23/2016
Excellent! Have used it towing my CRV on two 2,ooo mile trips since installation. Works very well
Purchased this braking system and installed on 2005 Jeep Wrangler and towed for over 3000 miles with no issue. Uninstalled and reinstalled on a 2016 Jeep Wrangler this fall. By far, the best supplemental braking system we’ve ever used.
2021 Ford Ranger. The installation is not really technically challenging, but there are a lot of steps and you need to twist yourself under the dash for quite a bit of it. The main installation comment I would have is assume you are going to drill a hole in the firewall for the wires/air hose. Using the existing grommets is more work/risk than it is worth. There were several videos, but none specifically for my vehicle and I would have liked the specific detail on the air connection. We have about 800 miles towing with it so far and it definitely it helps with stopping, plus the break-away safety is good peace of mind.
delivered early and packaged as stated
Douglas
1/10/2024
No issues and everything works fine.
works perfect
Nice product and simple to install should be easy to use. I installed under the seat of my 99 jeep wrangler
Works great after I finally got it installed (see review on wiring harness)
This review is more for eTrailer than the product RM-8700, which is a great product as well. I will be submitting further reviews as I install the device.
If you want to work with a knowledgeable staff, one that actually listens to your needs and not a company that simply sells a product just to get numbers. Deal with eTrailer.
If your RV has any need these guys know or will find out (as long as its in their area of expertise) and get back to you. They carry great products, they ship as promised and they stand behind what they sell. I highly recommend eTrailer.
Guy V.
8/10/2020
Most excellent products and customer service. I had purchased a few different items from eTrailer and found that there were a couple of missing items. Without question or hesitation, they were in shipping and satisfying my problem. After I got into the project, I found the missing items and notified eTrailer of my error. I cannot say enough good things which describes the excellent customer service, product knowledge and assistance they offer their customers and potential customers.
Happy so far. I wouldn’t say installation is difficult but it did take me some time. Unit just barely fits under the drivers seat of my ‘03 TJ so it is out of the way. Does take away leg room from the rear passenger but who rides in the back of a TJ right? I did have to fab up some spacers for the clip that holds the brake cable due to the fact that the firewall of my TJ has a ridge right where it needed to be mounted.
Easy install
It was not too difficult to install if you have basic mechanical and electrical knowledge. After a year owning it and using, I can while heartedly say this is an EXCELLENT PRODUCT. I never had a breakaway to really test it, thank God, but the peace of mind knowing it’s there is tremendous!
Doug S.
4/21/2020
Perfect operation still to this day!


Do you have a question about this Tow Bar Braking System?
Condition: Like New
Notes: May have damaged packaging or minor cosmetic blemishes.
Info for this part was:
At etrailer.com we provide the best information available about the products we sell. We take the quality of our information seriously so that you can get the right part the first time. Let us know if anything is missing or if you have any questions.


Jenny N.
6/14/2023
You are welcome to return this InvisiBrake system however I wanted to let you know that while most of the time the InvisiBrake actuator box installs beneath the front seat of the towed car it does not have to be installed there. It can be installed anywhere in the towed car that is convenient as on as you can still access the adjustment knob.