
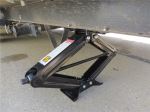
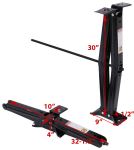
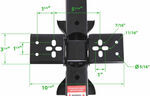
Forget about the hassle of finding level ground for your RV or trailer. With these leveling scissor jacks, each capable of a 30-inch lift, you can easily stabilize and level your RV, fifth wheel, or travel trailer on any terrain. The jacks adjust from a compact 5 inches to an impressive 30 inches to suit your needs, providing you the stability you desire for a great camping or travel experience.
No more worries about your jacks sinking into soft ground. These jacks feature a unique bow-tie base design, engineered to spread the load evenly and keep your vehicle steady on softer surfaces like dirt or grass. The innovative design provides confidence knowing your trailer remains stable regardless of where your travels take you.
Whether you prefer a bolt-on setup or a permanent weld-on mount, these jacks accommodate both options with ease. Designed with flexibility in mind, you can choose the most convenient method to attach the jacks to your RV or trailer frame, ensuring a secure and reliable installation.
These scissor jacks are not just for minor adjustments—they boast a combined stabilization capacity of 10,000 lbs. Each jack handles up to 5,000 lbs, making them perfect for significant stabilization tasks. Whether you’re camping in a teardrop camper or securing a large fifth wheel, these jacks help you maintain a solid and secure foundation.
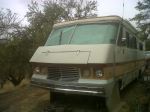
Suitable for a wide range of recreational vehicles and trailers, these jacks are ideal for fifth-wheel trailers, pop-up campers, RV motorhomes, teardrop campers, and travel trailers. Their versatility makes them a must-have for any traveler looking to improve the stability and comfort of their camping setup.
Constructed from robust steel, these jacks are designed to last, offering reliable performance season after season. You can trust the durability of their build to withstand the rigors of outdoor use, giving you peace of mind as you travel and camp.
These jacks are designed to stabilize a portion of your trailer's weight, not to support the full GVWR of your trailer. Do not use these jacks to lift your trailer or RV. Doing so will exceed the capacity of the jacks.
California residents: click here
Videos are provided as a guide only. Refer to manufacturer installation instructions and specs for complete information.
Hi. Matt with etrailer. If you're looking for a way to stabilize your trailer but you want something that's gonna be affordable and just really simple to use, then the Stromberg Carlson is gonna be a great jack for you. So let's check it out. (jack whirring) So this will be great for anyone who is going off camping on some uneven terrains with you and your RV. This is gonna help stabilize everything so you can sleep a little bit more comfortably at night.
But here at etrailer, if you do decide to go with this, we'd love to see what type of areas you're using it in. So send us a picture or leave us a review how you're using it. Today I'm mainly gonna be focusing on how it's gonna be like to actually use this. Then I'll go over my final thoughts about it and then I'll show you how to install it. So let's jump right into using it.
So you are gonna get this bit that is able to be used with a drill. It isn't gonna come with a manual crank, but most people are gonna have one of those on hand. If you don't already, you can actually find one of those on our website. But using it so far, it feels fairly smooth. I'll just put it in the up position.
(jack whirring) And that's something I will say, if you don't have a very strong drill or you don't have it in the higher position, then sometimes it won't move if you already have some pressure on it. But now that I've kind of put it in a stronger mode, (jack whirring) it moves just fine. And this actually moves fairly quick. (jack whirring) In no time, this has already been in the only retracted position and you're gonna have a maximum and you're gonna have a minimum. The minimum here is gonna be five inches from your frame where you're mounted up to.
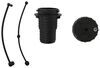
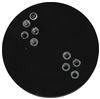
And then the maximum position that it's gonna be stretched out is gonna be 30 inches. So you're gonna have a fair amount of travel with this. And let's see that in action one more time. (jack whirring) That moves fairly easy. Now let's talk about how our foot is sitting in place. And what I like about these bow tie feet are that they're fairly large for the most part. Now, you are gonna be missing out on a little bit of what's in front of it. So if you're on some more rocky terrains, this can be a little bit finicky sometimes. If you do need to swap this out, this is really easy. All you gotta do is remove these bolts and nuts at the bottom and put a new one on here. And you are gonna get a few things with this kit, besides this adapter here, you are gonna get two jacks. So you can maintain either the front or back of your RV. If you need four, you can just get another kit from our website, since these are a little bit more affordable. And you are gonna get some hardware so you can mount it to your RV. That's kind of nice that they do make that process a little bit easier compared to some of the other kits I have seen around. In my opinion, I think this is gonna be a solid choice for most people who just need that extra stabilization, because we are gonna get a lot of travel with this jack here. The only things I do wish this had was a actual like manual attachment. So if my drill's not working at that time or if it's dead, I can just manually lift it up. But chances are you're probably already gonna have one on hand. Now, when it comes to the installation, it's actually a fairly simple process. If you're curious to see what this process looks like, just stay tuned, we'll walk you through it. To begin the installation, what I'm gonna do is find a good spot to place our jack. So all you have to do is come over here to the side and just kind of mark things out. So if I'm gonna place it, I know somewhere in this general area, I wanna make sure when this sits up there, this is gonna sit up there flush and nothing's gonna get in the way. You also wanna find a point where when you're drilling through here, you wanna make sure you're not gonna go into anything vital like any wiring or anything like that. Now, if we're actually marking out where we're gonna drill, there's a couple ways of doing that, but make sure before you do any drilling that you have your trailer chalked up so it's not gonna move around on you. When you are ready to start drilling, what I'm gonna do is there's two ways of doing this. You can put this in the area where you want this to sit, and you can grab some clamps and clamp it into place like that. You could do it that way, or if you have a friend on hand, they can actually come by and hold this up as you mark it into place. But before I do that, I'm just gonna extend this all the way to make sure it is gonna make ground contact. This is what mine's looking like right now, and I still got some room to even travel up, so I know this is gonna be in a good spot. So once you're done with that, just get this out of your way for the time being. (jack whirring) Yep. And I could actually show you a mark I already made. 'Cause we already drilled out one spot over here. Right here. And then right over on this side I have my other mark. So this is gonna let me know where I need to drill now. But it's gonna be the same drilling process on either side. Grab a 1/8 inch bit, we'll drill that hole through. Once that's done, we'll go to a 5/16. And once that's done, you have the option to enlarging that hole to work with any type of bolt you have. Now, if you're not gonna be using any type of bolt and nut, this kit is gonna come with some self tappers, so you can use those instead. (drill whirring) (wind howling) I'm gonna be using bolts today. And if you're gonna be doing that too, you might need to enlarge the holes a little bit more. If you're just using the screws, you can screw this up into place. But the way this process is gonna look is with the bolts, I'm gonna grab a bolt, a flat washer, and a split washer, put that through the opening. And you could do this one of two ways. You could just kinda hold this up there or you could jack it all the way up and have it stand that way. Sometimes it might kind of pivot on you, it might be a little bit awkward still. So you can still just do it like this, match it up with that hole. And then we're just gonna get it started on one side. Once it's started on one side, we're gonna do the same on the other. When you're ready, you can tighten everything down, and if you are gonna be using those screws, they will say the size socket that you need in your instructions. Just make sure you have a wrench on the very top to hold it down tight. (drill whirring) And once one side is done, we're gonna do the same to the other. And you are gonna have four holes that you can use. I recommend putting four up here. Once you have all those bolts or your screws tightened down and torque down the spec, you should be good to go. And I can actually check if this is gonna work properly. (jack whirring) There we have it. That works pretty smoothly. And from there you can repeat that same process on the other side. But other than that, that'll pretty much do it for the installation. And of course if you guys have any other questions, let us know here at etrailer. And again, I'm Matt. Thanks for watching.

Exactly as ordered. Super fast shipping.
Great, the shipping was awesome.
Do you have a question about this Camper Jack?
Info for this part was:
At etrailer.com we provide the best information available about the products we sell. We take the quality of our information seriously so that you can get the right part the first time. Let us know if anything is missing or if you have any questions.


Thank you! Your comment has been submitted successfully. You should be able to view your question/comment here within a few days.
Error submitting comment. Please try again momentarily.