
All it takes is one worn brake to throw your trailer off. Replacing a single ABS brake assembly restores smoother stopping and steadier tracking, so you stay in control on steep grades, in crosswinds, and during sudden traffic stops.
Note: These brake assemblies do not come with a sensor, you need to re-use your existing sensor when replacing your brakes.
California residents: click here
Videos are provided as a guide only. Refer to manufacturer installation instructions and specs for complete information.
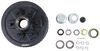
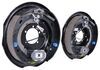
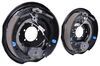
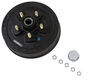
Hi, everybody. Andy here with etrailer.com. Let's take a real quick look at this Electric 10-Inch Right-Hand Trailer Brake Assembly for your Lippert ABS Hub. Now, this passenger side electric trailer brake is 10 inches by 2-1/4 inches. This is made for your Lippert ABS systems. This is going to fit your 13-, 14-, and 15-inch wheels with an axle rating of, with a trailer axle rating, rather, of 3,500 pounds.
And the mounting flange bolt pattern is going to be four bolts, as you can see there, and the hardware is installed. The integrated sensor's going to make this a suitable replacement for hubs that use the Lippert ABS system. And as you probably know, electric brakes are easier to install, and they offer more control, more user control than hydraulic brakes. They require only an electric brake controller, so no actuator or hydraulic lines are necessary. The automotive-grade friction material is molded to the brake shoes.
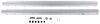
The pads are fully bonded, they're not riveted to the shoe, so that's gonna give you longer life and more braking torque, so there's less chance of cracking and crumbling that can lead to a mechanical lockup, thanks to the tapered edge and the circular grinding. Now, I did wanna point out, I said that this was 10 by 2-1/4. Just wanted to confirm that measurement with you. So from end to end, you can see, diameter is 10 inches, and then the width of the pad is 2-1/4 inches. Now, this is a self-adjusting brake, so it does not require the periodic manual adjustment like standard brakes do.
So as you can see, we do have this steel cable here that's attached to this pulley. I think you can see that. And then that is connected to the star wheel here, so it's gonna automatically adjust that. However, you can make fine adjustments if you wanted to manually. It's not required, though, but there are adjuster plugs here that are included that's going to cover the access holes to keep the dirt and grime out of the assembly and off the shoes.
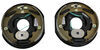
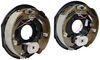
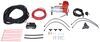
But a fine-tooth brake adjustment gear, that star gear, is going to allow for a more precise setting if you so desire. The E-coated backing plate is going to resist wear and corrosion. This is QAI and CSA certified. This does not include nuts or lock washers, so if you don't already have those, on your screen, I am including our model number for that kit. You can just take that model number and pop it in the search field of our website. That will take you to those nuts and washers, and you can add that to your order. So again, this is going to be for the right-hand or the passenger side of your trailer, but we do also provide this in a kit and also just the left-hand side. So if you are looking for the left-hand side by itself, you see the model number there. If you need both the left and the right, you see the item number there for you as well. So whichever one's gonna work best for you, just take those appropriate numbers, and, like I said, pop it in the search field of our website, and that will take you to what you're looking for. One other thing I wanted to mention in case you we inchesre interested, most assemblies nowadays will have a sticker indicating if it's right or left. So we have a sticker here on the back and a sticker here on the front that says this is going to be for the right hand of your trailer. But if you don't have a sticker there letting you know which way is which, a way that you can tell just by looking is if you see here, on this side, the brake pad is short, and on this side, the brake pad is much longer. So on the side where the brake pad is the shorter one, that's the primary brake shoe or the primary brake pad. That always points to the front. So as you can see, since this shorter brake pad is pointing to the front, that's going to make this the passenger side. You can see where this is going to be on the passenger side. So that's just another way to determine if you have a passenger side or a driver's side assembly. So hopefully that little bit of information was helpful if you didn't already know that. If you happen to have any other additional questions, don't hesitate to give us a call. Again, we wanna make sure that you're getting exactly what you want and need. Well, that's gonna wrap up our quick look today. I do hope that it was helpful for you. Again, my name is Andy. Thank you for joining me.
Ratings & Reviews

Had a hub issue with one side, so I rebuild both sides of the axle. Probably could get away with new shoes, but for the price..... its 4 bolts and everything is new. Going to put another set on the other axle soon.
Info for this part was:
At etrailer we provide the best information available about the products we sell. We take the quality of our information seriously so that you can get the right part the first time. Let us know if anything is missing or if you have any questions.


Thank you! Your comment has been submitted successfully. You should be able to view your question/comment here within a few days.
Error submitting comment. Please try again momentarily.