
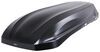
Thule WingBar Edge Roof Rack for Flush Rails - Aluminum - Silver - Qty 2


To see if this custom-fit item will work for you please tell us what vehicle you'll use it with.
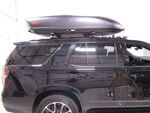
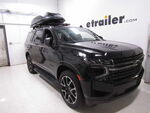
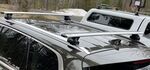
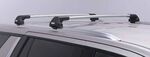
This aerodynamic Thule roof rack mounts flush on your roof for a sleek, factory look. Crossbars with split rubber strips in top channels work with channel-mount and clamp-on accessories. Installs to flush rails on your vehicle's roof.
Features:
Specs:
 Alternate Instructions
California residents: click here
Videos are provided as a guide only. Refer to manufacturer installation instructions and specs for complete information.
Hi, everyone. I'm Evangeline right here at etrailer. Today we have our Thule Roof Rack System. It's a very sleek, low profile, looks great roof rack that can carry a lot of cargo. And we're taking a look at how it looks and I'll show you how to get it all installed on a 2016 Audi Q5. It's pretty important to get the correct roof rack for your car.
Because there's so many different types of kits out there, we have a fit guide where you put in your year, make, model, and the type of roof you have, and then you can see all the kits that are custom fit for your car. For example, this one. Now this is gonna be the very flush style roof rack where you can see how it just stops right here at this nice curve. It is also designed specifically for the flush rails of the Audi Q5. So not only do you have style, but you also have a custom fit.
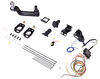
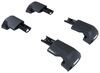
You have the ability to lock this with a screwdriver, but when you have it in the unlocked position, you can take off the end cap, which reveals how this roof rack looks. So you can see the crossbar up top. If you wanted to channel mount accessories, you would go through here, you can see the tower giving our structure, but then you can also see these hooks and this pad. This installs onto those flush rails. And a special note for this specific roof rack is that you can install this almost anywhere you have a level spot on your rails.
So if you need to adjust for a different crossbar spread, you can do so. That's a distance from one crossbar to the other, the distance apart. And I have this roof rack matched up to pretty close to where Audi has their factory roof rack set to. And that's gonna be from one bar to the other, 28 inches apart. That's gonna be really good for most applications that require a length.
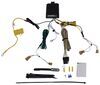
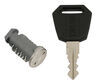
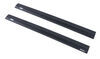
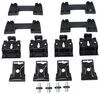
28 inches is right there in the fits most things. However, looking at the Audi Q5, you'll notice since this rail isn't really that long anyways and the back does slope down a little bit, our rear crossbar is a little angled downwards. So if you're looking for a very level experience, maybe you have a roof box that looks like it might be tilted upwards, you can move this over where it's a little bit more level with your front bar. But for most accessories, this is gonna be a great fit. But right here from the roof to the bottom of the bar, I have around two and a quarter inches. That's gonna be pretty small. So be mindful of those older accessories that have large hardware that goes around the bar. You might not have enough space. Try to look at things that have low profile clamps, or if possible, channel mounted accessories. Next up is the height added to the top of the roof. So top the roof to top of the bar right here is maybe three and a half inches, three and a quarter inches, or three and three quarter inches depending on where you measure. And that means that this will be pretty low to your roof. Things won't sit as high up, which is good in some cases. But if you have, let's say, skis with tall bindings, you wanna make sure that you have enough clear so those bindings aren't scratching up your roof. If you find that might sit a little too low, well, we have plenty of accessories to help out with that. For example, ski carriers that give you that extra height and that extra clearance. With the sunroof, you'll also wonder about how much that will take up in terms of space. So here we are opening up our sunroof. You can see that as it opens up, it does take up space underneath the crossbars. Let's set it to right about there. And that gives you a good reference for the distance. From underneath the bar to the top of the sunroof, around an inch and a quarter. So it's still clear, but it's close. With this being a smaller car, if you're on a road trip and you have your friends, your family, and all your gear, being able to put a roof box on your roof is awesome. Or you can carry around your bikes, or a kayak, things like that. Now for me personally, with a Thule WingBar Edge on this Q5, I love how it looks. It's very sleek, it looks great. This is something that I would recommend for people that want that roof rack on there all the time, but they might be using it occasionally. So if you like the look of this roof rack and you're curious about how to get it installed, stick around. Once you get this roof rack, if you're taking it on some cool adventure, I'd love to hear about it. Send us a picture, send us your story. Let us know how you're using it and maybe inspire other people along the way. My name is Evangeline. Stick around for the install. First up, you have to install these wind strips. So these will be stored with your crossbars. And you do have to split them apart first, and then push them into your crossbar. So a thing to note here is that you will have wind strips with arrows. Those will be pointing towards the front of your bar. And then the flat wind strip, that's gonna be right where your Thule logo is, which is going to be the back of the bar. Once you've secured the wind strips for both of your crossbars, then you can attach the towers. You will have a left and a right tower. So when you pull off that end cap, which may require a little bit of muscle, there will be written somewhere on the tower, "left" or "right." You probably won't be able to see if it's gonna be in this general area. But another way to confirm which side is left or right is when you line it up with your crossbar. So note here, the shape of the bar. I have a little bit more space to the side, which matches up with the space to the side of the tower. And then, as you push the tower in, you're gonna see that there is a hole on that crossbar. So you have to get this tab here into that hole. My tip here is I use the Allen key to push down on that tab, and that helps me push it into the crossbar, just like that. And then once I have it underneath the bar, I can just continue pushing until it secures in that tab. Grab the rubber pad once the towers are on there, and I just fit the rubber pad gently onto the towers. This is not the actual installation spot, this is just to protect the vehicle as you go to this next insulation step. You lift your crossbars onto your roof. You can gently set them on the flush rails. Now you don't have to think too hard about where you put the crossbars just yet. You can always adjust it a little bit back and forth, but you do wanna aim for the same spot on both sides. And you can also pull and adjust on these towers if needed to get up to your flush rails. Take off that rubber pad, and we're gonna attach hook letter "A." "A" will be stamped onto the hook, and then it fits onto the tower just like that. It'll be held in place by rubber pads with the stamp B. So then push that in to keep that in place. And then once that's in place, so you can then grab the other hook, labeled "C," and then that will go onto the lip of A, and then go around the lip of the flush rail. And then everything is secured with these nuts that are included with your kit. Once you have both sides secured to the flush rail with your hooks and your pads, then it's time to tighten down that nut with the included Allen key. Now if you didn't know, this Allen key is actually a torque tool where it does have a torque spec, so make sure you don't overtighten. Keep tightening until the torque tool clicks. Make sure both sides click, and that's how you know you have the proper tension. With your end caps, you're gonna have these plastic lock cores. And these are super easy to just push right in. Then you're gonna use a flathead screwdriver to turn it to a lock. Or you can replace this with Thule One-Key System lock cores. Those are purchased separately. Once those lock cores are in place, you then push the end caps onto the towers, and then lock the core to keep that end cap in place. And that's gonna be it for your installation. Now you have a roof rack for all those fun things.


Do you have a question about this Roof Rack?
Info for this part was:
At etrailer we provide the best information available about the products we sell. We take the quality of our information seriously so that you can get the right part the first time. Let us know if anything is missing or if you have any questions.


Thank you! Your comment has been submitted successfully. You should be able to view your question/comment here within a few days.
Error submitting comment. Please try again momentarily.