
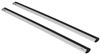
Thule WingBar Evo Roof Rack for Raised Rails - Aluminum - Silver - Qty 2


To see if this custom-fit item will work for you please tell us what vehicle you'll use it with.


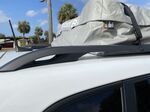
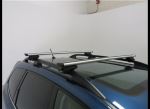
This Thule roof rack lets you carry cargo and gear on your vehicle. Aerodynamic crossbars with split rubber strips in top channels work with channel-mount and clamp-on accessories. Installs to raised rails on your vehicle's roof.
Features:
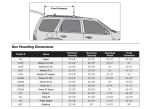
Specs:

California residents: click here
Videos are provided as a guide only. Refer to manufacturer installation instructions and specs for complete information.
Hi, this is Scott with etrailer. Today we're taking a look at and installing our Thule WingBar Evo for Raised Rails on our 2025 Subaru Forester. Our Thule roof racks we have on our Subaru today are gonna be a good option for anyone looking for a good way to carry their kayaks on the roof of their Subaru. Or I've seen people even use bike racks up there, that mount, you know. Rooftop carriers are also a good option. Gives you a little more room to put some stuff on top.
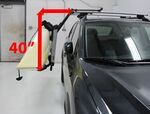
These look really good and they function really well. The security on these is also really nice 'cause you can change it up. You can add on security features like locks on all of your mounts. As far as measurements go, from our roof to the bottom of our bar, we're looking at three and three quarters inches. And with that measurement you'll be able to decide if you have a sunroof or a moon roof, if you'll be able to open that up.
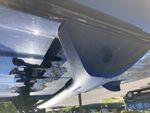
And that's how much clearance you're gonna have. Now, as far as overhang for the edges of your bars, they do stick out a little bit. I'd say maybe three to four inches on the sides. So, it's not something you're gonna be bumping your head on or anything like that. And also, where you mount these, you can kind of move these around where you want 'em, and to have 'em.
It kind of depends on what you have for accessories, but you can loosen these up and move these back and forth wherever you want them. To start our installation, we got all of our parts out and we wanted to make sure we had everything in our kit. So, what we have is this rubber strip and that's gonna come as one piece. So, what we want to do is just pull that apart, (strip pulls) all the way down, and we're gonna have a flat side. We're also gonna have a side with arrows on it.
Now, the side with arrows, we're gonna want on this part that's wider in the front. All we're gonna do is get that lined up on our ends and go along and pop that in place. Now, for our flat strip, we're gonna just pop that in place on the other side. Now, in your kit, you're gonna have this plastic piece. You're gonna have four of these. And what this is gonna do is it's basically gonna slide into this end of our bar. And we want our notch to go all the way to the end. And what this is gonna do is it's gonna serve as a built-in tape measure, but also what it's gonna do once we get our ends in place, these are gonna go towards our ends and act as a wind dampener so we don't get any whistling. So, they kind of serve a dual purpose. After we have those installed, we'll take our ends and we'll just get that slid in place (end rattles) and we'll do that on both sides. Now, we can get our end caps installed. We're gonna have this little end here that's gonna have a little clip and we want that to match up with this. What we'll do is get that started, (hand taps) just give that a tap. (hand taps) They can be a little tricky to get installed. (hand taps) (hand taps) Give 'em a tap and those will click in place. Now, on your end, you're gonna have these end caps. Just wanna pop them off. Just push that little tab and pull them off on both sides. (end cap clatters) Now, we can get our bars put on top of our vehicle. Now, you're gonna have two different sides. You're gonna have this side that kind of tapers down. You want this wider part to be facing the front of the vehicle. Now, when we get these put in place, you're gonna have this rubber flap. You want this rubber flap to be out. You don't want that bound up, up under here. You want that to kind of lay over the top of your bar. Now, once we're getting our racks put in place, we wanna make sure that we check our measurement between these two points. We wanna make sure it's the same on both sides of our vehicle. Another thing we want to check is our measurement from the edge of our rack out to either the end of this or to the silver point. We want those the same on both sides. And we'll do the same with the rack in the rear. We want the measurements to be the same here and that same on the other side. Once we get to that point, we can come back through and we'll just tighten down our mounts with our supplied wrench. This is gonna be basically a torque wrench. We're gonna tighten it down so far and once it gets to the torque that it needs to be at (wrench clicks) it's gonna give us an audible pop. And once we have that tightened down, we'll take our cap, pop that in place. Now we'll turn the little cylinder and that will lock our cap on. And that was a look at our Thule WingBar Evo for Raised Rails on our 2025 Subaru Forester. I'm Scott with etrailer and thanks for watching.

Do you have a question about this Roof Rack?
Info for this part was:
At etrailer we provide the best information available about the products we sell. We take the quality of our information seriously so that you can get the right part the first time. Let us know if anything is missing or if you have any questions.


Thank you! Your comment has been submitted successfully. You should be able to view your question/comment here within a few days.
Error submitting comment. Please try again momentarily.