
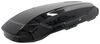
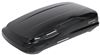
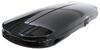
Inno Aero Flush Roof Rack for Raised Rails - Aluminum - Black - Qty 2


To see if this custom-fit item will work for you please tell us what vehicle you'll use it with.


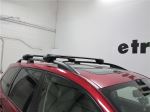
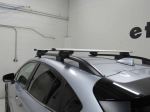
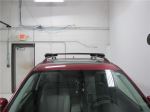
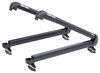
This aerodynamic roof rack mounts flush on your roof for a factory look. Crossbars with push-down rubber strips in top channels work with channel-mount and clamp-on accessories. Installs to raised rails on your vehicle's roof.
Features:
Specs:

Videos are provided as a guide only. Refer to manufacturer installation instructions and specs for complete information.
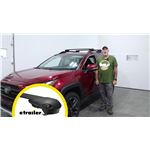
Hi, Bruce with etrailer. Today, we're gonna talk about and install the INNO roof rack on our 2023 Toyota RAV4. The first thing we need to do is go ahead and determine what type of roof rack we actually have. Here, today, we're dealing with a raised roof rack, and how you can tell that is I can fit my hand between the bottom rail here and the top rail. With a flush mount roof rack, you're gonna have just this top part right directly to your roof. You won't be able to fit your hand underneath, and then you will also have a naked roof.
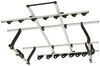
At that point, if you still can't decide, we do have a Fit Guide here at etrailer. Type in your year, make, and model, and we can get you set up. Having a roof rack is a great option. There are other options out there, like cargo carriers, but one, you need a trailer hitch for that and it makes your vehicle longer. Roof rack is great for kayaks, skis, and cargo boxes.
What's great about this roof rack is it is a flush mount versus an extended. Most of them will extend out about to the doorway there, and it's got some great integrated features. Let's take a look. Now, the kit does come with two items: your crossbar, which is 39 inches across, and then your tower. Let's go ahead and talk about the crossbar.
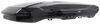
If you look on top, we do have a T-channel here, which opens up many mounting options. Since this is a flush mount, this will come in handy. And then if you look in thaT-channel, there is a piece of rubber that will cut down wind noise and keep any dirt and debris out. And if you look at the front here, it is kind of rounded, which will also cut down on your wind noise. Let's go ahead and talk about the end cap now.
This is a nice-shaped end cap, it's nice and round, it does look sleek, and it's also integrated with a lock, which some of yours are not. We go ahead and unlock that, the end cap comes off. And we have our integrated knob, which we don't need any tools to tighten this up or loosen it, so no tools to be lost, or forgotten, or left at home when you're trying to get the rack off somewhere else. Moving down to the strap, lift the knob up. It's got two hooks, and the strap rotates all the way around and gives you a solid holding feature versus a clamp. I really do like that on this unit. We're gonna go ahead and take a few measurements. The first measurement I'm gonna take is from the actual rail to the top of our crossbar. And right there, you're looking at just about 2 1/2 inches, which is great for any low clearances you may encounter. You should have plenty of room for any of them. Now, I want to take a measurement from the actual roof to the crossbar, and you're looking at about five inches. And the reason we're looking at that is if you have any bigger clamps or anything or like a sunroof, you should have plenty of room underneath not to worry about. What else I really like about this system is they are not fixed crossbars, so you can actually put these and spread these out anywhere you want because they're not gonna be fixed to a certain point that you have to deal with. One of the drawbacks I do see with the system, although I do like it, is the flush mount. You are gonna have to go ahead and reach for like ski carriers. You're gonna have to reach a little further to get your skis or your snowboards. The carrying capacity of these crossbars is probably gonna be more than your roof can handle, so just check your owner's manual of your vehicle, and just pick the lowest-rated component, and you should be fine. I really like the flush option, but if you're looking for the overhangs because you don't wanna reach as far to get your gear or anything, INNO does have an option for you for that. Either way you go, they're both gonna install pretty much the same. With that being said, let's get to the installation. To begin our installation, I like to lay out all the parts we have. So we have our tower, our end caps, the keys for our end caps, and the actual crossbar itself. We will start with the orientation of our crossbar. If you notice on this crossbar, you've got a thinner part and a thicker part. The thicker part will go towards the front of the vehicle, and we'll take our tower, and these are left and right towers, so make sure you have it on the corresponding sides. And begin that, we'll flip our crossbar over. These will snap into this groove here (crossbar clattering) and slide back out till it stops, and we'll do the same thing on the other side. I'm gonna give you a little tip. After some use on these, if you notice these two pieces here, they're pushed in. Those actually need to be pushed out a little bit before they will fit in that groove. So, all you have to do is come on the backside and push down and make sure those tabs are oriented in the down position, away from the plastic piece. Now, I like to start with the back side or the opposite side what you're standing on, and you kind of just get it up there close, you'll be good, and then get this one down. And then we'll go to the other side and get it clamped down. With the bar setting on top of the rails, now we've gotta go ahead and make sure we've got it even on both sides. And you can use a marker on the vehicle, which on the other side, we've got it centered with this line here. Or if you want a more exact measurement, you can take a measurement from any point you choose. If you go from here, we'll go to the end cap. Here, you're looking at three inches. You would just do the same thing on the other side. We have our bars where we want them, so we're gonna go ahead and clamp them down. You notice it's got a little knob here. You wanna lift that knob up a little bit. And the strap, you want the strap to go in these two hooks right here, these two little tabs go in these hooks. If you notice this is not reaching, so what we need to do is go ahead and loosen that strap up before we can go ahead and connect this. We just needed enough, we can get them tabs up in the hooks. Once we've got that, go ahead and start tightening it down. Now, I do recommend that you go side to side tighten this down, because sometimes the actual crossbar can move on you. So if you just do a few rotations on this side, go to the other side, do a few rotations as well. Now, when you're tightening this up, you just keep going until you get some resistance. Once we're there, right there's good enough. Go ahead and put your knob back down into into position, give it a little shake, and it seems like we're latched down very well. We're gonna take our end cap, and go ahead and put that on the end, and lock it up. (lock clicking) Once we have the rail complete on the front, you can go to the rear and do the same process as we showed you here. That completes our installation of our INNO roof rack on our 2023 Toyota RAV4. I'm Bruce, thanks for watching.
Ratings & Reviews


Info for this part was:
At etrailer we provide the best information available about the products we sell. We take the quality of our information seriously so that you can get the right part the first time.


Thank you! Your comment has been submitted successfully. You should be able to view your question/comment here within a few days.
Error submitting comment. Please try again momentarily.