
To see if this custom-fit item will work for you please tell us what vehicle you'll use it with.


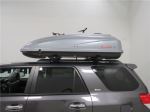
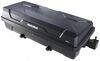
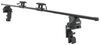
This sleek, aerodynamic roof rack provides space to carry gear on your vehicle. Crossbars with push-down rubber strips in top channels work with channel-mount and clamp-on accessories. Installs to raised rails on your vehicle's roof.
Features:
Specs:

Videos are provided as a guide only. Refer to manufacturer installation instructions and specs for complete information.
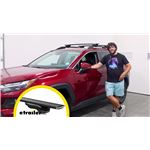
Hi, I'm Matt with etrailer. If you have a 2023 Toyota RAV4 and you're looking for a roof rack that has a lot of integrated features and a lot of bang for your buck, then the Inno Roof Rack is gonna be a great option for you. So let's check it out. One thing we need to check first is what type of roof you got. So today we do have a raised rail option, and that's what this kit is gonna work with. The way you can tell is if you can get your hands underneath your rails, you've got a raised rail.
Now if you come over here and you can only grab onto the rail, that's gonna be a flush option. And if there's no rails up here whatsoever, that's gonna be a naked roof option. So what I'd recommend doing is just putting in your vehicle's information into our fit guide to find the right one for you. And what's great about roof racks are they're gonna allow you to carry a lot more accessories on your vehicle, because trying to cram everything in here can lead to very tight situations, or maybe that stuff just won't fit back there if you have anything longer, like kayaks or skis. Now another great option is putting something into your hitch receiver, whether it be a trailer or a hitch carrier.
Those are great, but they're gonna take up a lot more space where you're driving. And the nice thing about that roof rack is it's gonna keep the footprint of your vehicle just the same. It won't extend it out any further. So if you're in a tight spot, you don't have to worry about it as much. Now what's making the one we have today unique is, like I said earlier, is gonna have more integrated features, and those integrated features allow this to be an easier rack to work with.
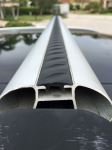
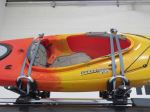
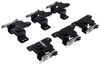
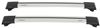
And our kit today is going to be comprised of two parts. There's gonna be the crossbar on top, and there's gonna be the tower beneath it. So looking at the crossbar, this is gonna be 48 inches in length. And it's gonna be an aero style bar. What that basically means is gonna be more aerodynamic to help reduce wind noise.
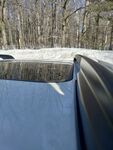
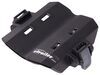
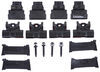
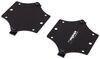
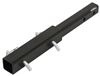
We'll also gonna have this T-channel right here, and that T-channel is gonna be where you can actually mount additional accessories, just in case you're running into the issue, if you have any clamp on accessories that just won't work with your tower right here, you'll have more real estate to work with now. And we're gonna have this built-in rubber weather strip. That weather strip's going to prevent any wind from whistling through there, and it's gonna keep any debris of water from settling in here either. And moving down to the tower, you'll notice we do have this lock on here. That's pretty nice, 'cause a lot of roof racks don't come with lock cores. That's nice that we get that right out of the box. If I unlock that real quick, remove that, you're gonna see what we have underneath here. So underneath here we do have this little knob. And this is great because this is what you're gonna use to tighten everything into place. I like that it's only one point, so there's not too much of a mess underneath here. And it's integrated, so you don't have to worry about having any additional tools or losing anything. And that's gonna tighten the strap that goes all the way around and secures right here. You're basically gonna have this middle bar that grabs onto these hooks, and this has given us a pretty good fit. Now you'll notice this wraps completely around, so I think that gives us more peace of mind. Now I've seen some better fits out there, like the Rhino Rack Roof Rack. I think that's a great fit that's more of a clamp-on style. But I think either one you go with, it still will be a great choice. Let's get a few measurements just to see how this is gonna live up here. So the first one I like to get is the overall height this adds. So I'm just gonna measure from our rails to the top of our crossbar, which is gonna be about two and a half inches. So that's pretty low profile. So what I still recommend doing though is taking the total height of a vehicle, your crossbar, and if you have anything on top of that, just in case you're going through a really low clearing area like a garage. The second measurement I like to get is gonna be the distance underneath the crossbar. And we're looking at just a little bit over four inches, which is plenty of space to work with. But if you have any really bulky clamps and you have a sunroof up here that expands pretty high up, I'd just recommend keeping an eye out for it. The next few measurements I wanna talk about are gonna be the crossbar spread. Now what's nice about this is we're not using a fixed mounting point. So you can really adjust this to fit your needs, because different types of accessories will have different types of crossbar spread needs. But what we can really focus on is gonna be our overhang. And it's going to be a little bit dependent on where these crossbars are. So over in the back, you'll notice we have a little bit of space to work with here. So this is gonna stick out about two and a half inches. If you have any smaller accessories like ski carriers, that should fit here 'cause those straps aren't very large. But when I go to the front side, you'll notice we have a lot less space. That's only gonna be a little bit over an inch. And the reason why is 'cause this roof actually tapers out a little bit, so it's gonna be a little bit wider in the front of it. So you might not be able to get some of those accessories at this point. And that's one of the good things about having this T-channel up top, because it'll open you up to more opportunities. And this is gonna have a pretty good weight capacity. And what's probably gonna be your limiting factor is gonna be your roof. So what I'd recommend doing is finding that in your owner's manual, and then going from the lowest rated component. As for how it holds up, I think this is a pretty great fit. One of the only downsides I see with this one though is just pretty much the aesthetic. I'm not a big fan of the design of the towers. They are a little bit rounded, and I'm not too crazy about this little silver area that goes through the center of your crossbar. That's just my personal opinion. I think if I we inchesre to compare it to anything else, if you are looking for a nicer look, then I'd recommend the Rhino Rack Roof Rack. We tried that out earlier today and I think that looks really nice up here. It's just more of a sleek design. But that one's not gonna have as many integrated features as one we have today. And if you're curious about the installation, just stay tuned, we'll walk you through the process. To start off the installation, I like lay everything out. So right here we're gonna have the crossbar itself. We're gonna have the tower. Along with that, we're gonna have the end cap. We have a set of keys that come with this. And I'd like to grab a tape measure, just to make sure everything stays even. Where I'd like to start, it's actually width installing the tower. Now this is gonna be pretty easy. All we have to do is flip this around. A lot of times you will have to take off this end cap. Not with these crossbars though. All we're gonna do is come over here. You're gonna have this little square. You're gonna press on it, push it underneath, push this all the way over here until you have this large opening. That large opening is gonna house these little tabs. So I need to make sure I put it on the right orientation. So I wanna make sure this little tab here is sticking out, away from the center of the crossbar. And I'm just gonna push those together to kind of feel it grab on. And before we do anything else, I'm just gonna apply pressure and push it out, just so it locks into place. And then I'm gonna do that on the other side. At this point, I'm just gonna put it on my roof. And to do that, we need to make sure it's in the right orientation. So we wanna make sure this thicker point is in front of us and the thinner point is behind us. And to do this, we're just gonna lift up, put it roughly where we want it to sit. If it's not sitting up there perfectly, that's okay, we can adjust it later on. But basically, you want to make sure this rubber strap is wrapping all the way around and we're getting a seat just like this, where it's almost flush at this point right here. With it in place, let's start getting some measurements. We wanna make sure it's even either side. So you can go about this two ways. You can find a point, so let's say the front of this crossbar, and let's say we're gonna line it up with this door right here. You can do it that way. Now if you want a more precise way of doing it, you can just grab that tape measure. I wanna find a location that's the same one either side, like the very edge of this opening. And I'm gonna measure to the very edge of our tower. Once you're doing that, you're just gonna do the same thing on the other side and make sure it's the same measurement. Now we can get our overhang. So I find the best way to do that is to use that tape measure, probably from that little knob here, all the way out. That's gonna be about an inch right here. I'm just gonna make sure it's the same distance on the other side. If it's not, I'm gonna adjust that. I'm just gonna come to the very end to the side that has a little bit more overhang and I'm just gonna tap on it until it's even. When you're still cinching this this into place, I find the best way to do that is just to come over here and use this little knob here. And we're just gonna take our time with it. The best way to do this is to tighten this until you have just a little bit of resistance, and then just go to the other side. You repeat that same process, just going back and forth, just so you don't tighten it too much and it pulls to one side, giving you an uneven fit. Eventually, you're gonna hit a point that you have a lot of resistance. Once you get to that point, then you can pretty much stop. I like to try to keep this centered up, angled just like this. And you're just gonna put your end cap into place and lock it up. Once that's locked up, I recommend coming by and just giving it a good shake test, making sure it's not gonna go anywhere. And if this feels pretty solid, you can repeat this process on the backside. But that was just a look at the installation and some of the features of the Inno Roof Rack on our 2023 Toyota RAV4. I'm Matt. Thanks for watching.
Ratings & Reviews


Do you have a question about this Roof Rack?
Info for this part was:
At etrailer we provide the best information available about the products we sell. We take the quality of our information seriously so that you can get the right part the first time. Let us know if anything is missing or if you have any questions.


Thank you! Your comment has been submitted successfully. You should be able to view your question/comment here within a few days.
Error submitting comment. Please try again momentarily.