Hey Steve, thanks for reaching out. That old Hydro Flame 8241 was a solid unit back in the day, but it’s been discontinued for quite a while. What I recommend for replacing it is the Dometic RV Furnace #DMC98RR. It’s compact (16-1/2" W ×…
Hey Kristoper, we have just what you need with the Dometic Furnace part #DMC54RR which has exact same dimensions as what you had at 16 1/2" W X 7" H X 20" D and also this has same 30k BTU rating so it will work perfectly for you. How…
Hi Harvey; the DFMD35 series (same as your AFMD35121) has been discontinued. This leaves you with two options. You can either downsize to a 30k Btu unit or move up to the 40k unit. The 30k will fit in your existing space but you will have a little…
Hey Gary, I looked up your Atwood 2334DCLP and it's a 12k BTU furnace that is designed for the standard RV furnace openings as it measures 7 inches high x 12 inches wide x 20 inches deep. The Dometic part #DMC86RR would work great in place of…
Hey Gwen! The distance from the center of the mounting hole to the bottom of the Trailer Valet JX Trailer Jack #TV35FR when fully retracted is 13.44". If you’re measuring from the bottom of the pipe mount instead of the center of the hole, that…
Yes, it will Bob. The Dometic RV LP Gas Furnace item #DMC64MR is also a 35,000 btu furnace that heats with LP gas and 12V power. It measures 20" deep x 7" tall x 16-1/2" wide. It can be installed in a horizontal or vertical…
Hey Tom, thanks for reaching out. Yes you are on the right track. The Ducted Air Distribution Box #LC64DX (2024040312) will indeed work with the Furrion Variable Speed Chill Cube RV Air Conditioner w/ Heat Pump #FR24TQ (2025008216). They are made…
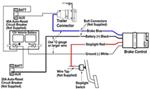
Hey Anthony! The outer diameter of the weld-on pipe coupling on the Trailer Valet JX Trailer Jack #TV35FR is 2.01". I went ahead and attached some dimensional drawings below for your reference. What kind of trailer do you have?
Hey Jason, thanks for reaching out! Your 2022 Grand Design Transcend Xplor 265BH either has 3,500 lb axles or 4,400 lb axles. Both are listed out on the Grand Design website so you'll just need to check out the tags in the middle of your axles to…
Hey Michael! Since you were looking at the SoftStartRV Soft Start #SSR54FR are you wanting that built in as well? The Active Controls ActiveStart Plug-In Soft Start for RVs #AS94FR is a soft start and surge protector all in one. If you aren't…
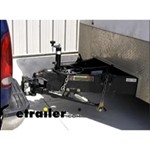
Hey Joe. For your 2024 Ram 2500, you'll need the B&W Turnoverball Underbed Gooseneck Trailer Hitch w/ Custom Installation Kit item #BWGNRK1320. This 30,000 lbs capacity gooseneck hitch fits all both bed lengths and the diesel models. This…
The LED Fabric Light Kit with Switch/Plate for Solera RV Awning - 21' Long #LC674283 can but cut to fit your 20' Solera RV awning. According to Lippert, this LED kit is for 16'-21' awnings and is designed to be cut down to fit…
Hey Steve, thanks for reaching out. That old Hydro Flame 8241 was a solid unit back in the day, but it’s been discontinued for quite a while. What I recommend for replacing it is the Dometic RV Furnace #DMC98RR. It’s compact (16-1/2" W ×…
Hey Kristoper, we have just what you need with the Dometic Furnace part #DMC54RR which has exact same dimensions as what you had at 16 1/2" W X 7" H X 20" D and also this has same 30k BTU rating so it will work perfectly for you. How…
Hi Harvey; the DFMD35 series (same as your AFMD35121) has been discontinued. This leaves you with two options. You can either downsize to a 30k Btu unit or move up to the 40k unit. The 30k will fit in your existing space but you will have a little…
Hey Gary, I looked up your Atwood 2334DCLP and it's a 12k BTU furnace that is designed for the standard RV furnace openings as it measures 7 inches high x 12 inches wide x 20 inches deep. The Dometic part #DMC86RR would work great in place of…
Hey Gwen! The distance from the center of the mounting hole to the bottom of the Trailer Valet JX Trailer Jack #TV35FR when fully retracted is 13.44". If you’re measuring from the bottom of the pipe mount instead of the center of the hole, that…
Yes, it will Bob. The Dometic RV LP Gas Furnace item #DMC64MR is also a 35,000 btu furnace that heats with LP gas and 12V power. It measures 20" deep x 7" tall x 16-1/2" wide. It can be installed in a horizontal or vertical…
Hey Tom, thanks for reaching out. Yes you are on the right track. The Ducted Air Distribution Box #LC64DX (2024040312) will indeed work with the Furrion Variable Speed Chill Cube RV Air Conditioner w/ Heat Pump #FR24TQ (2025008216). They are made…
Hey Anthony! The outer diameter of the weld-on pipe coupling on the Trailer Valet JX Trailer Jack #TV35FR is 2.01". I went ahead and attached some dimensional drawings below for your reference. What kind of trailer do you have?
Hey Jason, thanks for reaching out! Your 2022 Grand Design Transcend Xplor 265BH either has 3,500 lb axles or 4,400 lb axles. Both are listed out on the Grand Design website so you'll just need to check out the tags in the middle of your axles to…
Hey Michael! Since you were looking at the SoftStartRV Soft Start #SSR54FR are you wanting that built in as well? The Active Controls ActiveStart Plug-In Soft Start for RVs #AS94FR is a soft start and surge protector all in one. If you aren't…
Hey Joe. For your 2024 Ram 2500, you'll need the B&W Turnoverball Underbed Gooseneck Trailer Hitch w/ Custom Installation Kit item #BWGNRK1320. This 30,000 lbs capacity gooseneck hitch fits all both bed lengths and the diesel models. This…
The LED Fabric Light Kit with Switch/Plate for Solera RV Awning - 21' Long #LC674283 can but cut to fit your 20' Solera RV awning. According to Lippert, this LED kit is for 16'-21' awnings and is designed to be cut down to fit…
An RV furnace is essential for keeping your mobile home warm and comfortable during chilly adventures. When choosing one, consider factors like heating capacity, fuel type, and efficiency. A reliable furnace ensures you can enjoy your travels without worrying about the cold.
Choosing the right size depends on your RV's square footage. A furnace with 20,000 to 30,000 BTUs is typically suitable for most RVs. Consider your travel destinations and climate; colder areas might require a more powerful unit to maintain comfort.
Regular maintenance is key. Clean the vents and filters to prevent blockages, check for gas leaks, and ensure the thermostat is functioning properly. Annual professional inspections can help catch issues early and extend the life of your furnace.
Yes, many modern RV furnaces are designed with energy efficiency in mind. Look for models with high AFUE ratings, which indicate better fuel efficiency. These units not only save on fuel costs but also reduce environmental impact.
RV furnaces typically use propane or electricity. Propane is common for its efficiency and availability, while electric models are quieter and can be more convenient if you have a reliable power source. Consider your travel habits when choosing.
If your furnace isn't working, check the thermostat settings, ensure the propane tank is full, and inspect the power supply. If it still doesn't work, the issue might be with the igniter or blower motor, which may require professional repair.


 Filters