
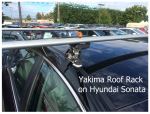
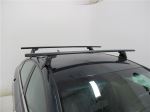
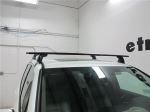
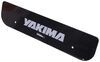
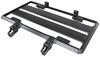
Yakima BaseLine FX Roof Rack for Naked Roofs - JetStream Crossbars - Aluminum - Black - Qty 2


To see if this custom-fit item will work for you please tell us what vehicle you'll use it with.

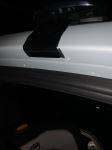
This aerodynamic, flush-mount roof rack lets you carry gear and cargo on your vehicle while maintaining a clean, factory look. Crossbars work with channel-mount and clamp-on accessories. Installs on your vehicle's naked roof.
Features:
Specs:
 Alternate Instructions
California residents: click here
Videos are provided as a guide only. Refer to manufacturer installation instructions and specs for complete information.
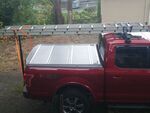
Hello neighbor, this is Curt with etrailer and today we're gonna be taking a look at the Yakima BaseLine FX roof rack and we're gonna see how it fits and how it installs on our 2024 Ford Escape. Now a roof rack is an excellent way to carry that cargo that you either don't want in the vehicle with you or just simply won't fit in there. And there's gonna be situations where maybe you're taking the Escape on a trip and you've got three passengers with you. It's a group trip. Everybody's got all their stuff, all their luggage, and while the Escape does have a decent amount of cargo space for the vehicle size back here, it's not gonna be enough to have four people's luggage back there, plus whatever else you're bringing on the trip. So a roof rack is gonna be an excellent option to get that stuff to and from your destination.
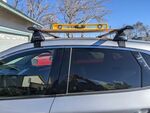
There's all kinds of accessories that can go up here, including rooftop cargo baskets, platform racks, cargo carriers, kayak carriers, snowboard carriers, all kinds of things that you can use with your roof rack just to make your trip that much more enjoyable. And taking a look at this particular roof rack, first and foremost, it has a weight capacity of 165 pounds. However, you always wanna double check your owner's manual for the vehicle's rooftop capacity. If it's lower than 165 pounds, then that's the capacity that you're gonna have to stick with. These are flush mounted roof rack bars and what that means is that the bars are going to dead end into your towers rather than come out past them.
And for a vehicle like the Escape, I think that's a really good thing. For one, the roof's not that high, so if you get too much overhang out here, it could become a hazard as far as hitting your head. The other thing about a flush mount is that you are kind of forced to use your accessories toward the middle of the vehicle. The Escape is not that tall of a vehicle. So standing up in the door threshold, you should have pretty good access to whatever you're putting up here.
The things that you can't use, however, with a flush mount are things like roof rack awnings. You need an overhang in order for those to deploy correctly. The other thing would be any kind of lift assist kayak carrier, those need an overhang because they need to be able to go up and down on the outside. And we do have an overhang roof rack option from Yakima, and it's available right here at etrailer. So let's take a look at just how this fits on the roof of our Escape.
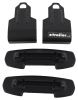
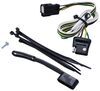
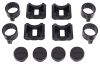
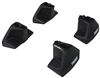
First and foremost, the measurement that I want to take is going to be our crossbar spread. That's the distance between the two bars. And the reason that that measurement is so important is that every rooftop accessory has a minimum and a maximum crossbar spread allowable in order to use that accessory. So the crossbar spread that we have here is going to be right at 28 inches. So 28 inches is a pretty good spot to be. Most rooftop accessories they'll fit 25 to 35 inches and you're just fine. So 28, that's close to the middle of that. I'm not really too worried about finding rooftop accessories to go up here. The next thing we're gonna double check is how much height is this going to add to your vehicle Well, in the middle of the bar here, we get an added vehicle height of 2-3/4 inches. And if we're looking over here at the top of the tower, we're gonna end up being at about 3-1/4 inches. Now this shark fin antenna in the back sits up at about 2-3/4 inches. So that really sits right toward the top of the bar. Generally speaking, because you've got clamp mounts and things like that under accessories, whatever you're putting up here, a roof box say, should be able to clear over that antenna back there, but it's very close. So you do wanna be very conscious of the specs on that accessory to make sure you're gonna be able to clear that. And the last thing that we're gonna double check is going to be what clearance do we have underneath the bar Underneath the bar we've got about an 1-1/2. Now that's not a whole lot, but it should be enough room for clamp mount accessories to get underneath there and grab onto your bars safely. Now, I had mentioned that was the last measurement. There's actually one more that I think would be really, really valuable for you. So because the roof of the Escape tapers so aggressively, it starts out really wide up here at the front end and tapers very aggressively toward the tail end of it. We've really got two different bar lengths up here. So the bar in the front is longer than the bar in the back. So when it comes to usable bar space, we're really working with what's in between the two towers on our rear bar. So I'm gonna get a measurement of that and let you know exactly what you'll have to work with. So what we'll have up here is 35-1/2 inches of usable bar space to be able to use either our T track mounted accessories or our clamp mounted accessories. Now you might be wondering, well, can I move these forward, back, whatever it might be. Technically you can, but Yakima, in their installation instructions have some measurements for you to put them in some very specific spots, which is what we did today. So stick around, I'll show you exactly how we got these on the roof of our Escape. So to begin our installation, we're gonna go ahead and just lay out everything we need. We've already got our front bar installed. We're gonna show you how to install the second bar. The methodology is pretty much exactly the same. The only difference is gonna be a few measurements and a couple of the parts we use. So when you get your kit, what you're gonna notice is that you've got two different bars in two different bar lengths. You'll have one marked L and one marked XL. The XL is going to be your front bar, the L is going to be your back bar. So the shorter bar goes toward the rear of the vehicle because the roof tapers as you get toward the back of it. Therefore the smaller bar is gonna fit better on the back. But each of these is going to come with the towers already attached. So what you're really gonna have to add to it is going to be the fit kit. So pay attention to your instructions because there's a different fit kit for the front bar than the back bar as well. The front bar is going to take Kit BC137. The back bar takes Kit BC152, which we have laid out right here. It's gonna be your foot pads and your clamps. So to start things off, I'm just gonna go ahead and first remove the end cap off of the bar, which you could do just by pinching the sides of it and pulling it straight out. Once we do that on each side, we'll go ahead and turn the bar over. Now the foot pads come attached to this plastic foot right here, but the brackets that it goes on, the foot in the fit kit, they're too narrow. They won't really fit on here, but all you need to do is switch the pad out. So just remove the pad from there and put it on the pad that's already attached to the tower. So you're just gonna compress that around the edges, get a good flush fit. Yep, it can come detached. So we're just gonna pick it up and go from there. That could make it easier anyway, but just get good flush fit all the way around. And then when you have to reattach it, you wanna make sure to do so with this cavity here facing outward. So the next thing that we're going to need to do is figure out how far apart our towers need to be. Now there is a measurement for that in the instructions. On the back bar it's going to be your M3 measurement. On your front bar it'll be your M1 measurement. So we're looking at the M3 measurement, and on each of our towers we have this little hash mark etched in right here in front of these bolts. We've got it on the other side as well. The M3 measurement is going to be the distance between those two hash marks. There is also a mark indicating the center of the bar as well. So you could double check just to make sure you've got an equal amount on both sides of that if you wanna make sure that you're gonna be really symmetrical. Now before you tighten it down completely, I always think it's a good idea to get it on the roof, make sure you've got it placed correctly and just double check that the width is right. We've already done that. So at this point now we're gonna go ahead and tighten that bolt back down completely. You'll know it's tightened down all the way when you get a popping sound out of the Yakima tool just like that. This is a torquing tool, so it's gonna let you know when you've got it tight enough. But now that we've got it all set and ready to go, let's go ahead and get it up on our roof. So when you're setting your bar up here, it's this kind of gutter or this strip up here is really where it's going to set just like that. Now as far as where up here, how did we determine where up here it needs to go Those are in your instructions as well. They are the M2 and the M4 measurement. The M2 measurement for your front bar is measured from the top of your windshield glass to the front of the base of the tower. The M4 measurement is going to be from the center of your front bar to the center of the rear bar. So you could actually do that any way that you want to. If you wanna measure it from the back of the bar to the back of the bar. That's what I did. That got it really accurate for me. But what you wanna make sure that you do on both of those measurements is double check it on both the driver and the passenger side. So we've got the same measurement here on the driver's side that we have on the passenger. We've got the same measurement here on the driver's side as we do the passenger. That's gonna guarantee that our towers are directly across from one another and that our bars are perfectly parallel. That way if they're parallel, we can put a cargo, put some stuff up there safely and get it to our destination. So once you get it in place where you need it, go ahead and grab your flathead screwdriver. We're gonna use it right here to get this unlocked. Alright, once that's done, you'll be able to lift up on this tab and pop this little door open. It's gonna expose this bolt. Now, in order to really get this to fit well, my suggestion would be to grab the included Yakima tool. We're gonna use it right through here and we're gonna loosen this bolt. Reason we wanna do that is this is where our clamp is going to attach and we wanna get as much slack as we can between here and around the inside of our door there. So I'm just gonna go ahead and loosen that all the way up for now. Make sure that I can get my clamp on and around the doorframe. And with that set through this little slot underneath here, I'm gonna go ahead and insert my clamp. Lemme just lift up a little bit. Now, one of the things too that you might wanna do is you can usually get this to kind of bow out a little bit more and give you some more slack, but this clamp will hook in just like that. There you go. You can expend it out and get it around the doorframe. Now in this case, we're a little bit shy. I am just gonna loosen this bolt up a little bit more, make sure that we can get it settled down in there. So with the clamp going around the edge of the door, I'm gonna go ahead and that bolt back up. I'm just getting this to the point where the clamp is snug, not too tight. Reason being is I wanna make sure that I can get this done over on the passenger side as well. If I overtighten one side, it can generally knock the other side loose from wherever it's at and you end up having to undo and remeasure everything. So once I get that other side set over there, what I'm gonna do is tighten that bolt down incrementally on each side until I get it tightened down completely. And just like before, when we get it tightened down enough, we're gonna hear that loud click or pop coming out of the tool just like that. Now we know that we're clamped down and we're in a good spot. Now what I usually like to do before moving on from here is after I get both sides tightened down, I just like to give it a little bit of a shake test. What I'm making sure of is I'm really just making sure that this is not shifting forward or side to side too much at all. It looks like it's in a pretty good solid position right now. Now since we got all of this tightened down, there is something that we noticed. The rain gutter up here gets a bit of a depression underneath our towers. Now this is going on on both the driver and the passenger side. We've got this exactly where Yakima asked you to put it. Now this isn't gonna hurt anything on the vehicle, it's not gonna do anything as far as the carrying capacity on the vehicle, but when you're installing it, it's something that you might see yourself and be concerned. My opinion, I actually think it's because this isn't a space where there's not really a support underneath the rain gutter. We've put other roof racks on here and didn't really come up with this result. Of course, depending on the manufacturer, they tend to have to place the bars in some different places. The other thing that I think is causing this back here and not so much on the front, is on the front, the foot pads, these rubber foot pads have a bit of a lip to it that comes out over the metal part of our doorframe here. So all of the weight doesn't sit directly on the gutter like our back bar. But like I said, this shouldn't hurt anything or hinder you as far as carrying capacity or anything like that. So we're going to move on with our installation. Now at this point, we're gonna close this door back up just like so. We'll grab our flathead screwdriver and we're gonna twist this and lock it down. Now that is the anti-theft security measure that you're gonna get from the Yakima right outta the box. My recommendation though would be to take advantage of their SKS or same key system and get yourself a set of metal lock cores with the keys so that you could secure this roof rack onto your roof and just really do a good job of not letting anybody take it from you. So these plastic cores that it comes with, again, you can replace 'em all. And the cool thing about the SKS system is that you can get those lock cores keyed alike to other Yakima accessories you already have or you could just get four of 'em for each of your towers. Get those keyed alike and any Yakima accessories you pick up down the line, you can request lock cores for those that'll be keyed alike to your roof rack. But once everything's there and locked into place, we can replace our tower cover. All we're gonna do with that is these tabs here are gonna go into these slots and it's essentially just gonna push straight onto the tower and click in place. And with that, that's really just gonna complete our installation. So not too terribly difficult. The toughest part sometimes is figuring out those M measurements that they've got. If you forget what each measurement means, you can go to Yakima's website and they'll tell you exactly what those measurements mean in case you need it for a reference. But if after watching this video you've still got some questions about this roof rack, go ahead and leave those in the comments below. We would love to share those with other neighbors just like you so they can make the best decision for themselves. Once again, this is Curt with etrailer. Thanks for stopping by.


Do you have a question about this Roof Rack?
Info for this part was:
At etrailer we provide the best information available about the products we sell. We take the quality of our information seriously so that you can get the right part the first time. Let us know if anything is missing or if you have any questions.


Thank you! Your comment has been submitted successfully. You should be able to view your question/comment here within a few days.
Error submitting comment. Please try again momentarily.