
To see if this custom-fit item will work for you please tell us what vehicle you'll use it with.


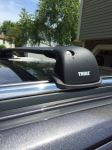
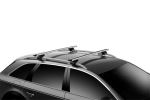
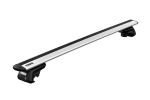
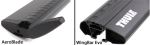
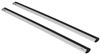
This Thule roof rack lets you carry cargo and gear on your vehicle. Aerodynamic crossbars with split rubber strips in top channels work with channel-mount and clamp-on accessories. Installs on your vehicle's naked roof.
Features:
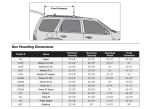
Specs:
 Alternate Instructions
California residents: click here
Videos are provided as a guide only. Refer to manufacturer installation instructions and specs for complete information.
How's it going, neighbors This is Ed here with etrailer.com. And today, we're gonna take a look at the Thule WingBar Roof Rack for your 2023 Nissan Rogue. So when you add a rooftop to your Rogue, this is gonna help solve the issue as a Rogue owner I'm sure you're aware of, having limited cargo area. If you load it down with passengers, it's gonna limit how many things you can bring along with your adventure. And when you add a roof rack to the top of your vehicle, this is gonna allow you to take advantage of this negative space. So let's take a closer look at our roof rack and see what it does for us.
The WingBar is shaped just like a airplane's wing. And it's designed to reduce the amount of drag, which in turn is gonna help reduce wind noise. You have a T-track slot on the top, and that's gonna allow you to use any track-mounted items without having to trim up on your installation here to help minimize your wind noise. As far as the thickness, you're right at three inches wide. So that's gonna work with most rooftop accessories like rooftop baskets or rooftop cargo carriers, you know, anything that you would put on top of your vehicle.
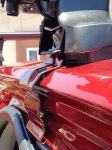
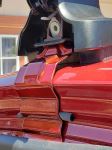
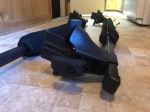
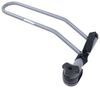
As far as our tower, it's constructed of weather-resistant, UV-resistant material. So that means that it's gonna work well in the hottest deserts and the coldest areas, pretty much anywhere. Our neighbors, they use these guys in all types of environments, and this is designed to go from super hot to super cold for many seasons to come. Now, as far as security, you're gonna have a plastic lock core that comes with it, but you can switch it out to the Thule system, and you'll have a single key for all your Thule accessories if you go with Thule hitch-mounted carriers or hitch-mounted anything that's lockable. When you pop to the inside in here, this is gonna allow you to see how this structure's working together.
You actually have this clamp that's gonna hook underneath your door and make a solid connection to the top of your door jamb. You can see on our fit kit, it fits and contours right to the side of the gutter here. So it's gonna protect your paint from the roof rack that you have on top of your vehicle. Now, as far as the rack itself, it's rated at 165 pounds. However, you definitely wanna make sure you follow your manufacturer's recommendation for your rooftop weight limits.
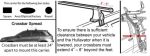
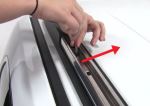
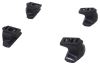
Thule products in general have a really easy set up, even though their instruction manual leaves a little bit to be desired. So I'm gonna show you how to get this installed. We're gonna put our strip in the top of our WingBar. It's gonna come as one piece. And you can separate that, it's already pre-cut where it just comes apart. Now, you wanna make sure that the part with the little triangles are pointing towards the curve, towards the front of your bar. And this is gonna drop right into the pre-cut channel. These are gonna be a lot longer than the bar that you have here for your Rogue. So you're just gonna use a pair of scissors to trim on the size. Using your thumb, you can just press it right in, and it goes in pretty straightforward. (machine buzzing) And the second part of your strip that does not have the the pyramids on them, the little triangles, we're just gonna press that in as well. And now, we're gonna cut off the excess. Right here, just using scissors or a knife or whatever. You wanna make sure it is clean, so your end cap can go on pretty easily. Let's see how to clean that up. Just to give you a quick rundown on your parts, 'cause they all look similar, but they are different. So as far as the fit kit pads, you're gonna have a individual one for your front driver, front passenger, 822 and 823. For the rear passenger and driver, it's 824 and 825. And as far as your hooks, the front are gonna use the shorter 590 hooks, you're gonna have two of those. And then for the rear, you're gonna have the longer 340 hooks. But the assembly is basically the same, just different parts, and you just wanna make sure you have those in the correct position for the roof. So now, we're gonna put our foot on the bottom of our rack here. And with this guy, you actually have kind of a hinge in here that allows you to raise and lower the track right here. And so, you're gonna press down on here and making sure the outside is pointing away. Just slide it along our track. And here, we're gonna use our foot for our 822 side. We're just gonna put it on down here, and just allow it to wrap around the edges. So I'm gonna do the same thing on the other side, and then we're gonna get our measurement together. And make sure I have the measurement that I got from my rooftop. On the front, it was actually right at 44 inches, and that's gonna work out pretty handy. One of the cool things about this system is the fact that they give you a torque wrench, so you can lock it down to your rooftop really securely, and it clicks to let you know when it's in place. So now, we're gonna take this up to the roof and get the next part of our install going. Crossbar down on our rooftop. And you wanna make sure that on the side along the seam is sitting along the gutter. That's gonna give you a nice solid connection on the roof and also help minimize wind noise. So now, we're gonna put on our hooks for our front. Now, these clamps are gonna hook on the inside of our clamp here. It's hard to see. Actually, the only way you can see it is like inside of it. But it's a pretty straightforward thing, you're gonna push up and then hook down. So I'm gonna slide this guy in here, and we're gonna get a grip of it. You hear it click, and now we're in position. So from here, we're gonna grab our our torque wrench. And we're gonna start fastening down. Now, rule of thumb that I usually do with this is, every time you fasten down one side, it's gonna pull the other. So you wanna go from side to side, tightening it as you go before you get down to the torque requirement. And that just keeps it nice and even pressure on it to allow you to get that best application for your crossbars. All right, and now that we got that click, we know we're locked down onto the roof. So from here, we're gonna put on our door and our end cap. So now, we're gonna put on our door and our end cap. And as you can see, nice and secure on the roof. Thule is one of the brands I like a lot when it comes to being easy to set up and more premium as far as the materials. Alternatively, if you were looking for something that was gonna give you similar features, but was gonna be a little bit more cost effective, you can look towards some products from Inno and products from Yakima. But, in the end, Thule is gonna give you something that works well for your Rogue and last for a pretty good time for you when you're out and about. So again, this is Ed with etrailer.com, taking a look at the Thule WingBar Roof Rack on our 2023 Nissan Rogue. Have a great day.
Ratings & Reviews


Do you have a question about this Roof Rack?
Info for this part was:
At etrailer we provide the best information available about the products we sell. We take the quality of our information seriously so that you can get the right part the first time. Let us know if anything is missing or if you have any questions.


Thank you! Your comment has been submitted successfully. You should be able to view your question/comment here within a few days.
Error submitting comment. Please try again momentarily.