To see if this custom-fit item will work for you please tell us what vehicle you'll use it with.
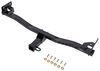
This custom-fit trailer hitch with a hidden cross tube installs behind your vehicle's rear bumper, leaving only the receiver visible beneath it. Aluminum and steel alloy construction is durable and eco-friendly. Powder coat finish resists rust.
Features:
Specs:
The EcoHitch Hidden trailer hitch is designed to be as inconspicuous as possible. The hitch's cross tube bolts onto your vehicle's frame, behind your rear bumper. No drilling or welding is required. Once the hitch is installed, only the receiver will be visible beneath your bumper. This means that your vehicle can maintain its stylish, from-the-factory look, and you won't have to do any major modifications to its body or frame.
With a combination of aerospace-grade aluminum, steel, and stainless steel, each EcoHitch is made of a strong metal alloy that will withstand the test of time. The lightweight alloy is composed of recycled materials. Traditional steel hitch manufacturing can use coal or oil, which can contribute to harmful gas emissions. The EcoHitch's recycled materials limit the carbon footprint during manufacturing, so you get a sturdy trailer hitch while also helping the environment.
This EcoHitch trailer hitch is tested for durability and sturdiness. Using Finite Elemental Analysis (FEA), individual points of stress on the hitch can be detected and remedied. Designers can accurately test the hitch to ensure that it will meet or exceed SAE J684 standards. The EcoHitch Hidden trailer hitch is carefully researched and strength tested for a durable, high-quality hitch that can resist damage while on the road.
At etrailer.com we're committed to the products we sell, and to our customers. Our experienced and knowledgeable staff are available via both phone and email to address your questions and concerns for the lifetime of your hitch. The technicians at etrailer perform hitch installations on a daily basis, making them a valuable resource for do-it-yourselfers. The one-on-one, personal service you'll receive comes straight from an expert in the towing and automotive field. We've installed it, we've wired it and we've towed with it, so whatever your question, we can answer it.
Tech Tip
Product fits Hybrid models. No drilling through vehicle frame required for installation , Requires temporary removal of bumper/fascia during installation , Installation requires permanent removal of the impact structure; hitch replaces the impact structure for support and safety , Exhaust must be temporarily lowered for installation
California residents: click here
Videos are provided as a guide only. Refer to manufacturer installation instructions and specs for complete information.
Hello, neighbors, it's Brad here at etrailer. And today we're taking a look at installing the EcoHitch trailer hitch receiver on a 2025 Kia Carnival Hybrid. Adding a trailer hitch receiver to your Kia Carnival is a great option to really open up the real estate available on your vehicle. So whether you're pulling a trailer for work or for fun, or just adding a bike rack or cargo carrier, a trailer hitch receiver is a great way to do it. And originally this had a factory hitch installed, and it was quite unsightly. It was a completely exposed cross tube.
It hung down quite a bit. And so our neighbor opted for the EcoHitch, which is gonna bolt up to your bumper beam and give you a much cleaner look. So when it's installed, you'll see that there is no crossbar that's visible, just the receiver, and that's gonna give you a nice, clean OEM look, but all the usability of your hitch. Looking a little bit closer, this is a two inch by two inch receiver tube opening, which is gonna be great. It's the standard size for a lot of different accessories.
So if you are choosing a ball mount, bike rack, or cargo carrier, you're gonna have tons of options when it comes to choosing those. And all of your accessories are gonna stay in place with a 5/8 pin and clip. Now keep in mind this does not come with the hitch. A lot of times when you pick up accessories, they'll have them included. If you plan on leaving your accessories on the back of your Carnival, you might wanna take a look at a locking pin and clip.
It becomes a good deterrent for anyone just walking by. They won't be able to just take out your pin and clip and walk away with your accessories. Plate style safety chain loops are nice oblong shape, makes it nice and easy. It's also a clean look, but our standard S-hook goes on there with no problem. Even a larger clevis style is gonna work well.
And speaking of pulling trailers, you're gonna wanna adhere to the weight capacities of your hitch as well, as the vehicle's weight capacity. So check the vehicle's owner's manual, see what it's capable of towing, and then compare it with the numbers on the hitch as well as the accessories you'll be using to hook up to your trailer. Our Torklift EcoHitch comes in pretty solid. This is a heavy-duty hitch, and you get a gross trailer weight rating of 4,500 pounds. That's gonna be the weight of the trailer plus the accessories loaded onto it. So pretty heavy duty, but again, check the vehicle's owner's manual and make sure it's okay with the vehicle. As far as your tongue weight rating, that's gonna be the downward pressure on the inside of the receiver tube opening, and that really accounts for a lot of your suspended accessories. So cargo carriers and bike racks, this one's gonna be rated at 450 pounds, and that's pretty heavy duty. So a four-bike bike rack loaded up or a cargo carrier on vacation shouldn't be an issue for your Carnival. A few quick measurements. From the center of our hitch pin hole to the furthest point of our fascia, it's about 2 1/2 inches, and that's gonna be important when choosing folding accessories, cargo carriers, and bike racks, and sometimes be stored in a vertical position. I don't worry that you're gonna have any issues with those making contact with a vehicle. So you definitely can store those in a vertical. Just keep in mind, you're probably gonna have to fold those down to open up your rear hatch. Now if you're planning on pulling a trailer, you wanna make sure that your trailer's gonna be level going down the road. So to determine a rise or drop necessary, from the top of the receiver tube opening to the ground, we're coming in at 14 inches. So if you have your trailer available, you can get that nice and level. Measure from the ground to the top of the coupler and then compare that with our measurement and determine the riser drop necessary to get everything level. Now this is a great option. If you're looking at it, I think it's the cleanest look as far as hitches for Carnivals. It sits up a little bit higher than some of the other ones out there, so definitely a great option. But the drawback is gonna be the fact that the fascia's gonna be coming off, and the installation is just not as simple as some of the others, which are raise up, put bolts in, tighten, and torque. This one is gonna be a little bit more difficult. It's got a few different brackets that get a little bit unique, and it's got some new body mounts that we put in place, which is something I've never done, but overall, none of it's terribly hard to do. So if you're a DIYer, follow along, I'll give you some tips and tricks to make sure you get your hitch installed. But if you watch the video and decide that maybe it's not for you, you don't have the time, place, tools, want, any of it to, you know, get the hitch installed yourself, you can reach out to our dealers that are close to you by using our dealer locator. That way you can still get the hitch installed and not have to worry about the install. I think it's totally worth it because having that hitch is really just gonna make your Carnival that much more usable. And if you do the install yourself or have it installed, either way, once you have that finished product installed, show us how you're using it on your Carnival. We'd love to see how neighbors are using our products out in the wild. It'll give other neighbors like you a chance to see what they can do with their Carnival. Speaking of the installation, let's take a look at that now. Now we'll begin our installation underneath, and we're gonna be removing some panels, and that way we have access to get our fascia off and eventually our hitch in place. Now, ours originally had a factory hitch on it, and it hung down quite a bit. It was pretty unsightly. So some of the steps in the beginning as far as removing panels may be different. Ours might have been trimmed for that hitch. So just take that into account when doing this. But the rest of it should be pretty much the same. So the first thing we'll do with a trim panel tool or a flathead screwdriver is gonna be removing the plastic clips along the bottom side as well as the panel that we have here. And as I mentioned, we might have had one on this side, but I don't see it. Regardless, we have plastic push pins on this end too. So we have a total of three on this side, we have four along the bottom. And then our plastic panel here, we have 1, 2, 3, 4, there's also one that's tucked back there. So we'll go through and get those all popped out. And to get these off, pretty simple. There's gonna be slots on four sides of these. So with a trim panel tool or a flathead, just pop that center, and you should be able to remove these. I recommend having a nice, organized spot to keep all of your hardware. It'll make reinstallation a lot easier. So again, ours is trimmed. You may have one that's located here, but we have one that's here. (push pin fastener popping) (push pin fastener popping) And then on the, as this curves up up on the frame rail, we'll have one up here as well. (push pin fastener popping) And with those removed, we can take our panel and set it aside. Now you're gonna head to the wheel wells, and there's gonna be four Phillips head screws along the wheel weld trim and this wheel well liner that we're gonna be removing. And it's pretty tight here against the tire, so you could probably get away with the stubby Phillips. I have a 1/4 inch ratchet with just a Phillips head bit in here, and that's gonna make it a little bit easier to get in here, but we'll get all four of 'em removed. And then we'll just repeat on the other side. (ratchet cranking) And the fascia has attachment points that are underneath the taillight, so we are gonna need to remove those, and they're fairly easy to do. On this cap, you'll see that there's two caps with a little indent, so we'll just pry this open. And that's gonna give us access to a 10 millimeter bolt on both of these. So we'll get that loosened up and removed. (drill whirring) And then the taillight has alignment pins and it can get a little bit tricky to pop these out because they've probably never been removed. So they're in place pretty good. So what I recommend doing is just kind of grab hold and pull it back with you, and just kind of wiggle it back and forth. And if it gets really tight, what you can do is with the plastic trim tool, you know, something that's not gonna scratch or paint, you can use this as a wedge, and that's gonna kind of keep that pressure. And as we wiggle it back and forth, we should be able to get those to pop out. But just make sure you're going straight back. (taillight clacking) And be careful not to put too much pressure on the edge of your taillight. You can crack them, you know, in the process here. So just take your time here. (taillight clacking) (taillight popping) There we go. So those alignment pins, you'll find that we have one here and then there's one up top here as well. So if you need to pry, you can kind of look and see where those are, but you'll just have to wiggle it back and forth a little bit until you get that to pop out. And then we will separate our taillight. There's just gonna be a tab on our connector, push that in, and then we can set our taillight aside. Now we can repeat on the other side. With the taillight out, we're gonna be attacking the two 10 millimeter bolts that we have here, as well as the plastic push pin here on the bottom. (drill whirring) (drill whirring) At this point, we can begin to remove our fascia. And you might notice the painter's tape. I put this along the edge of the rear fascia and the rear quarter panel. And that way, you know , as it's rubbing against each other as you're fighting it on and off, this will help protect scratches or chips from occurring. Now to get the fascia off, you're just gonna pull back where that wheel well liner and we remove those screws. You can get your hand behind here, and there's just gonna be a series of clips. And you're just gonna kind of work your way down, keeping pressure just at the small gap. And these clips can get a little bit tricky and tight. So just take your time here. (fascia popping) And we're gonna work all the way up. (fascia popping) And then this plastic portion's kind of interesting. It's got clips up top, so we're gonna just try to peel this back a little bit here. Kinda work here as well, kind of moving it back and forth. And the plastic's rather brittle on this piece here. So just kind of take your time. There's clips back here, so I'm gonna just kind of work this out. And the trick is to, as you're working on one side, have someone else be working on the other side, get to the point where you can start removing it at the middle. And having that extra person's really gonna make a big difference because there may be electrical connections and it's nice to have someone be able to hold the fascia as you separate those. And it's really cumbersome too as you're removing it. So we'll make it a little bit safer, not damaging your fascia in the process. (fascia popping) There we go. And once I was able to pop that off, we can start to pull this back and see if we have electrical connections. And as we head over to the driver's side, we're gonna find that we do have one that's located, it's gonna go right here, but this whole thing kind of connects to the bumper. So we're gonna go to this main harness and get this separated. Now it's a little bit tight here, but we should be able to pull this gray plastic clip. Once we have this off, I'll show you. But once you get that popped, you should be able to pull this back, and that'll push the clip out. And there's also one that's located a little bit further back, so again, you can see why it's important to have that extra person holding the fascia up. And this one, you just push on that top. And then from here, we can set our fascia aside. We're gonna remove our rear bumper beam, or cross member as they call it. There's just gonna be two bolts that we're gonna tackle on each side and they're gonna be a 14 millimeter socket to get this accomplished. (drill whirring) Once you have that hardware removed, we can pull this out. There is an alignment pin that just kind of keeps that in place, and we're gonna set this aside. It's not gonna be reinstalled, so you can hold onto it if you'd like. Now on the side, on our passenger's side by the exhaust, we're gonna have this plate, and it's gonna be two 10 millimeter bolts. So we'll get this taken down. (drill whirring) (drill whirring) And then from here, you'll have easy access to the exhaust hanger isolator. Now mine's already off because I had to take the factory hitch off, which was located here, but you're gonna just pry on this. You can use a little bit of silicone or soapy water to get this to pop off. You can pry off bottom or top. But the top one's gonna be a little bit easier. So just use the pry bar or a long flathead to just kind of wedge that and get this to pop off. Now we're getting ready to get our hitch kind of at least raised in place. And we're gonna put two bolts. So we have our zinc-coated bolts with a split washer and a flat washer. I have one on each side. And we're gonna be attaching it to this hole. So I'm gonna get one side started here. (metal clacking) It's a pretty heavy-duty hitch, so just get a few threads on each, and that'll support it, making it easier to get the other side up. (metal clacking) Now this hitch is gonna have a secondary bracket that goes on the backside and bolts up to the frame. And this is gonna, you know, give us a nice solid mount on our hitch, but there's also a spacer that goes in between our bracket and the metal on the body before getting bolted down to the frame. So your spacer's gonna look like this. And you'll see this square portion. That's gonna go where we're eventually gonna have threads passed through. And this hole should pretty well align with the hole that's in the vehicle. Now, the issue is on this back end, you can see the caulking from the factory. That sealant is gonna cause a little bit of issues to where this isn't gonna sit as flush as we'd like. So you can use a putty knife or a utility knife. I'm just gonna trim some of this back and make sure that we have clearance for this to sit nice and proper. (metal clacking) Now, you're not gonna get a perfect fit on this. It is gonna sit at a slight, just kind of angle here just because we want that hole to align. That's gonna be the most important. And there is a metal lip here. So it may end up kind of sitting like this, but either way it's gonna be flush once we tighten it. So what we'll do is get our side=specific bracket. These holes on the long edge, they're gonna go into the frame and the closest threaded holes, and then this should line up. So just make sure you have that hole lined up here. And as far as the bolts that go up into the frame rail, we'll be using these ones. We have a split washer and a flat washer. And we're just gonna get these hand-tightened in place. (metal clacking) And these are slotted, so they're gonna give you that adjustability to be able to get that bracket, the spacer in place. So I'm just hand-tighten this down to get it snug-ish, but still make it to where it's movable. (metal clacking) And then I can slide this back. And you'll see this little cornered edge here should align fairly decent. Again, it's not gonna be perfect here. (metal clacking) And then we can move that bracket forward and then snug these down a little bit more. And that weld nut on the backside should keep this all in place. We'll go ahead and repeat on the other side as well. Now we're gonna grab our more fine-threaded bolts, little smaller diameter. They're gonna be the same ones that we threaded into that top hole, and we're gonna put those into the bottom here. So we'll get these just hand-tightened in place for now as well. Now we've threaded in this bolt. And eventually, we're gonna put a rated flange nut on the backside to just sandwich it all together, but we don't have enough threads to do that quite yet. So what we're gonna do is get our large shoulder bolt in. And then once we tighten that, it'll draw it in, and that's gonna allow us to get that serrated flange nut in place. So the holes may not be perfectly aligned, and that's okay, we can just use a screwdriver to kind of, you know, get this all aligned as much as we can. And then with our long shoulder bolt, split washer, flat washer combo, we'll pass this in, and you may be able to thread this in, but you'll be able to get this to pass all the way through. That's why we also leave the hitch loose so we can push up on this if we need to. So it might take a little finagling here, but I should be able to get this to pass in. And if it's fighting you on the threads, don't mangle up the threads. What you can do is put a floor jack or something underneath the hitch and just raise this up enough to get those clearance for all of it to pass through. I was able to get it to thread through, and then I finished it up with a flat washer, split washer nut. Now, don't be surprised if it's not completely perfectly aligned. Neither of the sides were. So the main thing is you get it passed through your spacer as well as our bracket that we have on each side of the frame. Now with all of our hardware in place, we can start to snug things down. We're gonna come back later with a torque wrench so you really don't need to crank 'em down. We just want everything snug and kind of in place. It's also gonna give us a chance to snug down this bolt and get that serrated flange out on the back end. Now when it comes to tightening and torquing, I do recommend going on the vertical ones that go into the frame first, and then we'll work with our larger bolt and then finally back to our threaded ones. So I'll just go through and get these all snugged down. The bolts on the frame are gonna be a 3/4 inch socket to accomplish that. (ratchet cranking) Now once you have the hardware all tightened down, we're gonna go back with that torque wrench and follow the instruction manual. It'll have the torque setting laid out for each of the different types of hardware. So make sure you're adjusting your torque wrench according. And if you don't have a torque wrench, we have 'em here available at etrailer. You can generally go to an auto parts store and rent one for free. But this is gonna be an important step because it's gonna make sure that long term, you can safely tow down the road and it's not gonna be loose. But also when it comes to weld nuts, you can overtighten and damage. So this is gonna make sure that we get it properly torqued exactly where we want it to go. So following that same procedure that we did before, we'll get it torqued down. And remember too, once we get this inside bolt that's threaded, you can go ahead and take that serrated flange nut, and we will put that on the back end and snug that down too. (torque wrench beeping) So again, make sure that you get that serrated flange nut on the back of this bolt. And at this point, we can get our exhaust isolator put back in place. And we're gonna be doing a little bit of trimming on our fascia to clear the bumper. So let's get that with some painters tape and we'll get that trimmed out. And to trim this out, I use painters tape just to gimme a nice guide. It keeps it, you know, to where you're gonna get a straight line. And to find the center point, you can use the holes where the plastic push pins we inchesre originally, find that center point. And the measurements in the instructions are gonna get you pretty close. So I'm gonna be using an oscillating tool. This works really well to get a nice clean line. Whatever you have available to cut, go ahead, get this trimmed out. We can always cut off more if we need to. But take your time and we'll come back with a file, get some of those burrs knocked out. (oscillating tool whirring) (oscillating tool whirring) So I trimmed out our fascia. And before we get it mounted up, we need to get our body mounts in place, and these are gonna become the new mounting points for our lower fascia with those plastic push pins or new hardware as it goes through. And what we're gonna do is put our carriage bolt through each of these slots, and then we have a longer bracket and a shorter bracket. The longer bracket is going to go on the outside, so you can feed that on. And then we have a nylon lock nut, we're just gonna thread that on for now. And then our shorter one, we'll go on the inside. And then we'll do the same thing on the other side. Now with our hardware loosely in place, we do wanna have it, at least a little snugged up so that way it's gonna hold in place, but we may need to adjust side to side for it to bolt up to our lower fascia. So I am gonna snug these down, but just make it to the point, again, where it's gonna hold in place, but you can still slide this side to side. (drill whirring) (drill whirring) We're gonna get our exhaust shield that we removed previous back in place before we hold our fascia up and get that mounted. So just make sure you get this all tightened down. And as you put your fascia in place, you're also gonna wanna make sure that those harnesses that we unplugged, that we're putting those back in. And from there, really everything's just gonna be the reverse order so you can get your taillights in place and everything else, just follow those steps. And then when we get that all put together, we'll come back and I'll show you how to mount these up on the bottom of the fascia. Now at this point with our fascia, all pretty well put back together. This lower bracket should be pretty close to lining up the holes. Again, that's why we leave it loose so you can kind of adjust that. And you can still gain a little bit of access to those nuts through the gap. So we can tighten those down a little bit later. But we're gonna attach using our button head screws, a split washer and a flat washer. And when we pass this through our bracket, we're gonna finish it up with a flat washer, a split washer, and a nut. So we're gonna do that for all four of 'em. So we'll go through and get these in place. And that was a look at installation of the EcoHitch trailer hitch receiver on a 2025 Kia Carnival Hybrid.
This hitch looks great on our new Kia Carnival. So much nicer than the factory install version!
Do you have a question about this Trailer Hitch?
Info for this part was:
At etrailer we provide the best information available about the products we sell. We take the quality of our information seriously so that you can get the right part the first time. Let us know if anything is missing or if you have any questions.


Thank you! Your comment has been submitted successfully. You should be able to view your question/comment here within a few days.
Error submitting comment. Please try again momentarily.