
Curt Trailer Hitch Receiver - Custom Fit - Class III - 2"


To see if this custom-fit item will work for you please tell us what vehicle you'll use it with.


Thank you! Your comment has been submitted successfully. You should be able to view your question/comment here within a few days.
Error submitting comment. Please try again momentarily.

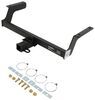
This Curt hitch gives you real utility with a 2" x 2" receiver opening that’s ready for towing, cargo carriers, or bike racks. Rated for 4,000 lbs gross trailer weight and 600 lbs tongue weight, it’s built for light to moderate towing and hauling without breaking a sweat. Whether you’re pulling a small trailer, adding a storage platform, or mounting a Kuat Sherpa 2.0 bike rack, the Class III design gives you the strength and compatibility you need.
The square-tube construction and precision, robotic welding give this hitch solid strength and a dependable fit. The gloss black powder coat finish is layered over a protective base coat for superior rust resistance, so it stands up to weather, road grime, and years of use. The open-back receiver also makes it easy to keep clean after a muddy ride or salty winter drive.
You don’t have to trade function for appearance. The concealed main body keeps the hitch tucked up under the bumper for an OE-style look that doesn’t distract from your vehicle’s lines. You get the utility of a full Class III receiver without the bulky profile of a traditional hitch.
This hitch is engineered as a custom fit with bolt-on installation right to the frame — no drilling or welding needed. It comes with all the mounting hardware and detailed instructions, so you can handle the install in your own driveway with basic tools. Once it’s on, it’s ready to work with your favorite towing accessories or cargo gear.

Videos are provided as a guide only. Refer to manufacturer installation instructions and specs for complete information.
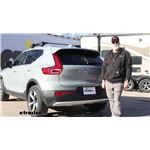
Hi everyone, Bruce here at Etrailer. Today we're gonna take a look at and install the Curt Trailer Hitch Receiver on our 2024 Volvo XC40. Now if you've already got a hitch on your XC40, on your Volvo, let us know how you're using it. Comment below or if you're getting ready to get a hitch, let us know how you're gonna use it. Now you may be wanting to get a hitch on your Volvo because you may be wanting to haul bicycles, a cargo carrier, or you could even haul a small utility trailer. Now this trailer hitch receiver does have a 4,000 pound gross trailer weight rating with a 600 pound tongue weight rating.
Now that the 600 pound tongue weight rating is just the downforce of anything you put on here, it's just the downforce going towards the ground. Taking a closer look at the hitch, we do have a 2" by 2" receiver tube opening, which will accommodate any of your standard ball mounts or your bike racks and cargo carriers. Now looking at our safety loop chains here, that's where our safety chains go. It's got a nice welded loop and I kind of like those. They're not big and square, it's the round ones and it lets them chains really hang on there and spin around without binding up.
Now as far as our loops go, it will accept your standard S hook and the bigger style clevis hooks. Now you are going to need to pick up a pin and clip and this is a 5/8" pin and clip. Most of your accessories do not come with these, so just keep that in mind and you just put that in and put the clip on and you're ready to go. Now what I wanna do is go ahead and give you a few measurements. The first measurement I'm gonna take is from the center of our pinhole here to the outside of the bumper and we're looking at roughly 4" to the edge of the bumper.
And the reason I'm giving you that measurement is if you've got a bike rack that folds up or anything, you're gonna need to know how long that shank needs to be. So when you do fold that up, it doesn't hit the back of your vehicle. The next measurement I am gonna take is from the bottom of our receiver tube to the ground. And the reason I'm giving you this measurement is if you're going over any steep inclines or you got a big hump going into your driveway, it's you're just gonna know how much clearance you actually have. Now looking at this one, it does almost, almost 12 inches, about 11-3/4", what I'm gonna call it, also, that'll tell you if you need a a dropped ball mount or anything like that.
But the main concern is you've got enough clearance here. You're not gonna be hitting anything on steep inclines or anything like that. If you're looking to get a hitch for your Volvo, I really think the Curt is a good choice. It is a hidden cross tube so you don't see the cross tube going across. All you really see is the receiver tube. Now as far as the installation goes, it's not too bad but you do have to completely remove this whole fascia piece here. So if you don't want to try that or you don't have the time to do it or the tools, check out our dealer locator on etrailer.com. But if you do want to give it a try, stick around. I'll show you how. To begin our installation, we do need to remove five Torx screws here. It's gonna be a T20. They're running right up along this fender liner here. The reason we do need to remove those is we are removing this whole rear fascia here. So let's go ahead and take our T20 and get those removed. Now you're gonna do the same thing on the other side. (tool buzzing) Now we do need to go ahead and remove some bolts from underneath the fascia here. The instructions say there are four eight millimeter bolts. Don't remove the Torx bolts. But looking at this, we've only got two Torx bolts here. So this black one and this black one, this one will stay. We're gonna take these out on both sides. There's two on the other side as well. So we're gonna go ahead and take a T25 and take those out and set them aside. (tool buzzing) Now we do need to remove this fascia here. We did use some painter's tape just to go ahead and protect the paint. The first one I'm gonna pull off is this one. I'm just gonna pull it back one and then you'll see a clip in here that we've gotta get loose. So basically we're just gonna take this piece here and pop it out. And if you notice this little clip right here, we're just gonna go ahead and get that guy started and you're just gonna pry on it like so. Now you may want to go ahead and grab an extra set of hands to go ahead and remove the fascia. There is some wiring we do need to unplug, but we'll show you that, I got my buddy Tom here to help me. And we're just gonna remove the fascia just by pulling on it like we did earlier. There it goes. Now we do have a plug here that we do need to unplug. That's your sensors. So we're gonna go ahead and unplug that. And there is one on the other side as well. Now during our installation, we did find that it's gonna be much easier to go ahead and unplug all your sensors before you actually take, remove the fascia. Let me just show you how that plug actually works. So there's a little tab right here that you're gonna push down and it's gonna release the tab on the inside and you just pull that apart. Now this one here is a little different. It's got a little different style plug on it and basically all you're gonna do is pull that direction on that tab and it will release and you can go ahead and pull it apart. Now that we do have this off, I do wanna show you exactly where all these plugs are. We've got a sensor here, you got a light, another sensor, another sensor, and then you're gonna have a wire loom connected right here that you just need to pull off. And you got another sensor, another light sensor, and a sensor. And there will be one plugged in right here in the center as well that you do need to unplug. Now we need to go ahead and remove the bumper beam and there's gonna be three bolts per side. So there's three bolts on this side, three bolts on this side and they are 15 millimeters. So let's go ahead and get those removed. (tool buzzing) Now you wanna save these nuts 'cause we are gonna reuse these. (tool buzzing) Now we've got all the nuts off, we can go ahead and remove our bumper beam and we're just gonna go ahead and set it aside. Now grabbing our hitch, we're just gonna go right where we took that bumper beam off like so. And then we'll go ahead and grab our bumper beam and throw that on too. Now we can put our bumper beam over the top of our hitch. Careful of any wires, you don't want to pinch anything. So now I'm just gonna take one nut and I'm gonna put it on the top side here, just loose so I can go to the other side and secure the bumper so it's just not falling off. Now taking our other nuts, so we're just gonna go ahead and loosely put 'em on and we'll come back and torque everything down to the manufacturer specifications. Taking our torque wrench, we are gonna torque these down to the manufacturer specifications. If you don't have a torque wrench, we do carry them here at etrailer or you can rent one from your local auto parts store. So now we do to do a little bit of trimming on our fascia here. So where I marked it is basically right along this cutout here. I'm just gonna follow that down. And I measured from here to here is 3-1/2". So if you just measure, your starting point right here and measure over 3-1/2". We do have to cut that piece out. Now we've got all the nuts off, we can go ahead and remove our bumper beam and we're just gonna go ahead and set it aside. Now grabbing our hitch, we're just gonna go right where we took that bumper beam off like so. And then we'll go ahead and grab our bumper beam and throw that on too. Now we can put our bumper beam over the top of our hitch, careful of any wires. You don't want to pinch anything. So now I'm just gonna take one nut and I'm gonna put it on the top side here, this loose so I can go to the other side and secure the bumper so it's just not falling off. Now taking our other nuts, so we're just gonna go ahead and loosely put 'em on, taking our torque wrench, we are gonna torque these down to the manufacturer specifications. If you don't have a torque wrench, we do carry them here at etrailer or you can rent one from your local auto parts store. So now we do have to do a little bit of trimming on our fascia here. So where I marked it is basically right along this cutout here. I'm just gonna follow that down. And I measured from here to here is 3-1/2". So if you just measure, your starting point right here and measure over 3-1/2". We do have to cut that piece out. Now you can use a utility knife or a pair of tin snips. (tool buzzing) I am using a multi-tool today and I'm just gonna follow my tape lines. (tool buzzing) Now I am gonna clean this up a little bit with a utility knife. Now we did just kind of place our fascia where it needs to be. We didn't clip anything in yet. I'm gonna actually try and reach up in there and see if we can get those connections made without sitting there trying to hold it with the very short wire. So let's go ahead and see how that's gonna work out. Now it does make it easier to go ahead and reach up in here and make all your connections back to the sensors. The hardest one to get to is this one way back here. You really gotta reach in for it, but it is doable and I think it's gonna be a lot easier to do it that way than try and get the fascia halfway off and unplug them. Once you do have the fascia put back on and just make sure you make all your connections with all your sensors and your lights that you did unplug. This completes our installation of the Curt Trailer Hitch Receiver on our 2024 Volvo XC40. I'm Bruce, thanks for watching.
Customer Satisfaction Score:
97% were satisfied with this product
3% of customers were not satisfied
Ratings & Reviews

nice hitches
Excellent item
Provided good instructions for installa tion.
Arrived quickly, fit perfectly
Fits my 2025 Volvo XC40 perfectly!
the installation vid is so helpful.. this 10/10 was a daunting challenge, but we got it installed with relative ease!
Hitch receiver fit perfectly, installation was very straight forward. Couldn't be happier!
My Curt hitch was well packaged and exactly what was represented. It arrived the next day after I ordered it (I expected 3-5 day shipping). Installation on my 2021 Volvo Xc40 Recharge was exactly as the install video and instruction showed. Was a lot easier than I expected actually. It's nice to see such great customer service!!
Great support! Installation videos were very helpful. My installation was a breeze. Solid, quality product. Very satisfied.
I have a 2022 Volvo XC40 recharge twin plus, this went pretty smoothly, I did buy the plastic trim removal set, which helped. I did not have to deal with the placement of the toe kick sensor, which was nice. I found that removing the wire harnesses for the light bulbs that are in the fascia seemed impossible, so I just twisted the whole bulb assembly out, which made it a lot easier. All in all, this was easier than I expected, a three-beer project.
Shipping was prompt and the hitch arrived on schedule. Fit and finish are perfect, and the YouTube instructions for installation aree very helpful.
I installed the Curt Receiver Hitch on a 2023 Volvo XC40 Recharge. A few observations that may be specific to this model:
Disconnecting the wiring from underneath is a non-starter. The Recharge has a large plastic panel covering the area between the rear axle and the fascia, making it next to impossible to reach the wiring with it in place. It wasn't that hard to disconnect and reconnect the wiring from above once the fascia was detached and I had someone available to hold it in place. It's a little tight but manageable.
There are are a couple of foam blocks partially surrounding the bumper bar supports. They're held in place by plastic barbed fasteners inserted through the top of the blocks and into the bumper bar end supports. The fasteners can be popped out with a flat-blade screwdriver. The blocks need to be removed to get at the nuts that hold the bumper bar on. Don't bother hanging on to them; they won't fit once the hitch is installed.
The bumper bar took a little effort to remove once the nuts were removed. Don't be afraid to use some force.
Finally, when you reinstall the fascia, make sure the connectors are very firmly seated. It took me 3 tries, resulting in two additional re-installations of the fascia. If you get a Backup Assistance error when you put the car in reverse, you screwed up.
Do you have a question about this Trailer Hitch?
Info for this part was:
At etrailer we provide the best information available about the products we sell. We take the quality of our information seriously so that you can get the right part the first time. Let us know if anything is missing or if you have any questions.

























Eric
8/11/2026
So far, no complaints. It handles a heavy electric bicycle rack very well.